Colorful Upcycled DIY Butterfly Votive Holders Gift

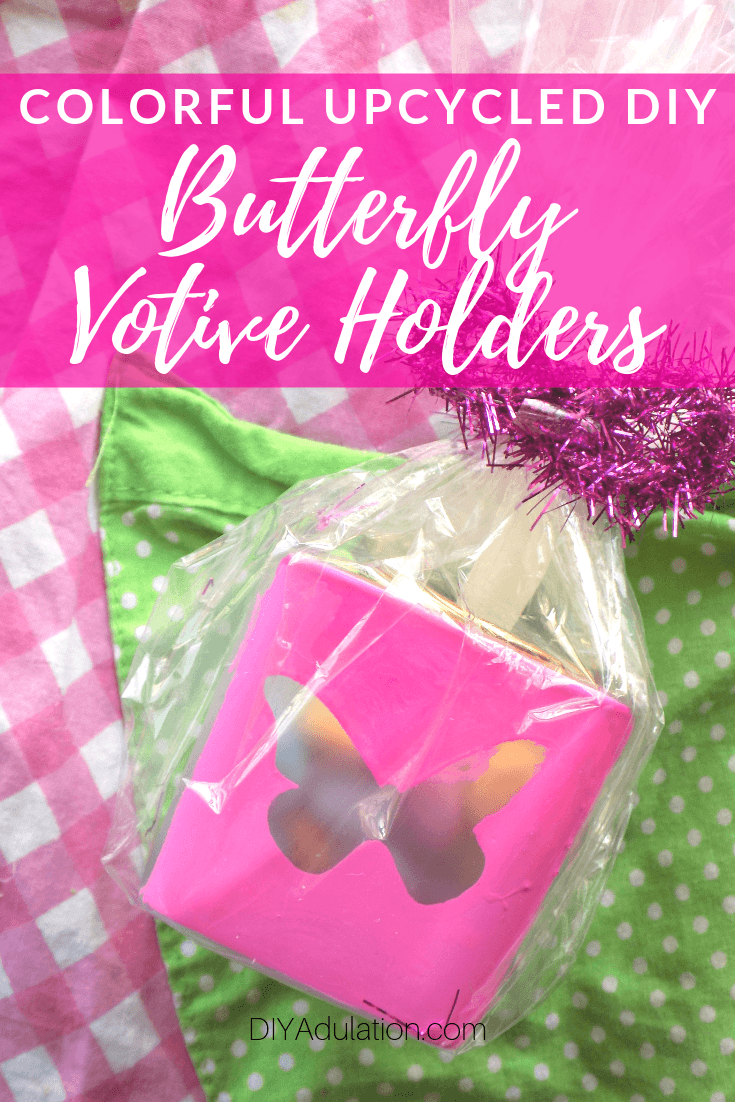
Are you utilizing your thrift store finds as awesomely as you could be? There are a ton of great furniture makeovers you can tackle and of course, they’re great places to find frames for a myriad of projects. Sometimes, though, it’s the little things you’re overlooking that can be crazy useful. These colorful upcycled DIY butterfly votive holders prove that.

Affiliate links may be used in this post. Ordering a product through these links may result in a commission. Read the full disclosure here.

Pink and Green Butterfly Votive Holder Gifts on Pink and Green Background with text overlay - Colorful Upcycled DIY Butterfly Votive Holders


The Rules:

Meet the Hosts

Angela | Simply Beautiful By Angela – Deborah | Salvage Sister & Mister Angie | Flippin Fanchers Denise | My Thrifty House
Jenny | Cookies Coffee and Crafts – Lynne | My Family Thyme
Meredith | Southbound Blog – Marie | The Inspiration Vault – Gail | Purple Hues and Me – Molly | Just a Little Creativity
Pili | My Sweet ThingsAmanda | Domestically Creative – Ali | Home Crafts By Ali – Carmen | Living Letter Home –
Emy | 
Semigloss Design – Jeanie | Create and Babble – Marie | DIY Adulation  – Heather | Glitter On A Dime

Make sure you follow our board on Pinterest for more upcycled decor inspiration!


Pink and Green Butterfly Votive Holder Gifts on Pink and Green Background

Glass votive holders at the thrift store are a dime a dozen… okay, maybe more like 25 cents each but still. You know what I mean. I can’t count the number of times I’ve strolled past them without a thought. This time I wanted to challenge myself to spend the smallest amount on my project so I grabbed 3 of these for only 75 cents.

I knew I wanted to do something spring-y but wasn’t quite sure what. Then I saw these butterfly stencil masks in my stash and thought they were perfect for spring. Boom! I was ready to start crafting.

It wasn’t until after they were made that I realized what a great gift they make and since we’re in the process of decluttering right now, why not make something beautiful to give away. Filled with candy and an electronic candle, these are the perfect easy gift for Mother’s Day, teacher appreciation gifts, and more!


[bctt tweet=”Filled with candy and an electric candle, these DIY butterfly votive holders are the perfect easy gift for Mother’s Day, teacher appreciation, and more!” username=”diyadulation”]


Votive Holders Next to Oil Based Sharpies

DIY Butterfly Votive Holders Materials

Step 1

First, clean your glass votive holders.


Votive Holder with Scalloped Circle Stencil Mask on It

Butterfly inside of Scalloped Circle Stencil Mask

Step 2

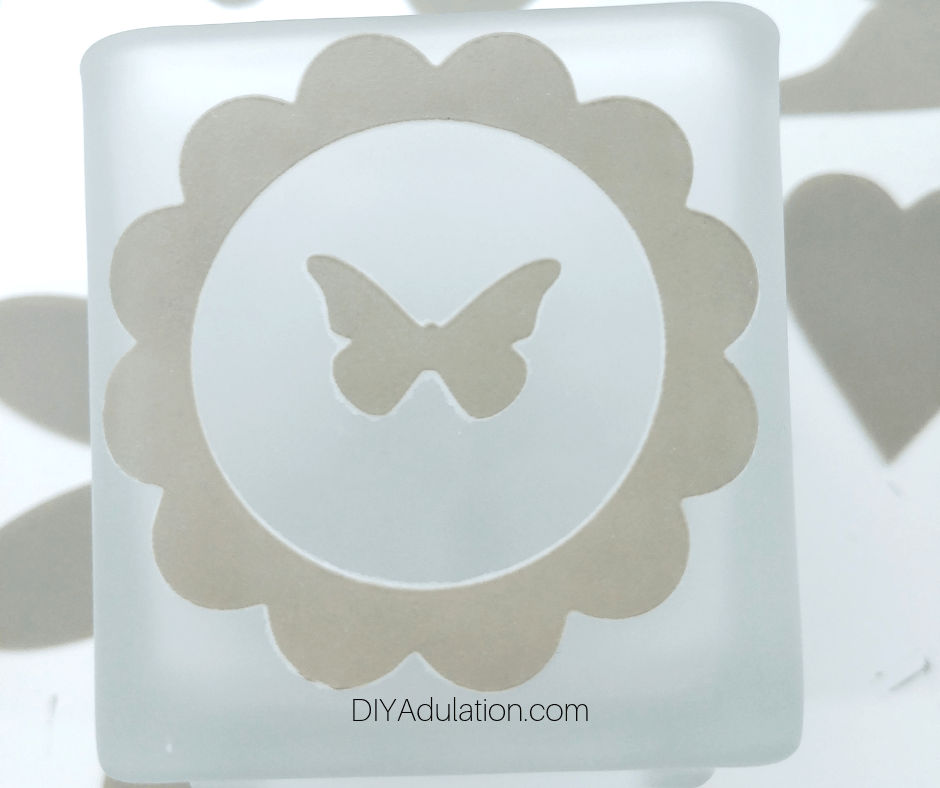
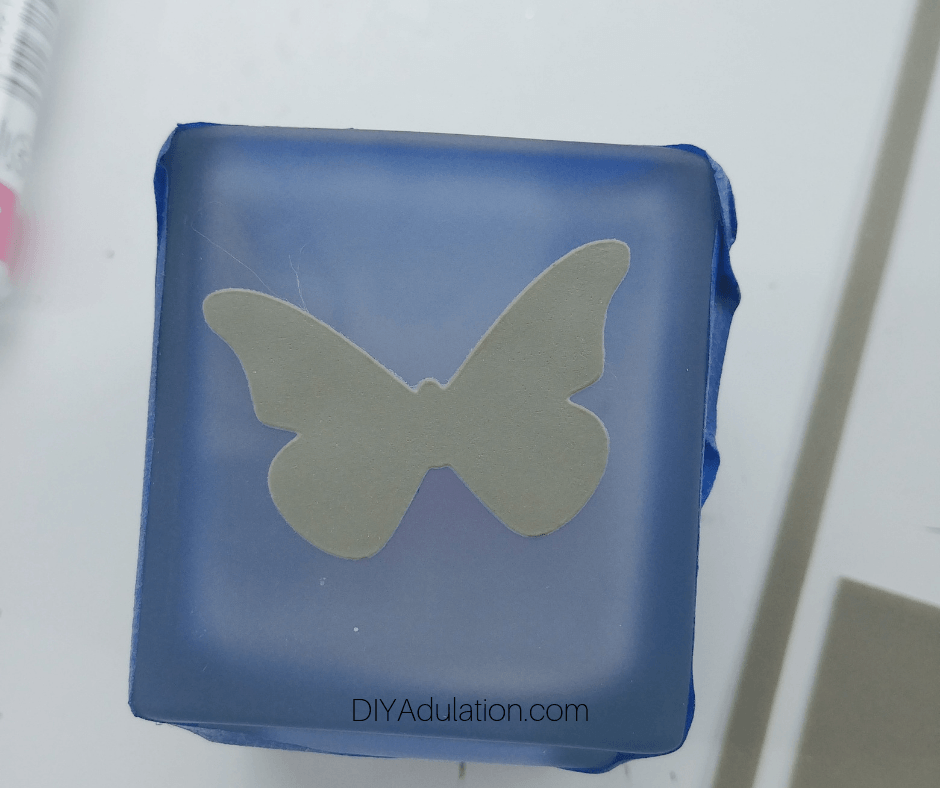
Next, place your stencils on a votive holder. I also recommend taping off the edges because it makes it easier to clean edges.


Green Paint on Masked Votive Holder

Close up of Green Paint on Masked Votive Holder

Step 3

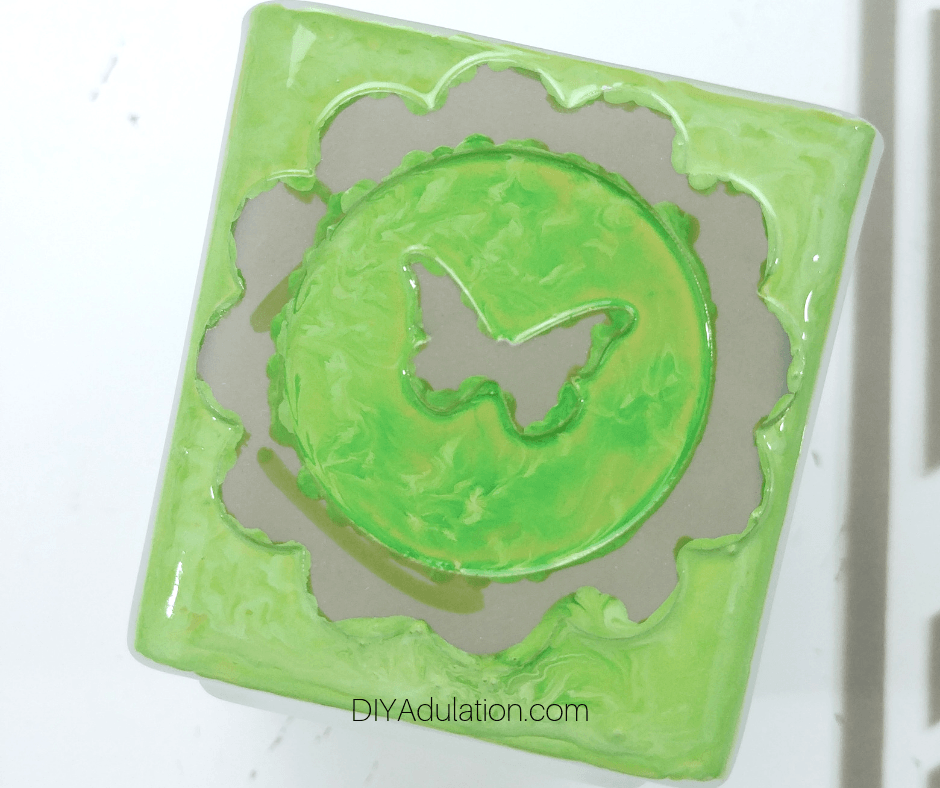
After your stencils and tape are in place, fill in the unmasked area with one paint color. Mine needed a couple of back-to-back coats to achieve the bright, vibrant color.

Step 4

Before the paint dries, carefully pull off your tape.


Green Stenciled Votive Holder

Step 5

Then carefully pull off your stencil masks. This is easier with a pair of slanted tweezers. If you use your fingers, the paint is more likely to smear.

Step 6

After the tape and stencil masks are removed, let the paint dry completely.


Butterfly Stencil Mask on Frosted Votive Holder

Tape Around Edges of Votive Holder with Butterfly Stencil Mask

Pink Painted Votive Holder with Butterfly Mask Removed

Pink Butterfly Outline Votive Holder

Step 7

Repeat steps 2 through 6 for each votive holder. You can use the same stencil masks and color or you can change it up like I did.


Pink and Green Painted Butterfly Votive Holders

Step 8

Once the paint is dry, place your votive holders on a sheet pan and place the pan in a cold oven.

Step 9

Set your oven to 325 degrees Fahrenheit and bake for 30 minutes to set the paint.

Step 10

After 30 minutes, turn the oven off but do not remove the votive holders. Allow them to cool down slowly in the oven.


Wrapped Butterfly Votive Holder Gifts on Pink and Green Background

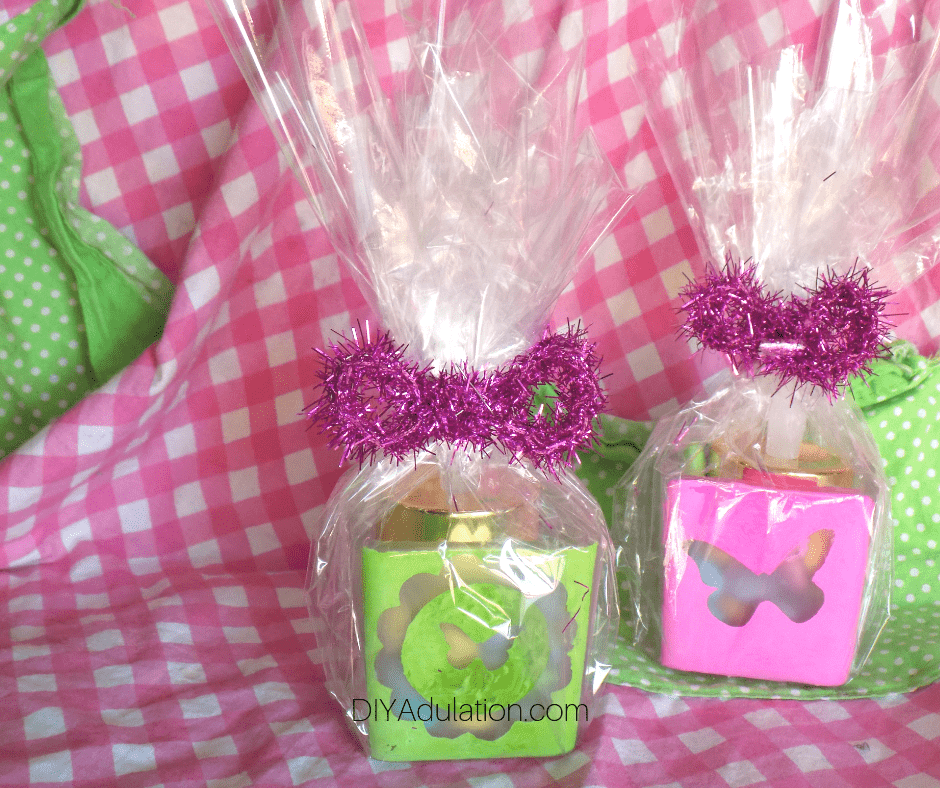
How to Make the DIY Butterfly Votive Holders Gift

Once your votive holders are made, you can totally keep them for yourself to use as decor. However, they also make a great gift (Mother’s Day is around the corner). Oh, and did I mention that they’re super easy to make?!


Close Up of Votive Holder with Candy

Step 1

Fill your butterfly votive holders with colorful candy.
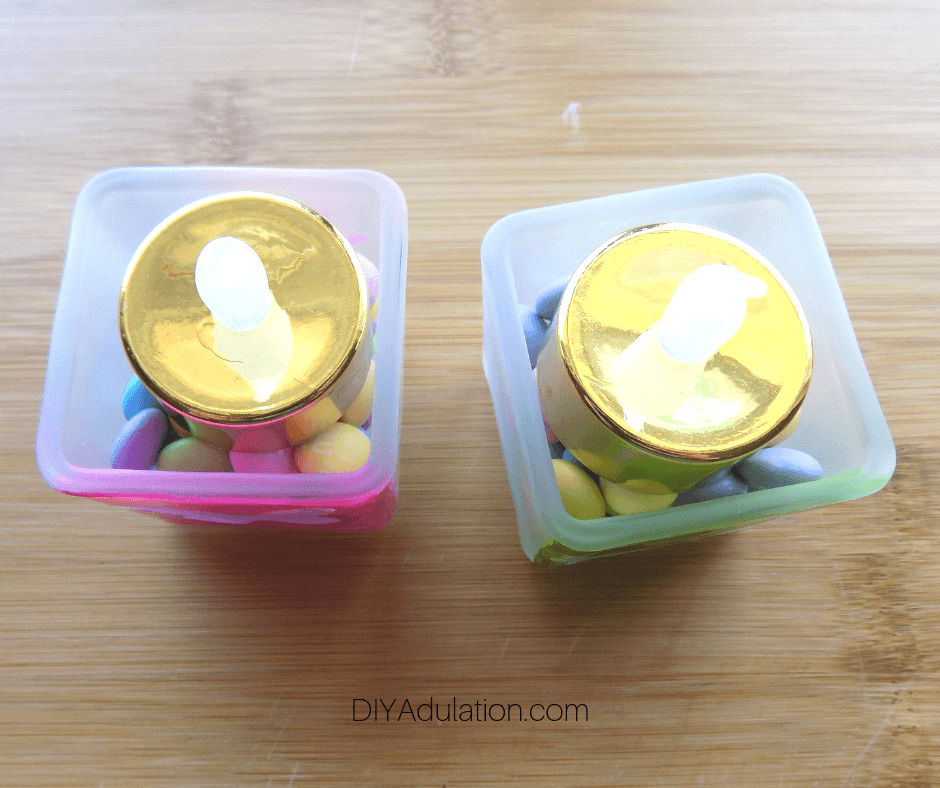
 

Electric Tealights on Candy in Votive Holders

Step 2

Set an electric tealight candle on top of the candy. You want it to stick up above the top edge of the votive holder.
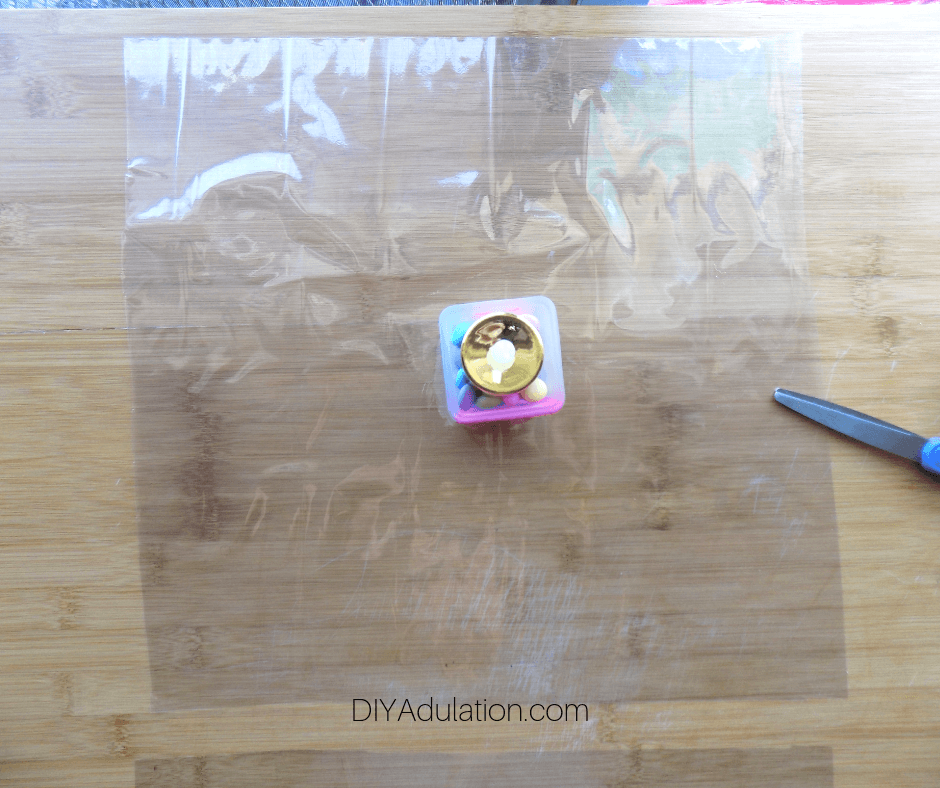
 

Filled Votive Holder in Center of Square of Cellophane

Wrapped Butterfly Votive Holder Gifts

Step 3

Next, wrap the entire thing with cellophane and secure with a pretty ribbon.


Pink and Green Butterfly Votive Holder Gifts on Pink and Green Background with text overlay - Colorful Upcycled DIY Butterfly Votive Holders

See? I told you it was easy. These colorful upcycled DIY butterfly votive holders are so pretty and easy to make. They’re totally budget-friendly too. You can find tons of glass votive holders at the thrift store for a quarter a piece. Done and done, if you ask me. Now it’s time to check out what my friends have made for this month’s Thrift Store Upcycle Challenge. Take a look and be inspired!

See where I’m linking up!

Don’t Forget to Pin It!

Pink and Green Butterfly Votive Holder Gifts on Pink and Green Background with text overlay - Colorful Upcycled DIY Butterfly Votive Holders


And now for more thrifty goodness!

Check out what my fellow upcyclers created below!

Adorable and Easy Pipe Cleaner Butterfly Craft

It’s officially Spring and that means bright and cheerful craftiness! Let’s start with something for kiddos like an adorable and easy pipe cleaner butterfly craft. This kids craft is super easy and only needs some of those pipe cleaners I know you have lying around and scissors.

Affiliate links may be used in this post. Ordering a product through these links may result in a commission. Read the full disclosure here.

Collage of Pipe Cleaner Butterflies with text overlay - Adorable and Easy Pipe Cleaner Butterfly


[bctt tweet=”Looking for a fun and easy spring craft to make with the kiddos? This adorable pipe cleaner butterfly craft is the perfect quick and easy creation!” username=”diyadulation”]

My tiny humans are always playing with pipe cleaners. Sometimes, I swear, I don’t even know where they came from (like didn’t we use all of those at Christmastime?). I think part of the draw is that you can turn them into anything. Your imagination is the limit.

They have made bracelets, glasses, animal tails, clothes for dolls, springs… the list goes on and on. While I love letting them create freely, sometimes it’s fun to pass on my own knowledge and watch their eyes light up. That’s exactly what happened with this pipe cleaner butterfly craft. It went from, “That’s so cool, how did you make it” to, “Mom look! That was so easy!”

Of course, the youngest played with his for about 5 minutes before pulling it apart and turning it into something else but that’s also part of the fun. Much like play dough you can create, destroy, and recreate again and again. So grab the pipe cleaners and gather the little ones around the table for some fun and colorful spring creating.


Pipe Cleaner Butterfly next to Flowers

Pipe Cleaner Butterfly Materials


2 Purple Pipe Cleaners with Ends twisted together

Step 1

First, grab 2 pipe cleaners of the same color and twist 1 set of ends together.


Close Up of Secured Ends of Purple Pipe Cleaners

Step 2

Next, straighten the 2 pipe cleaners into one line and flatten the twisted joint so that it is flush with the pipe cleaner line.


Twisted Loop in Purple Pipe Cleaner

Step 3

Then form a loop at one end of the joined pipe cleaners and twist once to secure.


2 Loops in Purple Pipe Cleaner

Step 4

Add a second loop next to the first loop and, again, twist it one to secure. This creates your first wing.


Purple Pipe Cleaner Butterfly Wings

Step 5

Repeat steps 3 and 4 with the rest of your joined pipe cleaners to create the second wing. Wrap any excess pipe cleaner ends around the center to secure in place.


Yellow Pipe Cleaner Wrapped Around Center of Purple Pipe Cleaner Butterfly Wings

Step 6

Next, grab one pipe cleaner in a different color and secure it to the middle of your butterfly wings by wrapping it 2-3 times around the center of them.


Yellow Pipe Cleaner with Small Loop on Top on Purple Pipe Cleaner Butterfly Wings

Step 7

Then fold your pipe cleaner in on itself to form the butterfly body and twist it together. Leave a small loop at the top as pictured.


Pipe Cleaner Butterfly next to Small Piece of Yellow Pipe Cleaner and Scissors

Step 8

Now cut a smaller piece of pipe cleaner in the same color as your butterfly body.

Mom Note:


Pipe Cleaner Butterfly with Antennae Attached

Step 9

Thread the small piece of pipe cleaner through the loop at the top of your butterfly body and twist the open loop you left in step 7 to secure it.


Pipe Cleaner Butterfly with Curled Antennae

Step 10

Lastly, curl the ends of the small piece of pipe cleaner to look like antennae for your butterfly.


Pipe Cleaner Butterfly next to Pipe Cleaner Flowers

Close up of Pipe Cleaner Butterfly with text overlay - Adorable and Easy Pipe Cleaner Butterfly

The great thing about this adorable and easy pipe cleaner butterfly craft is that once you can shape and bend the wings once it is made. Pull the wings slightly together to create a creature that looks as though it is ready to take flight. You can also make multiple pipe cleaner butterflies and thread them together to create a mobile. Or simply let the kiddos take flight on a playful adventure and run around the house with their creations. No matter what you choose, these adorable little critters are sure to be a fun craft to make with the kiddos.

See where I’m linking up!

Don’t Forget to Pin It!

Close up of Pipe Cleaner Butterfly with text overlay - Adorable and Easy Pipe Cleaner Butterfly


More Ideas You’ll Love:

Pompom Bunny Decor for Easter

When you’ve had enough of winter, the colors of Easter are a welcome bright spot in your home. Sometimes those colors aren’t enough and you want to amp up your colorful decor. This pompom bunny decor for Easter takes inspiration from the colorful eggs your kids love so much. Infuse that brightness and fun into your Easter decor with this easy tutorial!

Affiliate links may be used in this post. Ordering a product through these links may result in a commission. Read the full disclosure here.

Collage of Pompom Easter Bunny with text overlay - Colorful Pompom Bunny Decor


[bctt tweet=”Everything about this pompom bunny decor for Easter screams fun and cheerful which is just what you need after the dreariness of winter. Check out the tutorial and find out how to make your own now!” username=”diyadulation”]

Bright colors seriously light me up. If I had my way, my home would look akin to a brightly colored candy store. It’s not just the color but the feeling that it evokes. Bright colors create a cheerful and sunny environment that brightens up the space and your mood.

Fun and colorful items shouldn’t be limited to the kiddos. Turn the tables this year and add that brightness to your Easter decor too. When choosing the pompoms to add to your bunny, keep the colors of Peeps and plastic eggs in mind.

I didn’t use any of the red, brown, or black pompoms. It simply brings that brightness and vibrancy down. Instead, stick with pink, purple, blue, green, and orange. I also added some white pompoms to mine but that’s entirely optional. Do what speaks to you.


Pompom Bunny on Candy Background

Pompom Bunny Decor Materials


Empty Cardboard Box

Step 1

First, cut any tape on your box and dismantle it so that it is flat.


Cardboard Box Cut into 2 Pieces

Step 2

Next, cut apart your box so that the 2 main sections are separated.


Bunny Outline Drawn on Cardboard

Step 3

Pull one cardboard piece in front of you and draw your bunny. Start with a large circle on the bottom. Then draw an oval overlapping the top of the circle. Lastly, add your ears to the top.


Cut Out Cardboard Bunny next to Scissors

Step 4

After drawing the bunny, cut it out of the cardboard.


Cut Out Cardboard Bunny on top of Piece of Cardboard

Bunny Traced on Piece of Cardboard

Step 5

Then use your bunny cutout as a stencil to trace an identical bunny on the second piece of cardboard.


2 Bunnies Cut Out of Cardboard

Step 6

Again, cut your bunny out of the cardboard.


Cardboard Bunny with Glue on It Next to Plain Cardboard Bunny

Step 7

Cover one cardboard bunny in glue after both bunnies are cut out.


Hand Holding Ribbon with Cardboard Bunnies in Background

Close Up of Folded Ribbon Glued to Cardboard Bunny

Step 8

Next, cut a piece of ribbon and place it folded over in the glue at the top of the cardboard bunny between the ears.


Cardboard Bunny with Ribbon Hanger

Step 9

Then firmly place your remaining cardboard bunny on top of the one covered in glue.


Cardboard Bunny Clipped with Binder Clips

Step 10

Attach binder clips around the edges of the sandwiched cardboard bunny to hold them together while they dry.

Step 11

Allow your glue to dry at least an hour before moving on (24 hours for E6000).

Note:

Step 12

After the glue is dry, remove your binder clips.

Step 11

Open your pompoms and add a line of glue along the bottom edge of your bunny.

Tip:


Close Up of Glue and Pompoms

Step 12

Start adding pompoms in a random order to the line of glue. The only rule I followed was that 2 colors were not right next to each other (if possible).


Close Up of Bunny with Glue and Pompoms

Step 13

Continue adding lines of glue and pompoms to your cardboard bunny working from the outside to the inside.


Close Up of Top of Pompom Bunny

Pompom Covered Easter Bunny

Step 14

After your bunny is covered in pompoms, set a heavy book or similar on top and set aside to dry.

Tip:


Side of Pompom Bunny with Ribbon Glued to It

Step 15

Lastly, glue ribbon around the entire edge of your pompom bunny and allow it to dry completely before displaying.


Pompom Bunny on Pink Background

Pompom Bunny on Wood Background with Pompoms

Pompom Easter Bunny on Candy Background with text overlay - Colorful Pompom Bunny Decor

This pompom bunny decor for Easter looks like a holiday themed gum ball display and I love it! Everything about it screams fun and cheerful which is just what you need after the dreariness of winter. Brighten up your walls on a budget and get ready for Easter with this easy and inexpensive tutorial.

See where I’m linking up!

Don’t Forget to Pin It!

Pompom Easter Bunny on with Sequins with text overlay - Colorful Pompom Bunny Decor


More Ideas You’ll Love: