DIY Adulation

Fawning Over a Do-It-Yourself Life

  • Crafts
    • Papercrafts
    • Fabric Crafts
    • Paint Crafts
    • Recycled Crafts
    • DIY Crafts
  • Home
    • Home Decor
    • Organization
    • Recipes
    • Finances
    • Cleaning
  • Holidays
    • Spring Holidays
    • Summer Holidays
    • Autumn Holidays
    • Winter Holidays
  • Relationships
    • Self
    • Marriage
    • Parenting
    • Friends and Family
    • Kids
      • Kids Crafts
      • Kids Learning
      • Kids Activities
      • Back to School
      • Kids Parties
      • Kids Korner
  • Policies & Disclosures
  • Newsletter
  • About Me
  • VIP Resource Library

Easy DIY Game Night Medal

02.19.2020 by Marie // Leave a Comment

This easy DIY game night medal is the perfect upcycled craft to take your family game night to the next competitive level. With this simple tutorial, you be finished and ready to compete in no time!

Affiliate links may be used in this post. Ordering a product through these links may result in a commission at no extra cost to you. Read the full disclosure here.

Collage of Photos of Game Night Medals with text overlay - Easy DIY Game Night Medal - DIY Adulation

Competition is a healthy part of life. Celebrate it with this easy DIY game night medal! #diy #recycledcraft Click To Tweet

It’s no secret that family game night is big in our home.

We simply love laughing and competing over an awesome board game. We even own the Champion Monopoly. You know the one that comes with a trophy?

That got me thinking. What if we had some sort of trophy for the winner of our other games? The kids would love to have something to show off when they defeat the parents.

Thus, this easy DIY game night medal was born. It’s perfect because it is inexpensive to make and pretty!

Remember these DIY birch bark vases? This is a great DIY to use up the lids left over from that project!

 
Competition is a healthy part of life. Surprise your kiddos at the next family game night with this easy DIY game night medal and watch the fun unfold!

DIY Game Night Medal Materials

  • Baby Jar Lid or Other Small Metal Lid
  • Crop-a-dile
  • Gold Enamel Paint
  • Paint Brush
  • Gold Jump Ring
  • Black Sharpie
  • Ribbon


Competition is a healthy part of life. Surprise your kiddos at the next family game night with this easy DIY game night medal and watch the fun unfold!

Step 1

First, clean your baby food jar lid and then swab with rubbing alcohol. This will help ensure that the paint sticks.


Competition is a healthy part of life. Surprise your kiddos at the next family game night with this easy DIY game night medal and watch the fun unfold!

Competition is a healthy part of life. Surprise your kiddos at the next family game night with this easy DIY game night medal and watch the fun unfold!

Step 2

Next, paint the outside of your lid with gold paint. Allow it to dry before moving on.

Step 3

Then, flip your lid over and paint the inside gold too. Again, allow the paint to dry before moving on.


Competition is a healthy part of life. Surprise your kiddos at the next family game night with this easy DIY game night medal and watch the fun unfold!

Step 4 (Optional)

If needed, add a second coat of paint to the outside of your lid. Allow this coat to dry before moving on.

Tip:

  • The inside won’t likely need a second coat. The white rubber holds the paint well and is easily covered.


Competition is a healthy part of life. Surprise your kiddos at the next family game night with this easy DIY game night medal and watch the fun unfold!

Competition is a healthy part of life. Surprise your kiddos at the next family game night with this easy DIY game night medal and watch the fun unfold!

Step 5

Once your paint is dry, punch a hole in the side of the lid using your Crop-a-dile.

Tip:

  • This only works with the original one. I first tried with the Big Bite and it wouldn’t reach. 

Step 6

Next, attach your jump ring through the hole.


Competition is a healthy part of life. Surprise your kiddos at the next family game night with this easy DIY game night medal and watch the fun unfold!

Step 7

Then, cut a length of ribbon roughly 24 inches long. (Yes, those are kid’s scissors in the photo… they were the closest pair I grabbed.)


Competition is a healthy part of life. Surprise your kiddos at the next family game night with this easy DIY game night medal and watch the fun unfold!

Step 8

Next thread your ribbon through the jump ring.


Competition is a healthy part of life. Surprise your kiddos at the next family game night with this easy DIY game night medal and watch the fun unfold!

Step 9

Now tie the ends of your ribbon together with a regular knot.

Step 10

Trim any excess ribbon at the end of the knot.

Tip:

  • If you’re worried about your knot coming undone, singe the ends with a lighter.


Competition is a healthy part of life. Surprise your kiddos at the next family game night with this easy DIY game night medal and watch the fun unfold!

Competition is a healthy part of life. Surprise your kiddos at the next family game night with this easy DIY game night medal and watch the fun unfold!

Step 11

Lastly, draw “#1” in the center of your lid with a black Sharpie.

Tip:

  • You might need to go back over your “#1” to make it darker. For the best results, allow the marker to dry before going over it a second time.


Competition is a healthy part of life. Surprise your kiddos at the next family game night with this easy DIY game night medal and watch the fun unfold!

Competition is a healthy part of life. Surprise your kiddos at the next family game night with this easy DIY game night medal and watch the fun unfold!

How do you like my model? She definitely took creative license in the photos and these were the best shots that I got. We had fun with it, though. I think she likes the medal, what do you think?


Competition is a healthy part of life. Surprise your kiddos at the next family game night with this easy DIY game night medal and watch the fun unfold!

Close Up of Game Night Medal next to Cards and Die with text overlay - Easy DIY Game Night Medal - DIY Adulation

Can you believe how easy this is to make? Surprise your kiddos at the next family game night with this easy DIY game night medal and watch the fun unfold!

If you’re looking for even more family game night DIY’s then check out this Family Game Night Board. It keeps the board in place while allowing it to rotate so little hands can always reach their pieces!

Now if you’ll excuse me, I’m off to pick a board game out. Possibly one that gives me the edge so I get to rock this awesome medal first. Enjoy your next family game night!

See where I’m linking up!

Don’t Forget to Pin It!

Game Night Medal next to Cards and Die with text overlay - Easy DIY Game Night Medal - DIY Adulation


More Game Night Ideas for You:

  • 5 Games for a Fun and Frugal Game Night with Friends
  • DIY Colorful Family Game Night Turn Stick
  • Free Printable Summer Scattergories Game
  • DIY Game Night Trophy – All for the Boys

Categories // Activities, Crafts, Crafts, DIY, Kids, Paint Crafts, Recycled Crafts

DIY Moss Bunny Wall Art

02.18.2020 by Marie // Leave a Comment

This easy and beautiful DIY moss bunny wall art isn’t just for Easter! Make one to display on your wall all year long with this easy tutorial.

Affiliate links may be used in this post. Ordering a product through these links may result in a commission. Read the full disclosure here.

Collage of Photos of Moss Bunny on Gallery Wall with text overlay - DIY Moss Bunny Wall Art - DIY Adulation

Make this beautiful DIY moss bunny wall art for a fraction of what it would cost you in the store! It is the perfect addition to your Easter decor. #bunnycrafts #Eastercrafts #diyadulation Click To Tweet

Am I the only one who thinks that bunnies are super adorable? Around Easter cute little Peeps, fun window clings, and wall decorations all sport the springy little animals which seriously delights me.

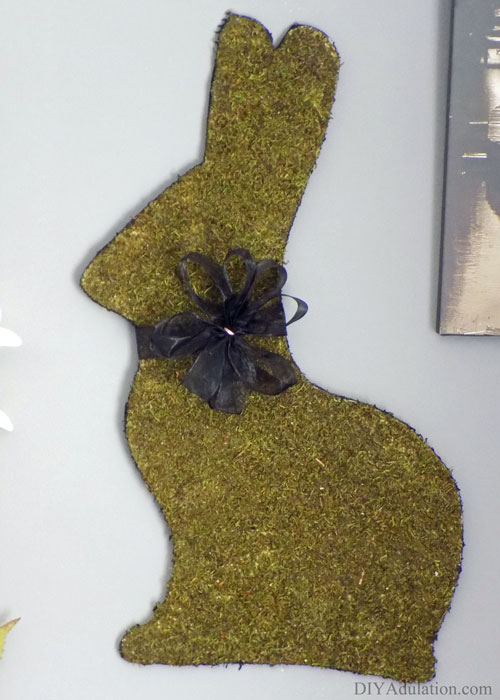
While shopping at Hobby Lobby (love that store) for supplies for this DIY spring wreath, I saw this gorgeous silhouetted moss bunny hanging. Like most craft-o-holics, I saw it and immediately thought, “I need one of these but I can totally make one like it at home.”

So that’s what I did and the end result is this easy and beautiful DIY moss bunny wall art! The best part is that you can make your own for a fraction of what it would cost you in the store.

 
Make this beautiful DIY moss bunny wall art for a fraction of what it would cost you in the store! It is the perfect addition to your Easter decor.

DIY Moss Bunny Wall Art Materials

  • Foam Board (Mine came from the dollar store)
  • Box Cutter
  • Fine Grit Sand Paper
  • Mod Podge
  • Loose Moss
  • Spray Sealant
  • Black Acrylic Paint
  • 7/8” Black Wired Ribbon
  • Picture Hook
  • Hot Glue Gun and Glue Sticks
This DIY moss bunny wall art is the perfect addition to your Easter decor! #Easter #diy Click To Tweet

Step 1

First, start by cutting your foam board in half, bisecting the longest edge. Don’t worry about making a perfectly even straight edge. Your bunny outline will be cut from it later.


Make this beautiful DIY moss bunny wall art for a fraction of what it would cost you in the store! It is the perfect addition to your Easter decor.

Step 2

Next, free-hand draw a silhouette of a bunny. You can use the photo above for reference if you need to.

Tip:

  • I chose to draw a side profile of a bunny but you can draw whatever is easiest for you. If you aren’t confident in your drawing skills, a quick Google search will give you an outline you can print and tape to your foam board. Simply cut out the outline of the taped image in step 3 just as you would the drawing.

Step 3

Then cut out your bunny along the outline you drew using a box cutter (or XActo knife).
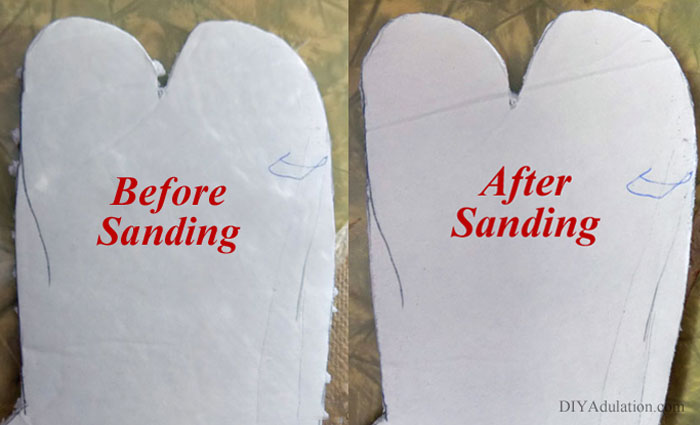
 

Make this beautiful DIY moss bunny wall art for a fraction of what it would cost you in the store! It is the perfect addition to your Easter decor.

Step 4

After you cut your bunny out, the edges are rough. Smooth them down by sanding the rough edges with your sand paper.


Make this beautiful DIY moss bunny wall art for a fraction of what it would cost you in the store! It is the perfect addition to your Easter decor.

Step 5

Once your edges are sanded, generously coat your bunny with Mod Podge.


Make this beautiful DIY moss bunny wall art for a fraction of what it would cost you in the store! It is the perfect addition to your Easter decor.

Step 6

Then place the entire bunny on a piece of newspaper or poster board and cover entire thing with moss.


Make this beautiful DIY moss bunny wall art for a fraction of what it would cost you in the store! It is the perfect addition to your Easter decor.

Step 7

Carefully shake off the excess moss and return it to the container. Allow it to dry completely before moving on.


Make this beautiful DIY moss bunny wall art for a fraction of what it would cost you in the store! It is the perfect addition to your Easter decor.

Make this beautiful DIY moss bunny wall art for a fraction of what it would cost you in the store! It is the perfect addition to your Easter decor.

Step 8

After the bunny has dried completely, add a second generous coat of Mod Podge. Make sure it gets into all of the nooks and crannies of the moss.


Step 9

Again, cover your bunny with moss and carefully shake off the excess. Return the excess moss to the container and allow to dry completely.

Tip:

  • Your bunny may require a third coat of Mod Podge and moss. This is completely up to your discretion. The bunny pictured only has 2 coats.

Step 10

After your bunny is dry, spray it with sealant in a well-ventilated space, and allow to dry.

Step 11

Paint the edges and back of your bunny with black acrylic paint. Allow the paint to dry completely.

Tip:

  • If you would like, you can add a second coat of paint. I chose to not to because the painted side will be against the wall.

Step 12

Next, create your bow while you wait for your paint to dry. To do this, cut 5 feet of ribbon from the spool.


Make this beautiful DIY moss bunny wall art for a fraction of what it would cost you in the store! It is the perfect addition to your Easter decor.

Step 13

Then fold your ribbon in on itself repeatedly as pictured so that the folded piece is about 5 inches long.


Make this beautiful DIY moss bunny wall art for a fraction of what it would cost you in the store! It is the perfect addition to your Easter decor.

Step 14

Next, tie a scrap of ribbon or a twist tie in the center of your folded piece of ribbon.
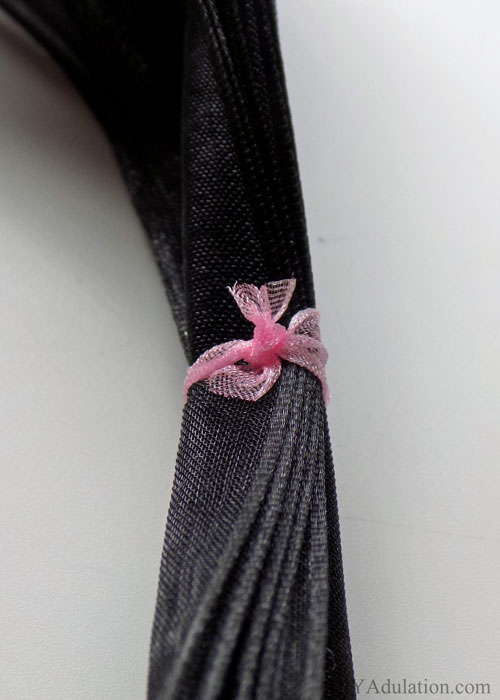
 

Make this beautiful DIY moss bunny wall art for a fraction of what it would cost you in the store! It is the perfect addition to your Easter decor.

Tip:

  • If you use a scrap of ribbon, be sure to cut the ends off.


Make this beautiful DIY moss bunny wall art for a fraction of what it would cost you in the store! It is the perfect addition to your Easter decor.

Step 15

To finish your bow, fluff your ribbon out to create a bow as pictured above.

Tip:

Do not cut the ends off of your ribbon on your bow.

Step 16

Once your paint is dry, attach your picture hook to the back of your bunny using hot glue.


Make this beautiful DIY moss bunny wall art for a fraction of what it would cost you in the store! It is the perfect addition to your Easter decor.

Step 17

Lastly, tie your ribbon around the neck of your bunny. Add a dab of hot glue on the back if necessary to secure it to your bunny.


Make this beautiful DIY moss bunny wall art for a fraction of what it would cost you in the store! It is the perfect addition to your Easter decor.

Make this beautiful DIY moss bunny wall art for a fraction of what it would cost you in the store! It is the perfect addition to your Easter decor.

Close Up of Moss Bunny on Gallery Wall with text overlay - DIY Moss Bunny Wall Art - DIY Adulation

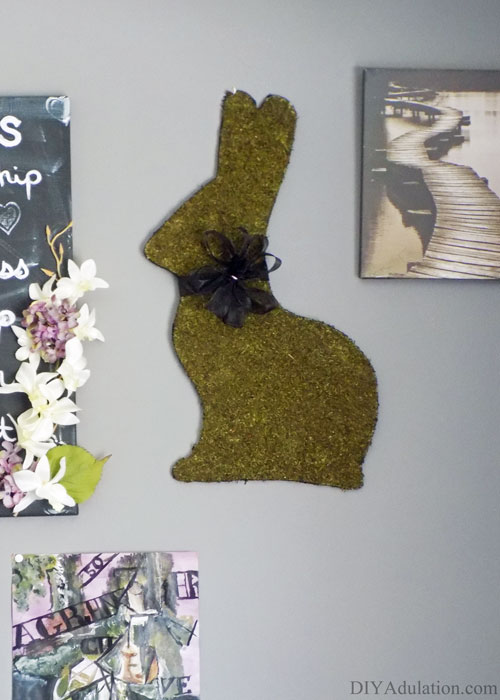
Once your DIY moss bunny wall art is dried, you can hang it up on your wall and enjoy. If you choose to hang it outdoors, I recommend spraying the entire bunny (front and back) with your sealant spray to help protect it from the elements.

I love ours so much that it found a place in our home with my Alice in Wonderland decor year round. It is beautiful Easter décor but can function as regular décor as well. Holiday décor is even better when it fits with your existing decorating scheme in my opinion!

See where I’m linking up!

Don’t Forget to Pin It!

Close Up of Moss Bunny on Gallery Wall with text overlay - DIY Moss Bunny Wall Art - DIY Adulation


More Easter Decor Ideas for Your Home:

  • Colorful Pompom Bunny Decor
  • Awesome Bunny Crafts for Spring and Easter
  • DIY Easter Bunny Egg Hunt Bags
  • Rustic DIY Bunny Sign with Cricut – Cookies, Coffee, and Crafts

Categories // Crafts, DIY, Easter, Holidays, Home, Home Decor, Spring Holidays

Fun and Colorful Girl’s Purse

02.17.2020 by Marie // Leave a Comment

Even beginning sewers can make this fun and colorful girl’s purse! It’s super easy to make and full of flowers and sweets for your adorable little miss.

Affiliate links may be used in this post. Ordering a product through these links may result in a commission. Read the full disclosure here.

Collage of Photos of Colorful Purse with text overlay - Fun and Colorful Girl's Purse


Make this fun and colorful girl's purse and watch her face light up! #sewing #diypurse Click To Tweet

Have you ever found a fabric that was so fun and bright that you just had to buy it? Instead of having a project that you purchase fabric for, you get the fabric and figure out the project later. If you’re anything like me, it probably happens more often than you care to admit.

That was exactly the case with this awesome fabric used to make this project. I have had the fabric for a couple of years now and just hadn’t found the right project for it.

Suddenly, when deciding what to make for the kids’ Easter baskets it hit me! My daughter loves purses so why not make her a fun and colorful girl’s purse for Easter?

Fun and Colorful Girl’s Purse Materials

  • Fabric of Your Choice (44” long by 15” wide) (Here is a similar fabric)
  • Length of Nylon Trim (32” long)
  • 3 Flowers from a Lei
  • 1 Brad
  • Liquid Stitch
  • Sewing Machine and Thread


Make this fun and colorful girl's purse for them to carry all of their important trinkets in and watch her face light up!

Step 1

If you haven’t already done so, cut out a piece of fabric that is 44” long by 15” wide.


Make this fun and colorful girl's purse for them to carry all of their important trinkets in and watch her face light up!

Step 2

Then fold your fabric in half, right sides together, so that the folded piece measures 22” long by 15” wide

Step 3

Next, pin the outside edges together (except for fold).


Make this fun and colorful girl's purse for them to carry all of their important trinkets in and watch her face light up!

Step 4

Sew the edges together leaving a gap in one corner that is 1.5” wide.


Make this fun and colorful girl's purse for them to carry all of their important trinkets in and watch her face light up!

Step 5

Turn fabric right side out by pulling it through the corner gap.


Make this fun and colorful girl's purse for them to carry all of their important trinkets in and watch her face light up!

Step 6

Once you’ve pulled your fabric out, fold the seam in (as pictured) and pin in place.

Step 7

Now, sew the folded seam closed.

Step 8

Fold fabric in half again so that it measured 11” long by 15” wide.


Make this fun and colorful girl's purse for them to carry all of their important trinkets in and watch her face light up!

Step 9

Next, pin the two 11” sides together.

Note:

  • Be sure to leave the 15” non-folded edge un-sewn.


Make this fun and colorful girl's purse for them to carry all of their important trinkets in and watch her face light up!

Make this fun and colorful girl's purse for them to carry all of their important trinkets in and watch her face light up!

Step 10

Now sew the 2 pinned sides on your fabric.


Make this fun and colorful girl's purse for them to carry all of their important trinkets in and watch her face light up!

Make this fun and colorful girl's purse for them to carry all of their important trinkets in and watch her face light up!

Make this fun and colorful girl's purse for them to carry all of their important trinkets in and watch her face light up!

Step 11

Using a lighter, burn the edges of your nylon strap by quickly passing the flame back and forth across them. This keeps the ends from fraying later.


Make this fun and colorful girl's purse for them to carry all of their important trinkets in and watch her face light up!

Step 12

Now, pin one edge of your strap to one side seam of your bag so that it measures 2” from the top of the bag.


Make this fun and colorful girl's purse for them to carry all of their important trinkets in and watch her face light up!

Step 13

Next, sew three rows of stitches on the end of the strap as pictured above to attach it to your purse.


Make this fun and colorful girl's purse for them to carry all of their important trinkets in and watch her face light up!


Step 14

Repeat steps 12 and 13 on the opposite pinned edge so that you strap is attached to both sides of the purse.


Make this fun and colorful girl's purse for them to carry all of their important trinkets in and watch her face light up!

Make this fun and colorful girl's purse for them to carry all of their important trinkets in and watch her face light up!

Step 15

Next, turn your purse right side out.


Make this fun and colorful girl's purse for them to carry all of their important trinkets in and watch her face light up!

Make this fun and colorful girl's purse for them to carry all of their important trinkets in and watch her face light up!

Step 16

Assemble your flower by pushing your brad through the center of your flowers from the lei.


Make this fun and colorful girl's purse for them to carry all of their important trinkets in and watch her face light up!

Step 17

Then fold down the prongs of the brad to hold petals together.


Make this fun and colorful girl's purse for them to carry all of their important trinkets in and watch her face light up!

Make this fun and colorful girl's purse for them to carry all of their important trinkets in and watch her face light up!

Make this fun and colorful girl's purse for them to carry all of their important trinkets in and watch her face light up!

Step 18

Lastly, adhere the flower to the front of your purse using Liquid Stitch.

Note:

  • I used a generous amount to secure it because this is for my daughter. I figured it could use all of the extra hold I can give it.


Make this fun and colorful girl's purse for them to carry all of their important trinkets in and watch her face light up!

Step 19

Finally, allow your Liquid Stitch to dry completely before using or gifting your new purse.


Close up of Flower on Brightly Printed Fabric with text overlay - Fun and Colorful Girl's PurseThis fun and colorful girl’s purse turned out beautifully. I cannot wait to see my daughter’s face light up when she sees this in her basket on Easter morning.

If you’re looking for an easy, non-candy gift for your daughter this year, this girl’s purse is perfect! If can be completely assembled in under an hour and once the glue dries you are ready to go. Your little girl will love carrying all of her trinkets around wherever she goes in her new bag!

See where I’m linking up!

Don’t Forget to Pin It!


More Awesome Easter Projects for You:

  • Easy DIY Easter Basket Stuffers
  • Colorful Pompom Bunny Decor
  • Easy Upcycled Easter Napkin Rings
  • Paper Plate Easter Wreath – Glitter on a Dime

Categories // Crafts, DIY, Easter, Fabric Crafts, Holidays, Spring Holidays

  • 1
  • 2
  • 3
  • …
  • 81
  • Next Page »

  • Facebook
  • Instagram
  • Pinterest
  • Twitter
  • YouTube
Shop The Best Machine Prices of the Year

Copyright © 2023 · Modern Studio Pro on Genesis Framework · WordPress · Log in