Easy Homemade Meatballs You Can Freeze for Later

Get ready to say good-bye to store bought meatballs forever. These easy homemade meatballs are crazy easy to make and are easily frozen for later meals. Simply make, freeze, and use them as needed for meals and parties.

Affiliate links may be used in this post. Ordering a product through these links may result in a commission. Read the full disclosure here.

Collage of Photos of Meatballs with text overlay - Easy Homemade Freezer Meatballs


[bctt tweet=”These easy homemade meatballs are super simple to make (only 3 ingredients!) and you can totally freeze them for up to 30 days! Perfect for weeknight meals.” username=”diyadulation”]

My kiddos are always asking for meatballs with spaghetti but I refuse to buy those pre-made ones at the store. When you’re working on a tight grocery budget, spending $7+ on 1 bag of frozen meatballs is insane. Instead, when there is a great deal on ground beef we buy it and make large batches of our own. Add them to this homemade spaghetti sauce for a frugal and delicious weeknight meal.

These babies are so super simple to make (only 3 ingredients!) and the kiddos absolutely love them. They are easy to turn into meatball subs, party appetizers, or any other delicious meal that calls for meatballs. You can totally freeze them for up to 30 days in a freezer bag too, so no worries about them going bad before you use them.


Side View Close up of Meatballs

Easy Homemade Meatballs Ingredients

Step 1

First, place your ground beef into a mixing bowl.

Step 2

Add in the entire box of instant stuffing and your egg.


Mixed Up Meatball Ingredients in Bowl

Step 3

Next, mix all of your ingredients until they are well combined.

Step 4

After your ingredients are mixed together, form it into 1 inch balls and place on a sheet pan lined with parchment paper.


Close up of Meatballs

Step 5

Once you have made all of your balls, place in the freezer for 1 hour.

Step 6

Next, pull your meatballs out of the freezer and place in a large gallon freezer bag.

Step 7

Label your bag with the date of freezing and place back in the freezer.


Plate of Meatballs

Pull out your meatballs and use just as you would the freezer kind at the store.

Cook Easy Homemade Meatballs on Stove Top

To prepare your meatballs on the stove top, add your desired amount of frozen meatballs to a sauce pan. Cook over medium heat for 20-25 minutes. Stir your meatballs occasionally during cooking to brown all of the sides.

Cook Easy Homemade Meatballs in the Oven

To prepare your meatballs in the over, preheat your oven to 350 degrees Fahrenheit. Place your desired amount of meatballs in a single layer on a baking sheet and bake at 350 degrees for 20 minutes.


Close up of Meatballs with text overlay - Easy Homemade Freezer Meatballs

We love to enjoy these easy homemade meatballs with spaghetti for easy weeknight dinners. They are also delicious cooked in barbecue sauce and served with mashed potatoes. The possibilities are pretty much endless. Add these to your family’s favorite meatball dishes any (or every) night of the week!

Homemade Meatballs You Can Freeze for Later

Homemade Meatballs You Can Freeze for Later
Prep Time 1 hour
Cook Time 20 minutes
Total Time 1 hour 20 minutes

Ingredients

  • 2 lbs. Ground Beef
  • 1 Box Instant Stuffing
  • 1 Egg

Instructions

  1. First, place your ground beef into a mixing bowl.
  2. Add in the entire box of instant stuffing and your egg.
  3. Next, mix all of your ingredients until they are well combined.
  4. After your ingredients are mixed together, form it into 1 inch balls and place on a sheet pan lined with parchment paper.
  5. Once you have made all of your balls, place in the freezer for 1 hour.
  6. Next, pull your meatballs out of the freezer and place in a large gallon freezer bag.
  7. Label your bag with the date of freezing and place back in the freezer.

Notes

Cook Easy Homemade Meatballs on Stove Top: To prepare your meatballs on the stove top, add your desired amount of frozen meatballs to a sauce pan. Cook over medium heat for 20-25 minutes. Stir your meatballs occasionally during cooking to brown all of the sides.

Cook Easy Homemade Meatballs in the Oven: To prepare your meatballs in the over, preheat your oven to 350 degrees Fahrenheit. Place your desired amount of meatballs in a single layer on a baking sheet and bake at 350 degrees for 20 minutes.

See where I’m linking up!

Don’t Forget to Pin It!

Plate of Meatballs with text overlay - Easy Homemade Freezer Meatballs


More Ideas You’ll Love:

Easy Valentine Scrapbook | Perfect for Gifting

Do you struggle to find time to scrapbook like you used to? This easy Valentine scrapbook is the perfect project for busy moms because you can work as you have time and pack it all away when you don’t. Even better, you’ll never lose your creative place because it comes with step-by-step instructions to make it easy.

This is a sponsored post written by me on behalf of Close to My Heart. I’ve used their products for years and am so excited to share them with you! All ideas and opinions are my own, as always.

Collage of Scrapbook Pages with text overlay - Easy Valentine Scrapbook


[bctt tweet=”This easy Valentine scrapbook is the perfect way for busy moms to enjoy making beautiful pages in the time they have. It totally makes a great gift too! #ad” username=”diyadulation”]

I first came across Close to My Heart products at a crop I attended years ago. It was seriously love at first site. They are beautiful designs and versatile products that get better and better every year.

I own tons of their stamps and their Cricut cartridges but I had never tried one of their scrapbook kits until now. Oh my gosh! They are awesome and so easy to use. They even give you the page sleeves!

These are the perfect kits for busy moms who can only squeeze in scrapbooking here and there. (Although you should totally ready How to Get Your Free Time Back as a SAHM.) Because you are following step-by-step instructions, you can easily come back to the project later and not forget what you were designing.


Close to My Heart Scrapbook Pages

Before we get to the tutorial, I want you to know that this one is a little different than normal. Your kit actually comes with step-by-step instructions. Instead of writing out all of these steps, I’m going to give you an abridged version with my tips and tricks to make it easier.

Some of the instructions are a little unclear and some I felt were in the wrong order. The instructions will absolutely work to get your beautiful scrapbook made. That’s totally one of the perks of Close to My Heart products. They have so many products that make your life easier and these kits are no exception.

Valentine Scrapbook Materials


Close to My Heart Open Scrapbook Kit Box

Step 1

The very first step is to open your kit and get everything organized.


Cut Out Scrapbook Elements

Step 2

Then you want to get all of your elements cut out.

Notes:


Cut Out Paper Elements for Pages

Step 3

Once you have all of your elements ready, you also want to cut out the papers as instructed. You can also label these for easier reference later.


Love Design Scrapbook Page

Step 4

Next, make your first page of your Valentine scrapbook. Again, because the kit comes with instructions, I’m not including the step-by-step for each page. However, you can see a photo of each step of page creation above the steps for every page except the first.


Photo collection of scrapbook page creation for easy Valentine Scrapbook

Step 5

Then make your second page.


Photo collection of scrapbook page creation for easy Valentine Scrapbook

Step 6

Continue and make the third page.


Photo collection of scrapbook page creation for easy Valentine Scrapbook

Step 7

Next make the fourth page of your Valentine scrapbook.


Photo collection of scrapbook page creation for easy Valentine Scrapbook

Photo collection of scrapbook page creation for easy Valentine Scrapbook

Step 8

Lastly, make the 5th and 6th pages of your Valentine scrapbook.


Love 2 Page Scrapbook Layout

2 Page Beautiful Title Scrapbook Layout

2 Page You Are So Loved Scrapbook Layout

Step 9

Once all of your pages are complete, slip them into an album or the page inserts that come with your kit.

Note:

Tips and Tricks

The instructions tell you to put on Shimmer Trim after adding embellishments… while you can do this, if you’re trying to make it look like the pictures, put it on a step or 2 earlier.

One really cool element that I LOVE is that the sequins come with adhesive on them! This is so convenient.

As I said above, one downfall is that is a lot of cutting upfront. Don’t skip this step, though. It makes the entire assembly so much easier when each element is ready to go before starting.


After you’ve finished your easy Valentine scrapbook, there are still plenty of materials leftover to make some gorgeous cards. This is perfect if you’re plan to give the scrapbook as a gift.


Collage of Scrapbook Pages with text overlay - Easy Valentine Scrapbook

This easy Valentine scrapbook is the perfect way for busy moms to enjoy making beautiful pages and they make a great gift too! Be sure to visit my friend Heather’s Close to My Heart website to order your kit today! Be sure to check out all of the other awesome kits while you’re there too. They’re all totally beautiful and easy to make.

See where I’m linking up!

Don’t Forget to Pin It!

Collage of Scrapbook Pages with text overlay - Easy Valentine Scrapbook


More Ideas You’ll Love:

How to Declutter Books the KonMari Way

All the book nerds in the world cringe at the advice that you should keep no more than 30 books when tidying up with the KonMari method. The fact is, books spark an immense amount of joy. They aren’t just stories. Books contain some of our best friends, amazing adventures, and worlds of exploration. Find out how to declutter books the KonMari way from a fellow bibliophile.

Affiliate links may be used in this post. Ordering a product through these links may result in a commission. Read the full disclosure here.

Collage of Stacks of books with text overlay - How to Declutter Books the KonMari Way when You Love Books


[bctt tweet=”Books contain our best friends, amazing adventures, and worlds of exploration. Find out how to declutter books the KonMari way from a fellow bibliophile.” username=”diyadulation”]

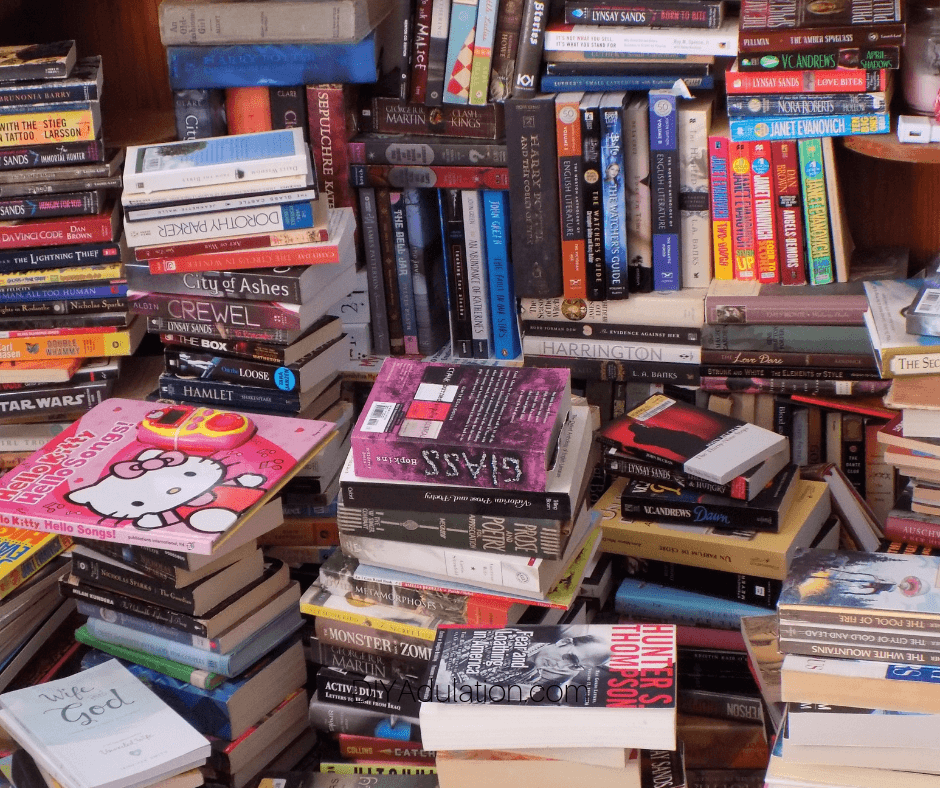
This is the part of the journey that I dreaded the most. I seriously love my books. None of them seemed dispensable. I’m committed to the process, however, so I gave it my level best.

As with all of the other areas of decluttering, The Life-Changing Magic of Tidying Up tells you to find all of your books and place them in a pile. That’s what I did and it took up half of my living room. The only exception to the piled up books were the kids books. Each child made their own piles of the books that belonged to them and we went through those individually.

Admittedly, I learned that even decluttering the kids books was difficult for me. It’s so hard to see them go. These are the stories that they begged for night after night. They illicit memories of snuggling in their beds and taking them on an adventure. We persevered and got through it.


Stacks of Books next to Fireplace

Disclaimer:

Decluttering Kids Books

I believe it’s important to include your kids in this process as much as possible. For that reason, I didn’t feel comfortable going through their books and deciding for them. Instead, each child went through the house and collected all of their books. Then we put them in separate piles. Here are my tips to make it easier:

  1. Mom or Dad should sit with them to help guide them as they declutter.
  2. As with the clothes, pull out a toy or other treasure that brings your child joy. When they are having trouble deciding, let them give it a squeeze and remember the feeling.
  3. Define an area beforehand that will store the books. Let your kiddos know that everything they keep has to fit in the pre-designated spot.


Stack of Cookbooks with Fruit on top

Decluttering Cookbooks

Decluttering cookbooks was super easy for me because I use so many online recipes now. When you pile them all up, it’s easy to see the cookbooks that I bought with high hopes of trying new recipes but never got around to it. Let’s be fair, it’s so much easier to pull out my phone and look up a recipe on Pinterest than to dig through cookbooks.

When you go through yours, think about how often you actually pull out the book instead of looking up the recipe on your phone or tablet.

Some cookbooks only get used seasonally and that’s totally okay. For example, I have a cookbook that I pull out during the holidays to make all of our Christmas treats. Although I don’t really use it the rest of the year, it gets more than enough use in the months of November and December. Keep those cookbooks guilt-free.

Decluttering Manuals and Textbooks

If your husband is in a field that requires continued education, you likely have more than one textbook laying around. We even had some of my old college textbooks from 10+ years ago… for courses I completed… and got a degree. Why hold onto those items? I held onto literature anthologies, formatting handbooks, and psych textbooks for reference.

Other than my MLA formatting handbooks (which are no doubt out-of-date at this point) I’ve never looked at these since class. The same goes for a lot of my husband’s medical textbooks. He has a medical textbook for ski patrol from 6 years ago. Even he did start volunteering again, he would have to get an updated textbook to learn the most up-to-date treatments and procedures.

If this sounds familiar, these tips will help:


Role Playing Game Core Rulebook

Decluttering Game Books

We are super nerds so we also have a collection of game books. These include video game guides, role-playing game (RPG) core rule books or additions, and even card game books.

When decluttering these, automatically get rid of any game guides for games you don’t play anymore. For example, I still had the entire set of Sims 3 game guides but I only play Sims 4 now. These were an automatic toss for me.

The same goes for RPG books of games we no longer play. Sometimes you get one to try out and it doesn’t fit your style or you simply lose interest. Whatever the case, get rid of these ones.


Stacks and Stacks of Books

Piles of Books next to DVDs

Decluttering Remaining Books

This was soooo hard for me. We put all of our books on the floor and I sat down next to them and started sorting. At the end of it, I was trapped between towers of books and was attacked by a stack once but I came out alive. Luckily, I have some tips to help out all of the book lovers like me.

  1. Don’t make a decision on series until you have them all together. This is especially important if you have similar books tastes to your husband. We had multiples of the Harry Potter series because both my husband and I collected them before getting married.
  2. As with your clothes, don’t feel bad about having a maybe pile. As you go through your books it gets easier so coming back to a maybe pile is actually helpful.
  3. Always remember to think about the local library. For example, I had collected a ton of Janet Evanovich books and have still only read 1 of them. Clearly, I’m not invested in the series and it is popular enough that I can always borrow them from the library when I want to read them.
  4. Limit books that you are keeping for emotional reasons. For example, I have my grandfather’s old Purdue textbooks because they remind me of him. Instead of keeping the entire set, I chose 1 Pose and Poetry textbook with his name and note written inside. The rest, I don’t need to hold on to.


Stack of books with text overlay - How to Declutter Books the KonMari Way when You Love Books

It’s not easy to give up books when you absolutely love your books… okay, let’s be fair: You love all books. Learn how to declutter books the KonMari way even when you’re a book love with these tips. If this bibliophile can do it then you definitely can!

See where I’m linking up!

Don’t Forget to Pin It!

 width=


More Ideas You’ll Love: