Delicious and Easy Homemade Garlic Bread

Is there anything better than a warm piece of garlic bread to go with your favorite pasta? In this house they go together like peanut butter and jelly. Don’t settle for frozen garlic bread from the store. Make your own delicious homemade garlic bread easily with this super simple recipe!

Affiliate links may be used in this post. Ordering a product through these links may result in a commission. Read the full disclosure here.

Collage of Photos of Garlic Bread with text overlay - Delicious and Easy Homemade Garlic Bread


[bctt tweet=”This delicious and easy homemade garlic bread is as awesome as it gets. The outside is crunchy and flavorful but the inside is soft and delicious!” username=”diyadulation”]

In case you haven’t figured it out yet, I seriously love bread. Most of my meals don’t feel complete without bread of some sort. I blame my southern country heritage. A standard meal in our household growing up would be homemade fried chicken served with heaping piles of mashed potatoes and green beans. Oh, and those green beans? Cooked with bacon grease and ham.

Believe it or not, my mom’s style of cooking was actually a healthier version of what she grew up with. My great grandma was a true country woman with biscuits always on the table and a bucket of lard for cooking pretty much everything. It’s no surprise that a traditional spaghetti dinner isn’t complete without that side of garlic bread. That’s why I need an easy recipe like this to whip up when I need it.


Close up of Pieces of Garlic Bread in Basket

Homemade Garlic Bread Ingredients

Step 1

First, preheat your oven 400° Fahrenheit.


Loaf of Italian Bread

Step 2

Next, remove your loaf of bread from the packaging and slice it down the center lengthwise.


Loaf of Italian Bread Cut Open on Parchment Lined Baking Sheet

Step 3

Set your bread, open-faced, on a parchment lined baking sheet and place it to the side.


Butter on Small Plate

Step 4

Next, add your butter to plate or small mixing bowl.

Note:


Seasoning and Butter on Small Plate

Step 5

Top your butter with garlic powder, garlic salt, and dried basil.


Mixed Up Butter on Small Plate

Step 6

Use a fork to mix the butter and spices together thoroughly. You want to make sure the flavors are throughout the butter.


Close Up of Garlic Butter on Bread

Step 7

Next, spread half of your butter mixture on one side of your cut apart bread.


Garlic Butter on Halves of Bread Loaf

Step 8

Cover the second side of your bread with the remaining butter mixture.

Step 9

Bake your garlic bread for 30 minutes at 400° Fahrenheit.

Step 10

After 30 minutes, broil your garlic bread on low for an additional 10 minutes.


Garlic Bread on Parchment Lined Baking Sheet

Bowl of Pieces of Garlic Bread

Step 11

Remove the garlic bread from the oven and slice into pieces for serving.


Hand holding piece of garlic bread with a bite taken out

Piece of Garlic Bread next to Lasagna on Plate with Basket in Background

Garlic Bread next to Lasagna on a Plate with text overlay - Delicious and Easy Homemade Garlic Bread

This delicious and easy homemade garlic bread is as awesome as it gets. The outside is crunchy but the inside is soft and delicious. It’s so good you could totally eat it on its own but you’ll also love sopping up your leftover sauce with it on spaghetti nights. By the way, the leftovers are pretty darn good for snacking too, if there are actually any leftover.

[amd-zlrecipe-recipe:52]

See where I’m linking up!

Don’t Forget to Pin It!

Garlic Bread next to Lasagna on a Plate with text overlay - Delicious and Easy Homemade Garlic Bread


More Ideas You’ll Love:

Easy DIY Find It Game | Perfect for Road Trips

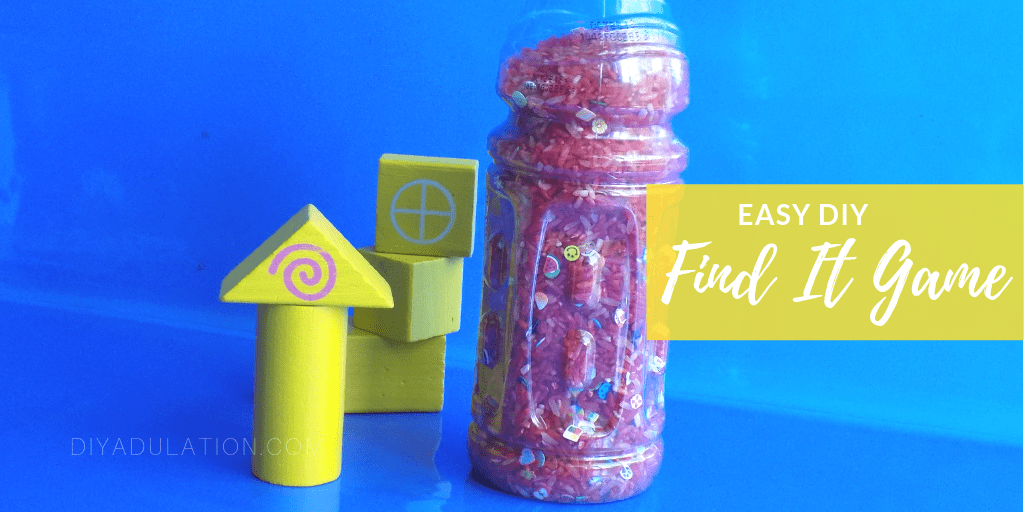
Does your kid love those Find It games? They’re the perfect quiet activity to entertain little ones again and again. That’s why it also makes a great road trip activity. This easy DIY find it game is the perfect travel size to entertain your kiddos in the car with less than half the bulk.

Affiliate links are used on this site. Ordering a product through these links may result in a commission. Read the full disclosure here.

Collage of Photos of Find It Game with text overlay - Easy DIY Find It Game


[bctt tweet=”Keep little ones entertained no matter how long your road trip is with this easy DIY find it game! It’s the perfect size for travel and easily customizable.” username=”diyadulation”]

When my youngest first started to express a defined interest in books outside of the bedtime stories we read, he loved ISpy books. Like, he couldn’t get enough of them. That was when I had the idea that he might also love the Find It games. He got one that was specifically geared for young kids for his 4th birthday and he still loves playing with it a year later.

You would think looking for things would get old, especially when you’ve found them a thousand times before, but not for him. That’s is what sparked this most recent project. We’re driving all the way to Disney World this summer (15+ hour drive, one way) and I thought this would be a great way to keep him entertained on our trip.

Even better, it’s so super simple that you can easily make more than one in different themes. In case you’re wondering, yes, I’m totally going to make a Disney themed one. It’s too easy and to much fun not to.


DIY Find It Game next to Yellow Blocks

DIY Find It Game Materials


White Rice in Plastic Bag

Step 1

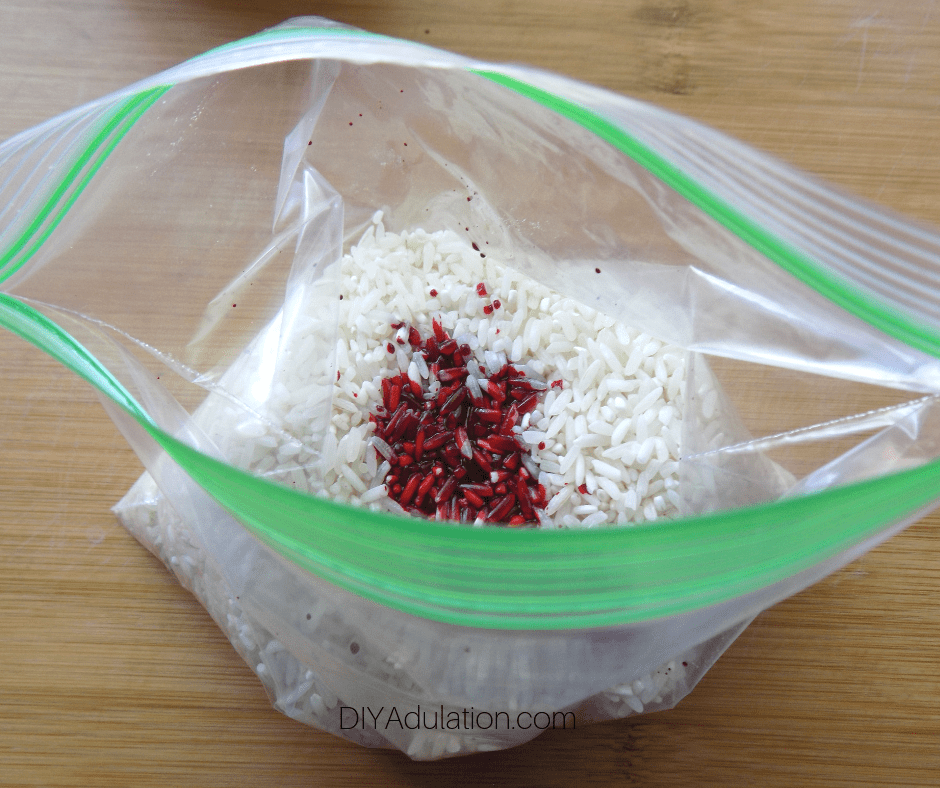
First, add your rice into a resealable bag.


Red Food Coloring on White Rice in Plastic Bag

Step 2

Next, add in your food coloring.

Tip:


Red Dyed Rice in Plastic Bag

Step 3

Then seal your bag and shake your rice to color. If your rice is still too light after shaking, add in more food coloring and shake some more.


Tray Lined with Parchment Paper

Step 4

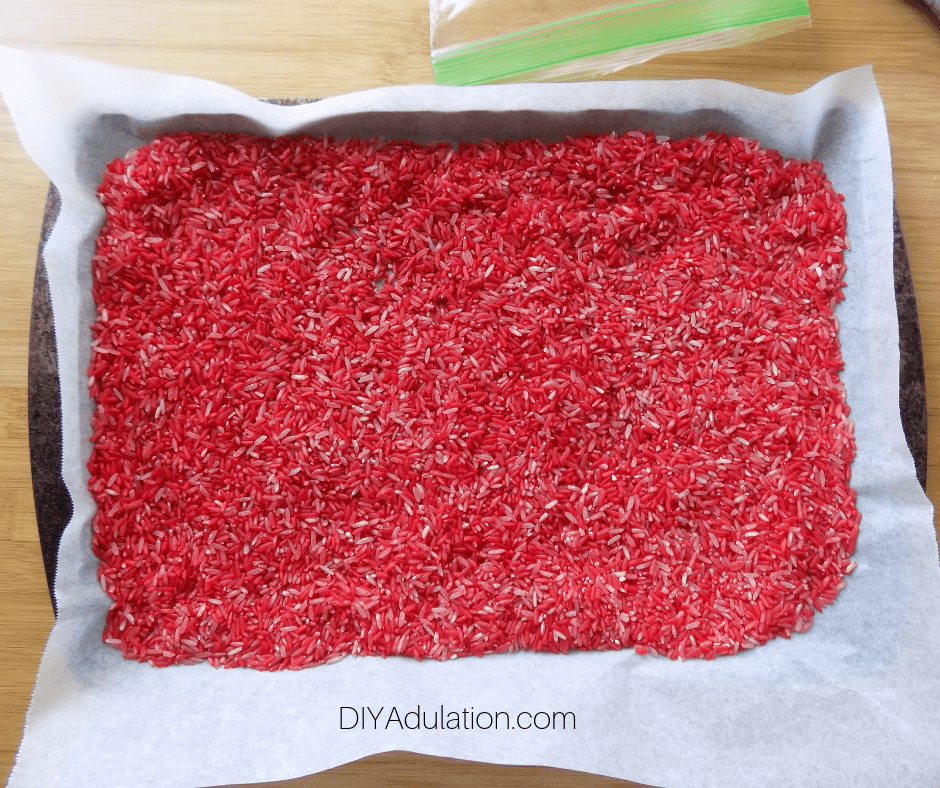
Now cover your baking sheet with a layer of parchment paper.


Red Rice on Parchment Paper

Step 5

Next, pour your colored rice onto the baking sheet and let it set out to dry.

Note:


Red Rice in Plastic Bottle

Step 6

After the rice is dried, add it to your bottle. Do not fill the bottle all the way to the top. Take into account the room for your slime charms and also leave room to shake the mixture.


Close Up of Small Charms on Rice in Plastic Bottle

Step 7

Now add your slime charms to the bottle. I used 1 of each letter I could find in the set and then some of the picture ones as well.


Small Charms Lined Up on Wooden Background

Optional:

Step 8

Put the lid on and shake up your mixture to incorporate the slime charms.


Glue Inside of Blue Lid

Step 9

Once the charms and rice are mixed, take the lid off and add a layer of E6000 along the inside of the lid.


Lid Glued on Find It Game Bottle

Step 10

Return the lid to the container and set the bottle on its side to dry. Try to keep the rice and charms from touching the lid so that they don’t get stuck in any glue that seeps down.


Smiling Child Holding Find It Game

Step 11

Allow your glue to dry 24 hours before playing with your new DIY find it game.


Find It Game next to Blocks with text overlay - Easy DIY Find It Game

It’s definitely time to start saving those juice bottles. Now you can keep little ones entertained no matter how long your road trip is. This easy DIY find it game is the perfect size for travel and easily customizable for your kiddos. Dye the rice in their favorite color and add in items that are fun for them.

See where I’m linking up!

Don’t Forget to Pin It!

Find It Game next to Blocks with text overlay - Easy DIY Find It Game


More Ideas You’ll Love:

How to Make DIY Sidewalk Chalk That Glows

The night takes longer to get here in the summer but it’s still fun to stay up late and enjoy it with the kiddos. Now you can enjoy some outdoor fun during the day and after it gets dark. Find out how to make DIY sidewalk chalk the glows for all day and night fun!

Affiliate links are used on this site. Ordering a product through these links may result in a commission. Read the full disclosure here.

Collage of Sidewalk Chalk with text overlay - How to Make DIY Sidewalk Chalk that Glows


[bctt tweet=”Find out how to make DIY sidewalk chalk that glows for endless summer fun with the kiddos. From games to glowing masterpieces, kids will love it!” username=”diyadulation”]

I love sidewalk chalk as much as (if not more than) the kiddos because there are so many fun things you can do with it. Of course, you can create masterpieces on the driveway but you can do so much more than that. Use it to make a hopscotch game or create a street hockey court. Seriously, can you think of a more versatile toy?

How do you make a fantastically versatile toy even better? You make it glow in the dark! That’s exactly what I did with this easy chalk recipe. Instead of using regular pigment powder, swap it out for glow in the dark powder. It’s truly that easy.


Sidewalk Chalk on Concrete

Glowing DIY Sidewalk Chalk Materials

Step 1

First, add your plaster to a medium glass mixing bowl.


Water and Plaster in Glass Mixing Bowl

Step 2

Then add your water to the mixing bowl.


Mixed Plaster in Glass Mixing Bowl

Step 3

Mix your water and plaster together until smooth.


Divided Plaster Mixture in Small Bowls

Step 4

Once your plaster and water are mixed, separate the mixture into four smaller plastic bowls.

Tip:


Color Powder on Plaster Mixture in Small Bowls

Step 5

Add different colors of glow in the dark mica powder to each bowl of plaster mix.


Color Mixed into Plaster in Small Bowls

Step 6

Carefully mix the mica powder into the plaster mix. The mica powder can be messy and get everywhere so go slowly until it is worked into the mixture.

Tip:


Sidewalk Chalk Mix in Bottle Silicon Mold

Sidewalk Chalk Mix in Puzzle Silicon Mold

Step 7

Next, fill your silicon molds with the different color mixtures.


Dried Sidewalk Chalk Mix in Bottle Silicon Mold

Step 8

Allow your molds to set until the plaster dries.


Sidewalk Chalk Popped Out of Mold

Step 9

Pop your sidewalk chalk out and enjoy! Let them “charge” in the sun all day for fun after dark fun!


Child playing with sidewalk chalk

Stacked Sidewalk Chalk in Front of Brick Background

Glowing Sidewalk Chalk

Bonus Tip

If you want the backs of the chalk to be smooth, sand them down on concrete until smooth. Then brush off the dust. Obviously you don’t really need to do this, especially if it’s just for the kiddos to play with. If you want to give them as a gift, however, you may want to give it a try.


Glowing Pieces of Sidewalk Chalk with text overlay - How to Make DIY Sidewalk Chalk that Glows

Once you know how to make DIY sidewalk chalk that glows you’ll be set for summer fun with the kiddos. Let the kids create masterpieces on the porch then take them outside after the sun goes down to check out their glowing creations. It’s yet another way to enjoy sidewalk chalk! What other ways will you play with your new glowing sidewalk chalk? I’d love to hear in the comments!

See where I’m linking up!

Don’t Forget to Pin It!

Glowing Pieces of Sidewalk Chalk with text overlay - How to Make DIY Sidewalk Chalk that Glows


More Ideas You’ll Love: