Glittery No Cook Homemade Play Dough

How many times have kiddos opened up their play dough only to find it dried out because they didn’t get the lid on right (or some other mishap)? No more running to the store for new ones. Instead, whip up this glittery no cook homemade play dough with items you already have at home!

Affiliate links may be used in this post. Ordering a product through these links may result in a commission. Read the full disclosure here.

Collage of Balls of Play Dough Next to Creations with text overlay - Glittery No Cook Homemade Play Dough


[bctt tweet=”No more trips to the store for play dough! Make your own budget friendly glittery no cook homemade play dough with ingredients you already have on hand!” username=”diyadulation”]

My kiddos love playing with play dough. Sometimes they even want to keep their creations sitting out to air dry then display in their rooms. This means we go through a lot of play dough and it gets expensive.

Finally, I decided enough is enough. It was time to create a budget friendly homemade version and that’s exactly what I did. Of course, I had to make it even better so let’s make it sparkle! The end result is this awesome glittery no cook homemade play dough that is super easy to make and a blast to play with. Even better, I had all of the ingredients on hand so it was totally free too. Definitely a mom win!


Glittery Play Dough Creations next to Balls of Play Dough

Glittery No Cook Homemade Play Dough Ingredients


Glass Bowls with Water in Them

Step 1

First, add 1/2 cup of water to 4 separate bowls. I used glass soup bowls for mine.


Glass Bowls with Glitter and Water in Them

Step 2

Then add different colors of glitter and food coloring to each bowl and stir the mixture. Try to make your food coloring correspond with the glitter color.

Tip:


Glass Bowls with Glittery Water in Them next to Oil

Step 3

Next, add 2 tbsp of oil to each bowl and again, stir to combine.

Tip:


Salt and Flour in Mixing Bowl

Step 4

Set your bowls aside and mix your flour and salt together in a separate mixing bowl.

Step 5

Then add 1 cup of your flour and salt mixture to each bowl of water and oil mixture.


Yellow Play Dough in Glass Bowl

Step 6

Mix your wet and dry ingredients together until a dough forms.


Yellow Play Dough on Floured Surface

Ball of Yellow Play Dough

Step 7

Lastly, knead the dough on a floured surface (use your remaining flour and salt mixture) until you achieve that play dough consistency.

Tip:


Close up of Green Ball of Play Dough

Close up of Yellow Ball of Play Dough

Close up of Blue Ball of Play Dough

Close up of Pink Ball of Play Dough

Step 8

Store your homemade play dough in air tight bags or containers in between play. I used resealable plastic bags and squeezed the excess air out before sealing.


Glittery Play Dough Creations

Colorful Balls of Play Dough

Balls of Play Dough Next to Creations with text overlay - Glittery No Cook Homemade Play Dough

This glittery no cook homemade play dough turned out fantastic! It’s hard to capture the sparkle in the pictures but it is definitely pretty and glittery. Note that this makes a huge batch so your can easily separate it into multiple sets for your kiddos. That prevents fighting over colors and amounts which was a lifesaver for us. Anyone else so over the fighting between the kiddos this summer? Save yourself some trouble and separate your large batch of play dough before handing it over for them to play with.

See where I’m linking up!

Don’t Forget to Pin It!

Balls of Play Dough Next to Creations with text overlay - Glittery No Cook Homemade Play Dough


More Ideas You’ll Love:

DIY Travel Chalkboards with Storage for Kids

Drawing and coloring are fantastic activities for road trips. That is until crayons get dropped and melt in your van. Double that aggravation if it happens in a rental. Now you can let your kids enjoy their coloring without the fear with these DIY travel chalkboards with storage for kids!

Affiliate links may be used in this post. Ordering a product through these links may result in a commission. Read the full disclosure here.

Collage of Chalkboards next to Chalk with text overlay - DIY Travel Chalkboard with Storage


[bctt tweet=”Skip melted crayon disasters in the car with these DIY travel chalkboards with storage! They’re perfect for your next family road trip!” username=”diyadulation”]

Why is it that crayons are immediately dropped and broken by kiddos? Whether it’s at the house or in the car, I swear it’s instantaneous. Since we rented our van for the drive to Disney World, I didn’t want to take the chance on melted wax. Instead, I whipped up these travel chalkboards.

The kids could draw or play games over and over and I could keep the peace of mind that we wouldn’t get slapped with a huge cleaning charge at the end of the trip. It was a big hit with the kiddos and there were LOTS of games of tic tac toe. Even better, it was also an activity that they could do in the room when we weren’t out at the parks during our trip.

I also totally recommend adding a loose sock in the case too. It makes wiping away the designs and games a breeze for kiddos. It’s also the perfect way to reuse those mismatched or too small socks!


Chalkboards next to Pieces of Chalk

Travel Chalkboards Materials


Inserts Next to Empty DVD Case

Step 1

First, remove any inserts from your DVD cases including the cover insert.


White DVD Case with Plastic Removed

Step 2

Then use your utility knife to remove the plastic on the outside of your DVD case. Gently fold your case backwards and lift the plastic. Then carefully run your knife down the edge. Trim any plastic that remains on the case.


Small Black Chalkboard on Pink Background

Step 3

Next, pull out your chalkboards and remove any packaging from them.


Washi Tape on Short Edges of Chalkboard

Double Layers of Washi Tape on Short Edges of Chalkboard

Step 4

Add washi tape to the short edges of your chalkboards with a slight overhang off the edge. For additional vibrancy, add a second layer of washi tape.


Washi Tape on Long and Short Edges of Chalkboard

Double Layers of Washi Tape on Long and Short Edges of Chalkboard

Step 5

Then add washi tape that is a different color to the long edges of the chalkboards. Again, add a second layer if you want your washi tape to be more vibrant on the board.


Secured Washi Tape on Back of Chalkboard

Step 6

Next, fold the edges of the washi tape over the sides of the chalkboard, saving the corners for last.


Glue on Empty DVD Case

Chalkboard Glued to DVD Case

Step 7

Then glue your chalkboards to the sides of the DVD cases that have the disc indentation. The smooth side of the case should be opposite the chalkboard.


Chalk inside DVD Indentation Inside of DVD Case

Step 8

Lastly, open up your DVD cases and place pieces of chalk inside the disc indentation on the inside of your DVD case. This ensures that it doesn’t get broken when you close the case.


Chalkboards next to Pieces of Chalk on Blue Background

Chalkboard with Drawings next to Chalk with text overlay - DIY Travel Chalkboard with Storage

My favorite part of these DIY travel chalkboards with storage is that everything is contained easily. The chalk and the eraser are right there for kiddos during the drive and they store away easily when it’s time to clean up. Of course, the $3 price tag doesn’t hurt either when it comes to keeping kiddos entertained on long trips!

See where I’m linking up!

Don’t Forget to Pin It!

Chalkboards with Drawings next to Chalk with text overlay - DIY Travel Chalkboard with Storage


More Ideas You’ll Love:

DIY Lighted Photo Frame Home Accessory

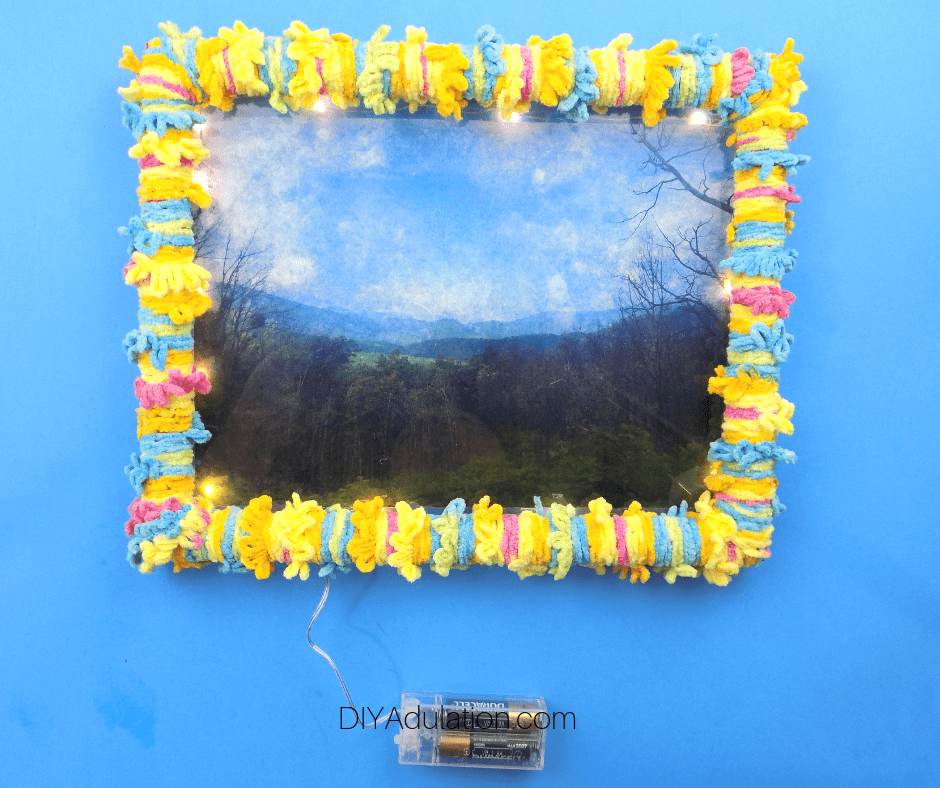
Sometimes you simply want to keep pushing the limits. Like, how many veggies can I put in this sauce before the kiddos notice. How many items can I throw in the cart at the dollar store before I am blown away by my register total. Or.. How can I take my wall art to the next level for a totally unique decor look? That’s exactly what this DIY lighted photo frame does.

This is a sponsored post on behalf on Rust-Oleum. I received product for free in exchange for my honest opinion and creation. Affiliate links may be used in this post. Ordering a product through these links may result in a commission. Read the full disclosure here.

Collage of Lighted Mountains Photo in Yarn Frame with text overlay - DIY Lighted Photo Frame Wall Accessory


[bctt tweet=”I love this DIY lighted photo frame home accessory! It’s colorful and fun during the day and a glowing masterpiece at night!” username=”diyadulation”]

I’m totally enthralled with those lighted canvases. The lights are the perfect accent to the not only the picture but the entire wall. While I’m not quite ready to tackle the canvases, a lighted photo frame seems totally possible. Then you’re not in charge of creating the entire work of art. You simply print out the photo and you’re good to go.

Of course, it helps that Rust-Oleum came out with this super simple photo transfer solution. It makes it totally easy to transfer your favorite photos to the glass from your frame. It works with a ton of other mediums too, if you’re curious. I just knew immediately that I wanted to use it for this project.

Empty Frame, Photo Transfer Solution, and Laser Printed Photo

Lighted Photo Frame Materials


Glass Removed From Picture Frame

Step 1

First, take your frame apart and pull out the glass insert. Set the rest of the frame aside for now and clean the glass if needed.


Edges Cut Off of Laser Printed Photo next to Scissors

Step 2

Next, pull out your laser printed photo and trim the white excess around the edges.


Photo Transfer Solution on Laser Printed Photo

Step 3

After your picture is printed, cover it with a coat of Rust-Oleum photo transfer solution. I used a very heavy coat.


Photo Pressed Face Down Onto Glass

Step 4

Then carefully place your coated picture face down onto the glass insert and smooth it starting from the middle to the edges.

Step 5

Leave your picture and glass sitting for 12 hours.
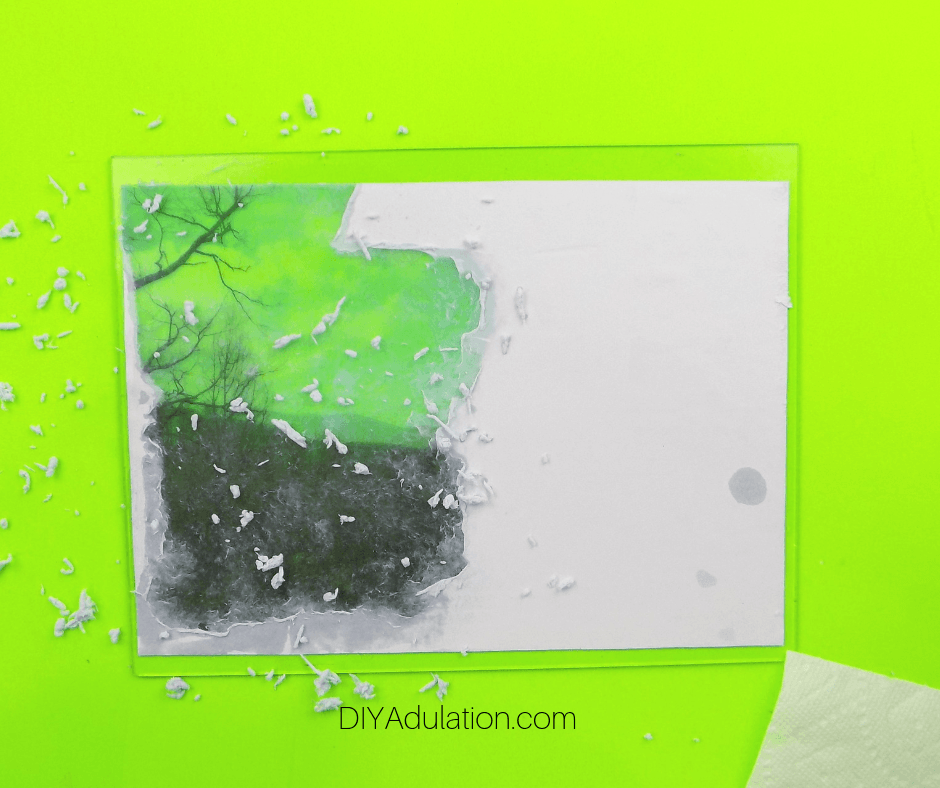
 

Half of Backing Rubbed Off of Transferred Photo

Step 6

After your photo and transfer solution has dried, wet a cloth or paper towel and gently rub away the paper on your glass. Use circular motions and wet the paper before rubbing to make it easier.


Backing Rubbed Off of Transferred Photo

Step 7

Continue removing the paper backing until all of it is removed.

Step 8

Once all of your paper is removed, set your glass photo aside and pull out your picture frame.


Close Up of Yarn Wrapped Around Picture Frame

Step 9

Begin wrapping your picture frame with your colorful yarn starting on one side close to the corner.


Yarn Wrapped Around Picture Frame

Step 10

Continue until your entire frame is wrapped in yarn then use knots to secure the end.


Mountain Photo in Yarn Picture Frame

Step 11

Then carefully press your glass photo into the yarn wrapped frame.


Lights Attached to Yarn Frame

Lighted Photo Frame

Step 12

Lastly, attach your fairy lights around the inside edge of your frame by threading it through the wrapped yarn.


Lighted Mountains Photo in Yarn Frame with text overlay - DIY Lighted Photo Frame Wall Accessory

I love this DIY lighted photo frame home accessory. It’s colorful and fun during the day and a glowing masterpiece at night. It’s the perfect decor idea for displaying your favorite vacation photos, like the one I used from one of our many Gatlinburg vacations. The lights make the skies in the photograph really pop and set against the mountains beautifully! Definitely the perfect addition to your gallery wall!

See where I’m linking up!

Don’t Forget to Pin It!

Lighted Mountains Photo in Yarn Frame with text overlay - DIY Lighted Photo Frame Wall Accessory


More Ideas You’ll Love: