Easy + Delicious Glittery Pink Holiday Punch

Are you ready to take your glitter addiction to the next level for your next party? Now you delight your guests with a delicious drink and satisfy your need for all things sparkly with this glittery pink holiday punch. Even better, it is crazy easy to whip up in minutes with just a few ingredients.

Close Up of Punch Bowl and Glass of Punch with text overlay - Glittery Pink Holiday Punch

You know those people that complain about how glitter gets everywhere, especially with kids? Yeah, I’m not one of those people. Of all of the things that sometimes drive me crazy about motherhood, that isn’t one of them.

I love glitter. I use it in my crafts, on my nails, and even to wrap my gifts. For that reason I perpetually look like I’m trying to get into an under 18 dance club but it’s worth it.

When you love sparkly stuff that much it’s only natural to take it to the next level… like with your food and drink. Last year, I experimented with these Sparkly Peanut Butter Caramel Chocolate Truffles and they are delicious and beautiful. This year, it’s time to add some shine to the drinks with this glittery pink holiday punch.

Ingredients for Glittery Pink Punch

Glittery Pink Holiday Punch Ingredients


Red Liquid in Bottom of Punch Bowl

Step 1

First, empty your pink lemonade concentrate into a large punch bowl.


Ice Cream on top of Red Liquid in Bottom of Punch Bowl

Step 2

Next, spoon half of your rainbow sherbet into the punch bowl. Make sure to include some of each color/flavor.


White Foam on top of Punch Bowl

Step 3

Then pour your half of your Sprite over the concentrate and rainbow sherbet and stir to combine.


Hand Holding Glitter over Punch Bowl

Step 4

Lastly, stir in 1/2 of your container of glitter until combined with your punch.


Bowl of Glittery Pink Punch

Step 5

Add more sherbet as needed throughout your gathering.


Glass of Glittery Pink Punch with Punch Bowl in Background

Close Up of Punch Bowl with text overlay - Glittery Pink Holiday Punch

Seriously, the pictures don’t do this drink justice. It is the exact right amount of sweet and tart plus swirling with gorgeous sparkles that brighten up every party in minutes. This delicious glittery pink holiday punch is also family-friendly so no worries about letting the kids sip on some this New Years Eve.

They will love it even more if you serve it to them in fancy party cups… although I totally recommend investing in a plastic set. Remember when we talked about things that kiddos do that drive you crazy sometimes? Yeah, breaking your glasses definitely falls under that category. Take the risk out of the situation with some kid friendly party “glasses” instead.

Close Up of Punch Bowl with text overlay - Glittery Pink Holiday Punch


More Ideas You’ll Love:

Hello Kitty Sugar Cookies with a DIY Cookie Cutter

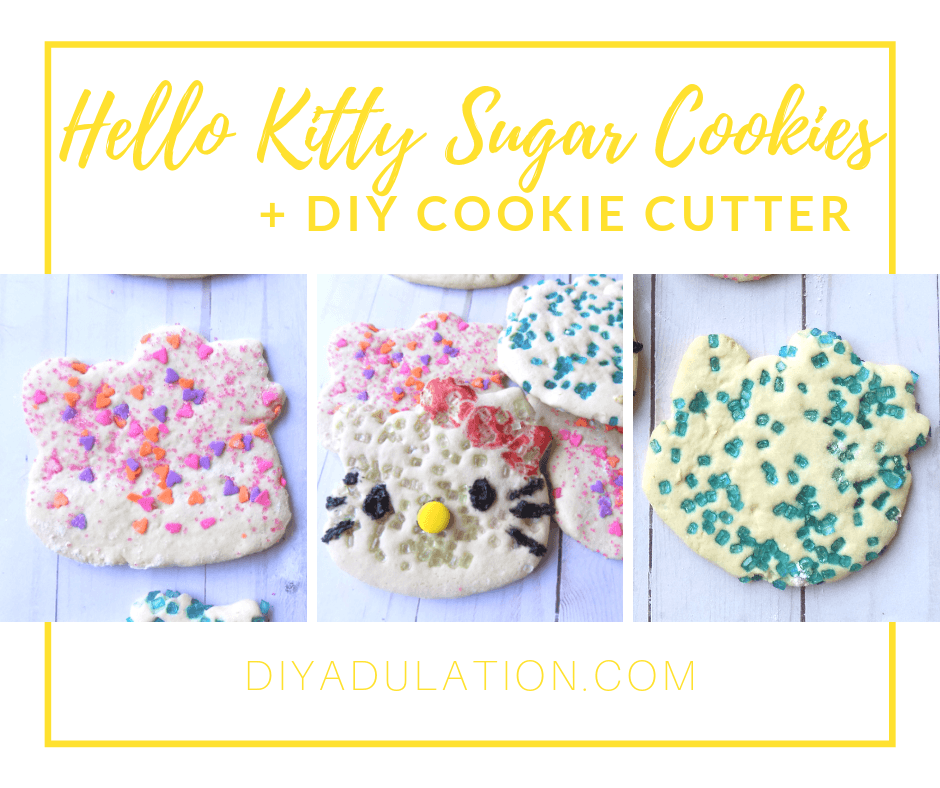
Can you believe tomorrow is the last day of the 4th annual 12 Days of Christmas Blog Hop? Of course, you can’t have a Christmas blog hop without sharing delicious treats and that’s what we’re doing today. Find out how to make these colorful Hello Kitty Sugar cookies with a DIY cookie cutter!

Collage of Hello Kitty Sugar Cookies with text overlay - Hello Kitty Sugar Cookie and DIY Cookie Cutter

Welcome to Day 10 of the Fourth Annual 12 Days of Christmas Series!

DIY Christmas Ideas and Recipes you can use this year! DIY Christmas Decor and Games Ideas #12daysofChristmas

We have teamed up with 50 plus bloggers to bring you a oodles of DIY Ideas and Recipes to make your holiday season merrier. There are 12 different posts in the series and we have spread them out over a four week period with three posts per week. Now is the time to subscribe!

GO HERE for the complete list of Dates and Topics plus a collection of most popular holiday ideas including ornaments, games, recipes and more from all 50 plus talented bloggers!

It’s Day 11 and we have been in the kitchen making something sweet to share!


Hello Kitty Sugar Cookies

I absolutely love Hello Kitty (which you may have deduced from my candy tree ornament). I’m one of those nerds that actually contemplated traveling across the country to check out the themed food truck that hit California.

It’s ridiculous how cute she is and clearly I’m not the only one because of the sheer amount of Hello Kitty stuff you can find. That’s great news for you, though, because that makes the DIY cookie cutter for this a lot easier to make.

Find a book, scrapbook paper, or some other flat surface with a large Hello Kitty picture and you’re set. If you don’t have one, check your kids’ stuff. 

Close Up of Hello Kitty Sugar Cookies

Materials and Ingredients

Hello Kitty Book with Embellishments

Step 1

First, find a large Hello Kitty picture. I used a fun book I received for my birthday this year.

Large Piece of Foil next to Scissors and Foil Box

Step 2

Next, cut a large piece of foil from the roll.

Folded Piece of Foil next to Hello Kitty Book

Step 3

Now fold your piece of foil accordion style so that it is roughly 1.5-2 inches thick.

Folded Piece of Foil next to Book

Step 4

 Then fold your foil strip in half long-ways.

Foil Molded Around Picture of Hello Kitty
Close Up of Molded Foil

Step 5

After you have folded your foil, loosely form around your Hello Kitty picture and tuck the overlap of foil.

Close Up of Tape on Molded Foil

Step 6

Once you’ve measured, tape the overlap to secure it in place.

Taped Foil Molded Around Hello Kitty Picture

Step 7

Finally, firmly form your cookie cutter to the Hello Kitty picture.

Step 8

After you have finished your cookie cutter, set it to the side and mix up your sugar cookie dough. I used this easy no-chill recipe from Katrina’s Kitchen.

Note:

This is also when you want to preheat your oven according to your sugar cookie recipe.

Rolled Out Dough Next to Rolling Pin

Step 9

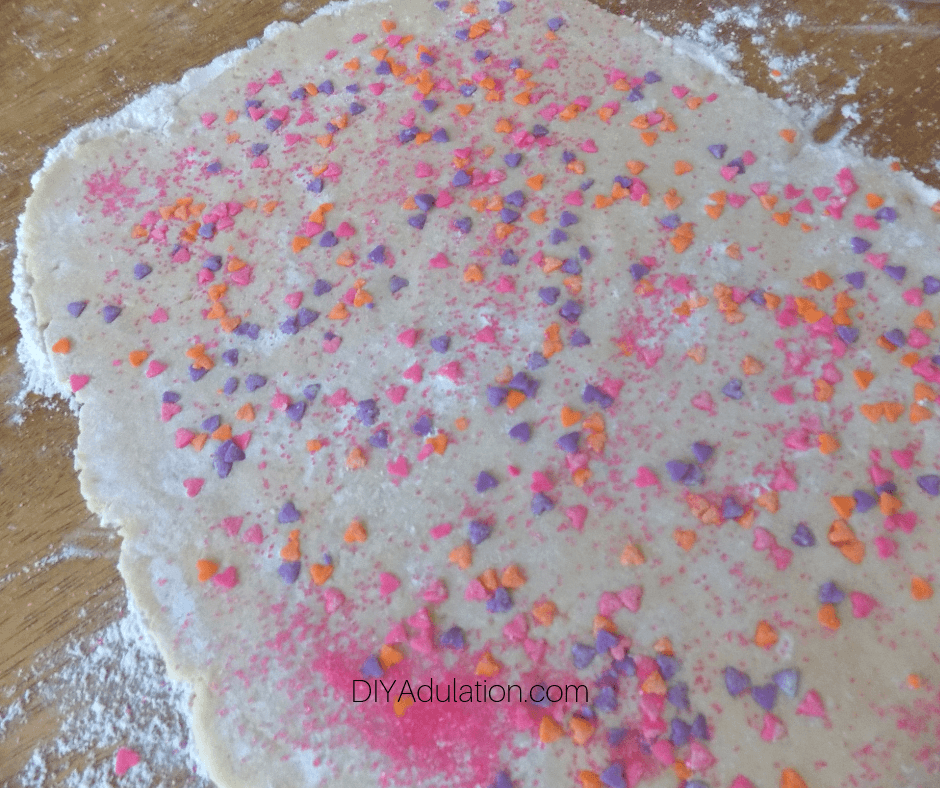
After your dough is mixed up, roll out 1/3 of it on a lightly floured surface until it is roughly 1/4 inch thick.

Step 10

Then, sprinkle sugar granules on top and gently pat into the dough.

Cookie Cutter in Dough

Step 11

Now begin cutting out your sugar cookies and placing them on a parchment lined baking sheet. The recipe I used (and most sugar cookie cutout recipes) does not rise much so your can place them fairly close together on the pan.

Raw Hello Kitty Cookies on Cookie Sheet

Step 12

Once your tray is full, bake according to your sugar cookie recipe.

Tip:

If you are using the same recipe I did, your cookies will need around 10 minutes.

Baked Hello Kitty Sugar Cookie with Blue Sprinkles

Step 13

Allow your cookies to cool before moving on.

Colorful Sprinkled Rolled Out Dough

Notes:

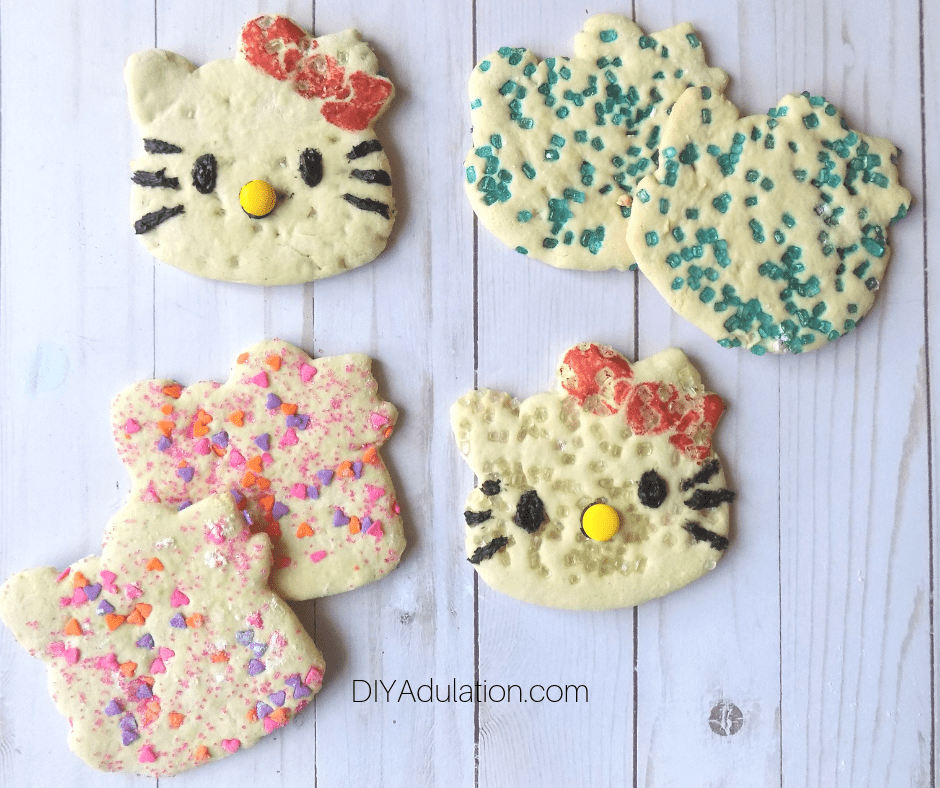
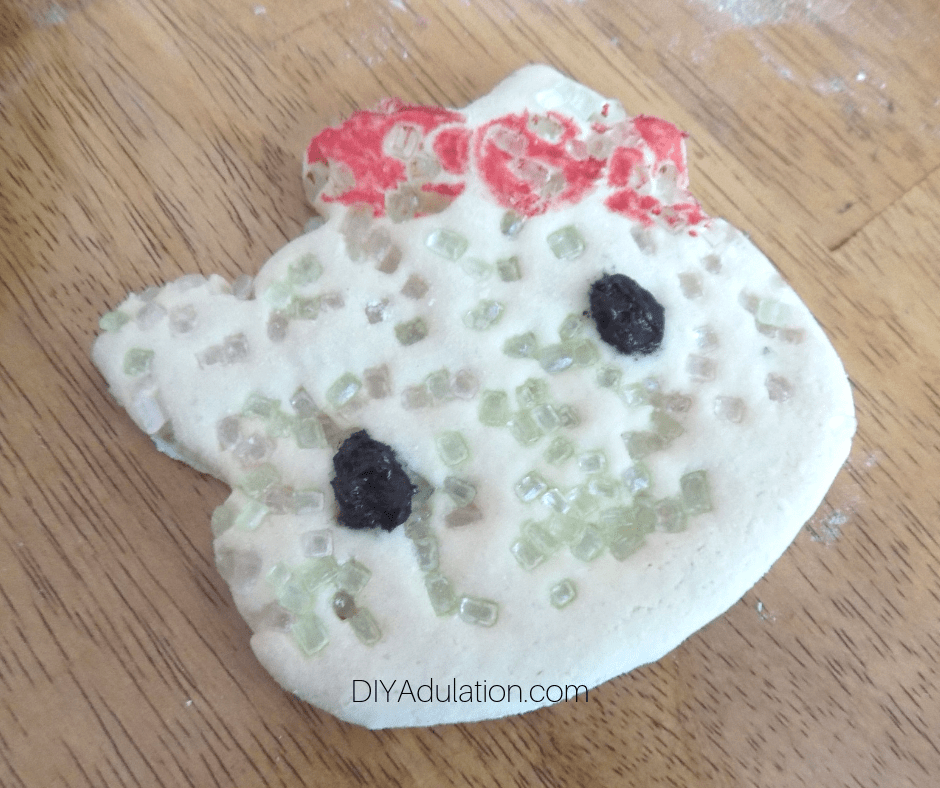
Don’t forget to use multiple types of sprinkles. Clear sugar granules are best for the colored Hello Kitty sugar cookies because the colors show up best on them.

You need the extra sugar because these do not have the traditional icing that sugar cookies have. If you don’t add them, they won’t be very sweet.

Red Bow on Sugar Cookie

Step 14

When you’re ready to start decorating, pull out your clear/lighter colored sugar covered cookies and use your red food pen to draw a bow on the top right of the cookies.

Black Icing Eyes on Sugar Cookie

Step 15

Next, add black eyes to your cookies.
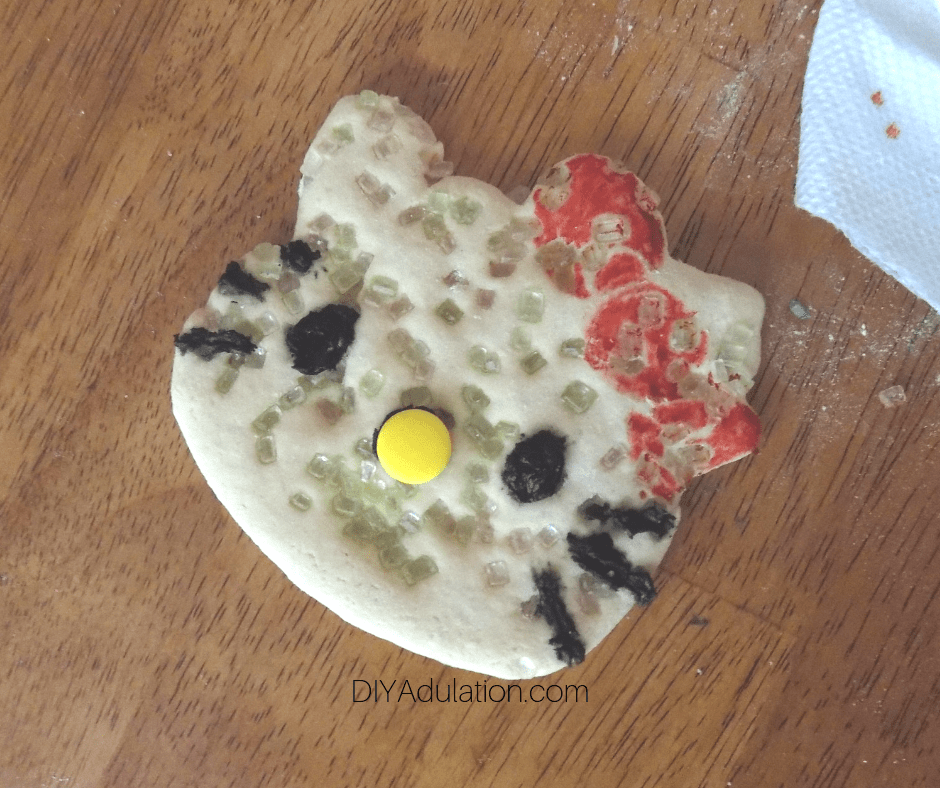
Hello Kitty Face on Sugar Cookie
Decorated Hello Kitty Sugar Cookie

Step 16

Lastly, add black whiskers and use icing to attach a yellow M&M to the center of your cookies.

Tip:

You do not need to decorate all of the cookies with a face. Having the decorated ones next to the colorful ones will make it clear what they are.

Pile of Hello Kitty Sugar Cookies
Lined Up Hello Kitty Sugar Cookies
Hello Kitty Sugar Cookies with text overlay - Hello Kitty Sugar Cookie and DIY Cookie Cutter

These Hello Kitty sugar cookies turned out amazingly! I definitely recommend using the same recipe I did. They are the softest sugar cookie cutouts I have ever tasted yet they still hold up to all of the decorating. Of, and did I mention they’re totally delicious? Try them for yourself today!

Hello Kitty Sugar Cookies with text overlay - Hello Kitty Sugar Cookie and DIY Cookie Cutter

Scroll down for even more Sweet Treats to make this holiday season!


DIY Hand Print Turkey Shirt | Thanksgiving Kids Craft

Sometimes during this time of year we get so caught up in everything we have to do that the kiddos can feel a little left out. This is especially true for the youngest ones still at home. Take a time out this weekend and make this DIY hand print turkey shirt with your kiddos for them to wear on the big day.

Affiliate links may be used in this post. Ordering a product through these links may result in a commission. Read the full disclosure here.

Collage of Smiling Boy Wearing a Hand Print Turkey Shirt with text overlay - DIY Hand Print Turkey Shirt

[bctt tweet=”Take a break this weekend and enjoy some crafty fun with this DIY hand print turkey shirt. It’s quick to make and you get some quality time together!” username=”diyadulation”]

This year has thrown into sharp contrast how busy the holidays get for us. In addition to my oldest being in more activities, my husband has been in Louisiana since October 22 for a military training. Good old Murphy is asserting his presence while I’m single-momming it.

A Visit from Murphy

This included my youngest getting Croup which I had never even heard of before. I must have gotten lucky with the older two, but at almost midnight on Halloween night, I heard my son wake up sounding like he couldn’t breath. Talk about scary! I was ready to rush him to the ER until I talked to my momma (God bless her) and she told me what it sounded like.

We slept propped up on the couch the rest of that night and headed to the doctor the next morning. He is since doing so much better, but it really made me look at how on the go we are. Some of the things are outside of my control such as holidays and after-school activities, but how often am I working on Christmas presents instead of hanging out with my kid this time of year? The answer is too often.

That’s why we decided to take a break and enjoy some crafty fun with this DIY hand print turkey shirt. It doesn’t take long but we had so much fun making it. We also got some quality momma and baby time. I want that for you and your kiddos too!


Smiling Boy Wearing a Hand Print Turkey Shirt

DIY Hand Print Turkey Shirt Materials


White T-Shirt Laying Flat

Step 1

First, lay out your t-shirt. Depending on the age of your kids, you may want to put it on a protected surface like old newspaper.


White T-Shirt with Box Inside

Step 2

Next, put your cardboard inside of the shirt to separate the front and the back. This keeps your paint from seeping through the fabric and marking the back. It also keeps the sides from getting stuck to each other.


Yellow Hand Print on White T-Shirt

Step 3

Begin placing hand prints on the shirt by covering your kid’s hand with fabric paint and having him press the hand firmly, fingers fanned out, down on the t-shirt. Clean any remaining paint from your child’s hand.


Colorful Hand Prints on White T-Shirt

Step 4

Continue adding hand prints in different colors, fanning out like feathers. Be sure to clean his hand between each paint color.


Black Hand Print over Colorful Hand Prints on White T-Shirt

Step 5

Lastly, add some black paint to your child’s hand and have him press his hand firmly down in the center, fingers together and thumb sticking out. Again, clean the paint off of your kid’s hand.


Black Turkey over Colorful Hand Prints on White T-Shirt

Step 6

Now, take your paint brush and fill out the turkey shape using the black hand print as a guide. The thumb becomes the beak and the hand is the head. Don’t forget a bulbous body that hits all of the colorful hand prints.

Step 7

Allow your paint to dry before moving on.


Black Turkey with Beak and Snood over Colorful Hand Prints on White T-Shirt

Step 8

After your paint has dried, add a yellow beak and pink (or red) snood.

Step 9

Again, allow your paint to dry completely.

Step 10

Once your paint is dry, toss the shirt in the dryer for 20 minutes to set the fabric paint.


Smiling Boy in Hand Print Turkey Shirt with Arms Out

DIY Hand Print Turkey Shirt Care

When washing your turkey shirt, flip it inside out to protect the paint, especially the beak and snood. After washing, you can dry it as you would any other plain t-shirt.


Close up of Hand Print Turkey Shirt with text overlay - DIY Hand Print Turkey Shirt

This DIY hand print turkey shirt is so much fun to make, especially with toddlers. They laugh and squeal when you put the paint on their hands and it’s absolutely adorable. Be sure to have your camera ready for some fantastic candid shots. Then on Thanksgiving, throw on your turkey shirts and some sweaters and you’re ready to go. Pretty awesome, huh?

See where I’m linking up!

Don’t Forget to Pin It!

Smiling Boy Wearing a Hand Print Turkey Shirt with text overlay - DIY Hand Print Turkey Shirt

More Ideas You’ll Love: