6 Easy and Fun Halloween Game Ideas

Halloween isn’t all candy and costumes. It’s also a time of parties both in the classroom and at home. Plan you party fun now with these 6 easy and fun Halloween game ideas!

Affiliate links may be used in this post. Ordering a product through these links may result in a commission. Read the full disclosure here.

Collage of halloween games with text overlay - 6 Easy and Fun Halloween Game Ideas


[bctt tweet=”Be ready for all of your Halloween parties with these 6 easy and fun Halloween game ideas. Make them now so you can grab and go when it’s time to play!” username=”diyadulation”]

I know we still have a couple of months until Halloween but with all of the craziness in my house, I know I need some fun inspiration. Halloween is my favorite holiday so it’s basically my happy place.

If you need a light at the the end of the tunnel to look towards while you get through the crazy back to school season, consider this your beacon. Not to mention, you’ll totally be ahead of the game once October rolls around!


Collage of zombie body parts toss game

Zombie Body Parts Toss Game (My Pinterventures)

I absolutely love this inventive and creepy game idea! It’s not one for the classroom but perfect for a backyard Halloween party. It’s super easy to set up and fun for everyone making it a must-have for your zombie bash.


Stacked Sleeping pumpkins next to mini pillow

DIY Pumpkin Pillow Fight Game (DIY Adulation)

This adorable little game is perfect all fall long. Some painted cardboard pumpkins and miniature sewn pillows are all you need to entertain the kiddos during any fall party. It’s an especially great classroom party idea because it’s easy to transport and not the least bit spooky.


Zombie Bowling Pins next to Brain Bowling Ball

DIY Tabletop Zombie Bowling (DIY Adulation)

For older kids, you can’t go wrong with this tabletop bowling game. Take turns rolling the brain down the table to knock down as many zombies as possible. It’s also a great classroom game because it still flexes those math skills in a fun way!


Bat Pumpkin Golf Game on Table

Halloween Pumpkin Golf Game (Cookies, Coffee, and Crafts)

Have an empty cardboard box around the house? If so, turn it into your next awesome Halloween game with this super simple pumpkin golf game tutorial. Kid love the challenge of putting that ball into his vampire mouth again and again.


Halloween Scattergories Cards next to Board and Pen

Free Printable Halloween Scattergories Game (DIY Adulation)

If you love Scattergories then try out this awesome free printable Halloween version. It’s the perfect group party game for older kids and adults with themed cards about horror movies and trick-or-treating just to name a few.


Painted Pumpkin Faces Collage

Easy Painted Pumpkin Coasters Game (DIY Adulation)

This super easy little craft doubles as a game and home decor. Grab a pack of orange coaster from the dollar store and get painting. When you’re not using them to protect your table, play a fun game of coaster toss!


Collage of halloween games with text overlay - 6 Easy and Fun Halloween Game Ideas

You’ll be ready for all of your Halloween parties with these 6 easy and fun Halloween game ideas. Make them now so you can grab and go when it’s time to play, especially if you’ve got multiple school parties lined up.

See where I’m linking up!

Don’t Forget to Pin It!

Collage of halloween games with text overlay - 6 Easy and Fun Halloween Game Ideas


More Ideas You’ll Love:

How to Make a Half Sphere Beach Ball Cake

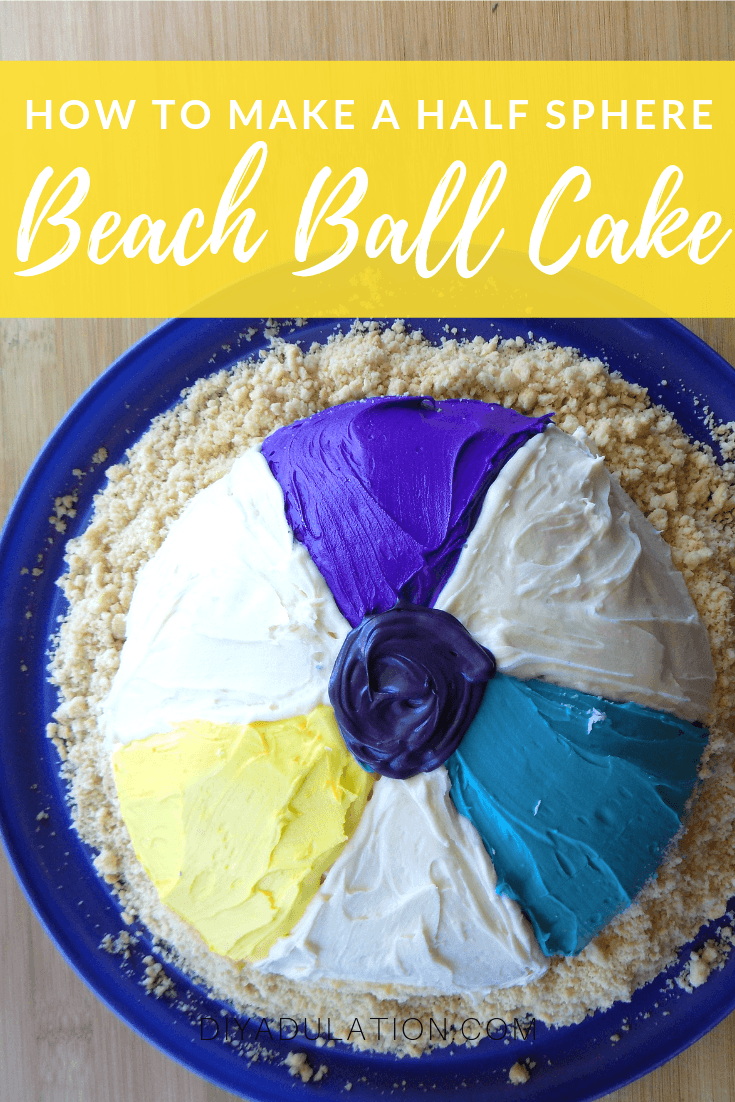
How many times have you bought the stuff to make a cake and then procrastinated about making it only to end up buying one from the store? Creating a beautiful cake seems intimidating and we put it off because of that. Guess what! It isn’t as hard as you think. Find out how to make a half sphere beach ball cake easily for your upcoming summer party with this simple tutorial.

Affiliate links may be used in this post. Ordering a product through these links may result in a commission. Read the full disclosure here.

Collage of Photos of Beach Ball Cake on Sandy Platter with text overlay - How to Make a Half Sphere Beach Ball Cake


[bctt tweet=”Creating a beautiful cake is easier than you think. Find out how to make a half sphere beach ball cake easily with this simple tutorial!” username=”diyadulation”]

Store bought cakes are delicious, don’t get me wrong. When you’re trying to save money, though, the savings of making a cake yourself is so worth it. A box cake mix and a couple of container of icing are roughly $6.00. Compare that with the $20-$30 of a store bought cake with a few plastic baubles on it. No thank you.

Last weekend was my mom’s birthday and I wanted to give her a super special cake. She loves the beach and since her birthday falls in the summer, I thought this beach ball cake would be the perfect idea. Even better, it’s super easy to make so I was able to get it made and decorated even with tiny tyrants running around my house.


Sandy Beach Ball Cake

Note:

You may need to invest in a ball cake pan but the possibilities of fun cakes you can make with it are so endless that it’s totally worth it. Don’t be fooled into thinking it always has to be a sports ball. I’ve used it to make a ball of yarn for a Lalaloopsy party and animal heads for kids parties. Seriously, it’s one of the best cake pan investments.

Beach Ball Cake Materials and Ingredients

Step 1

First, pre-heat your oven to 350° Fahrenheit and mix up your cake mix according to the package directions.

Step 2

Then spray your soccer ball pan with cooking spray and pour your mixed batter inside.

Step 3

Bake your cake at 350° Fahrenheit for 50 minutes or until cooked through. Use a toothpick in the center of the cake to check if it’s baked. If the toothpick comes out clean, your cake is done. If not, continue cooking in 2-3 minute increments until it is. Use a fresh toothpick each time you check your cake.


Soccer Ball Cake on Cooling Rack

Step 4

After the cake is baked, flip it onto a cooling rack and let cool.

Step 5

Once your cake is cooled, place it on a plate and toss in the freezer for about an hour.


Soccer Ball Cake Cut in Half

Step 6

Next, pull your cake out of the freezer and in half at the middle of the dome.


Dollop of Icing on Cake Half

Step 7

Spread a layer of icing on the bottom piece and then top with the remaining half of cake.


Icing Spread on Sphere Cake

Step 8

Then spread a layer of icing over the entire cake. This is not a crumb coat so don’t be stingy. I used an entire container of vanilla icing to completely cover the cake.

Step 9

Again, pop the iced cake back into the freezer. It it easier to layer when it’s frozen because you’re using store bought icing.

Step 10

Once the icing on your cake is frozen, pull it from the freezer and divide your 2nd container of icing in half. Reserve 1 half to keep the original color. Divide the remaining half into thirds in separate small bowls.


Close up of Gel Food Coloring

Close up of Teal Icing in Bowl

Step 11

Color one of each bowl of icing teal, violet, and yellow.

Step 12

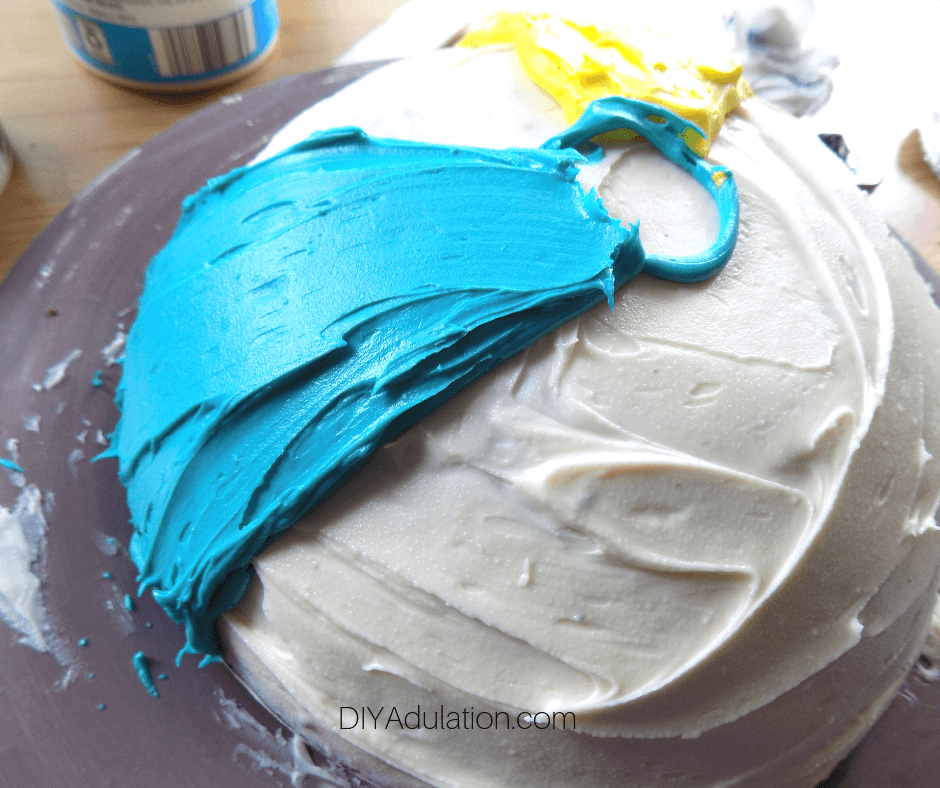
Next, add your teal icing to a small resealable sandwich bag, press out the air, and cut off the tip.


Teal Icing Piped on Cake

Step 13

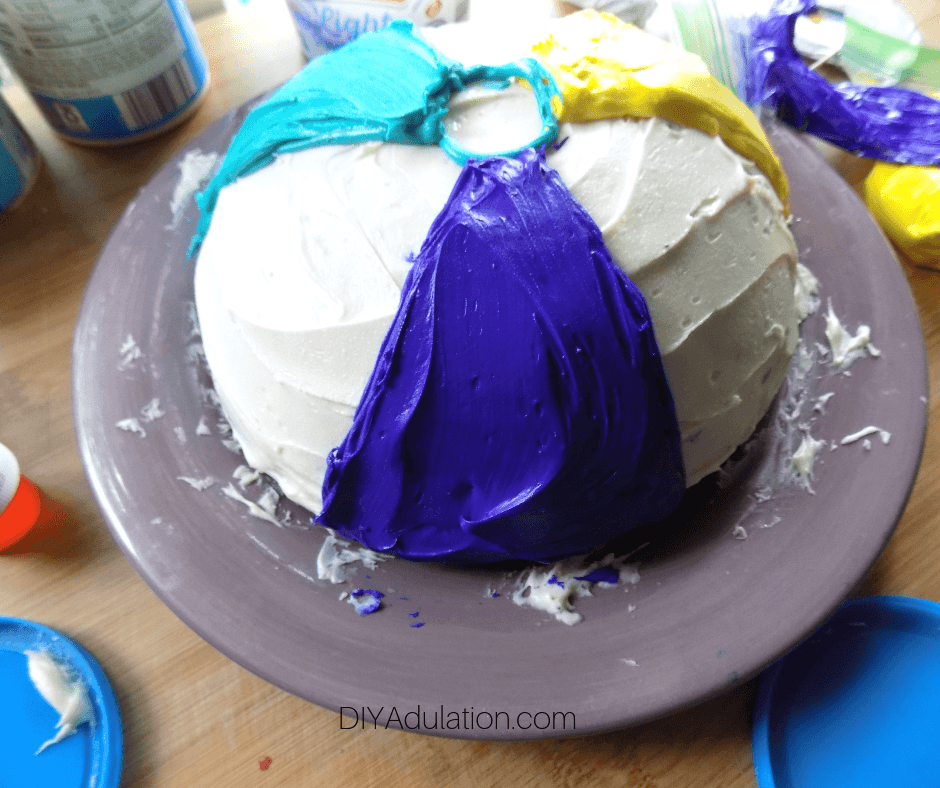
Pipe a small circle in the top center of your cake to act as a guide and then pipe one section of your beach ball teal as pictured.


Teal Icing Spread on Cake

Step 14

After you pipe on the icing, smooth and spread it with a small rubber spatula.


Purple Icing Spread on Cake

Step 15

Repeat steps 12 and 14 with your remaining 2 colors on your beach ball. Make sure to leave a white/off-white section in between each color.

Step 16

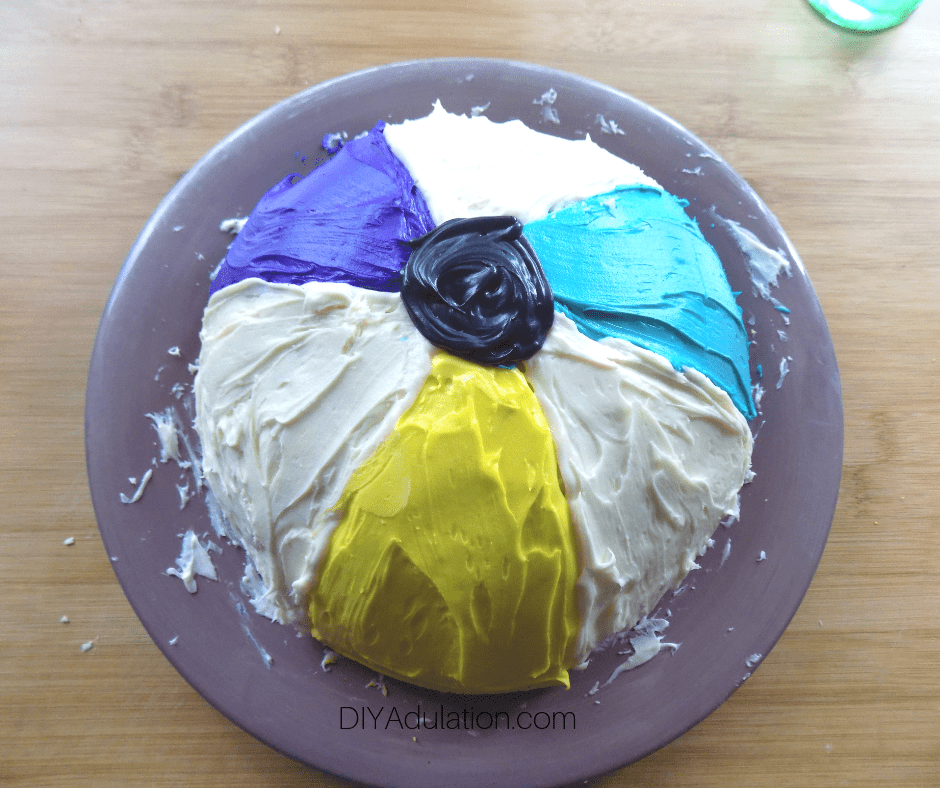
Once your colored sections are on the beach ball, fill in the remaining sections with the additional white icing (reserve 2-3 tbsp of white). Adding the colors on top of your cake makes the icing levels uneven which is why you want to fill in the white sections with additional icing.


Center of Beach Ball Iced

Step 17

Lastly, color the 2 tablespoons of icing you saved black and pipe it over the circle at the top of your beach ball.

Step 18

Again, pop your iced cake into the freezer and leave it there until you’re ready to serve or transport.


Beach Ball Cake on Platter next to Cookie Box

Step 19

Once you’re ready to serve or transport, place your frozen cake on a tray. Place a dollop of leftover icing on the tray before putting your cake on. This will help hold the cake in place.


Plastic Travel Cover on Beach Ball Cake

Side View of Plastic Travel Cover on Beach Ball Cake

Tip:


Close up of Cookies in Plastic Bag next to Meat Tenderizer

Crushed up Cookies in Plastic Bag

Step 20

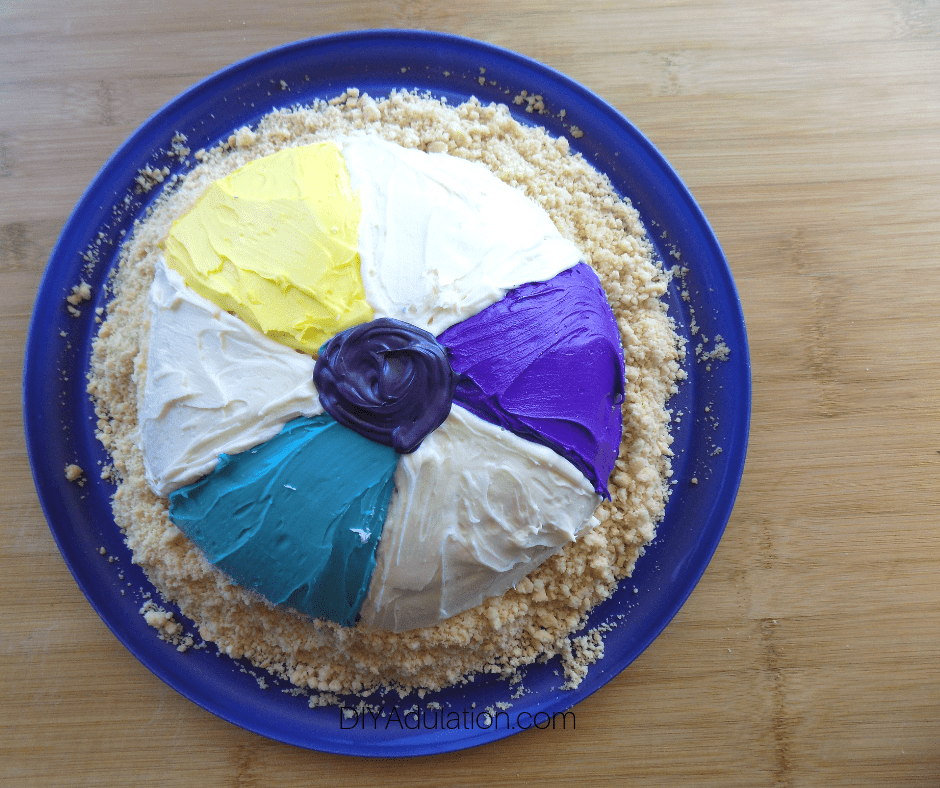
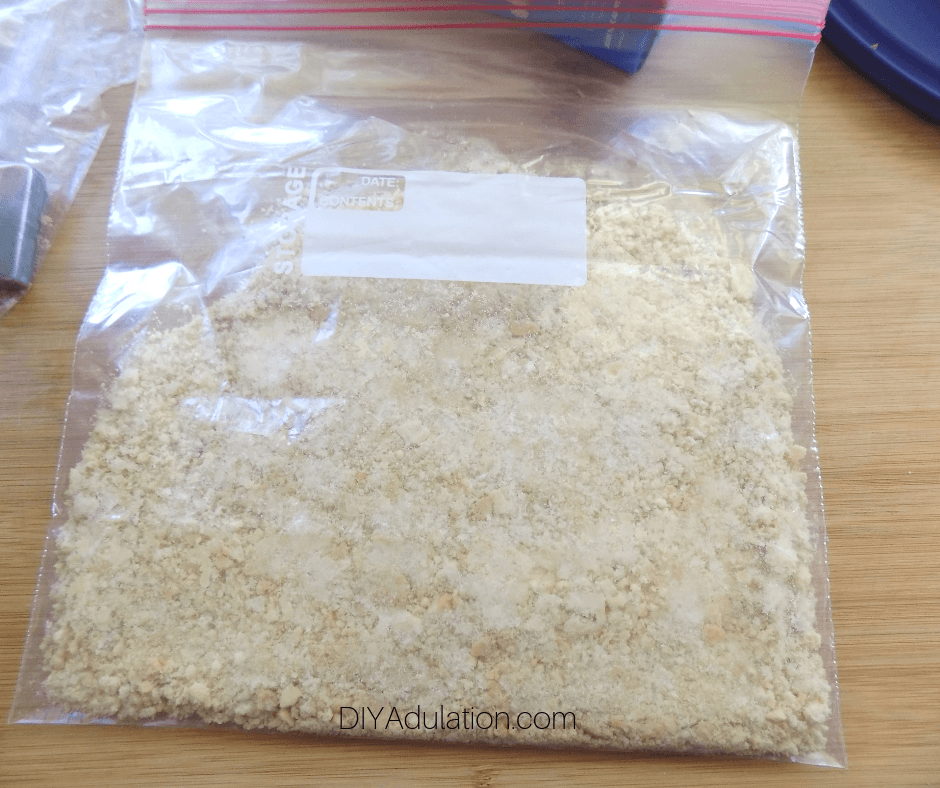
Lastly, create the sand around your beach ball cake by emptying a sleeve of shortbread cookies into a gallon sized resealable bag and crush them up with the flat side of a meat tenderizing hammer. You can also use a food processor to crumble the cookies but I really enjoy beating the cookies with a hammer. It’s cathartic.


Crushed up Cookies on Cake Platter next to Beach Ball Cake

Step 21

Spread your crushed up cookies around the edge of your cake and you’re done.


Close Up Sandy Beach Ball Cake

Beach Ball Cake on Sandy Platter with text overlay - How to Make a Half Sphere Beach Ball Cake

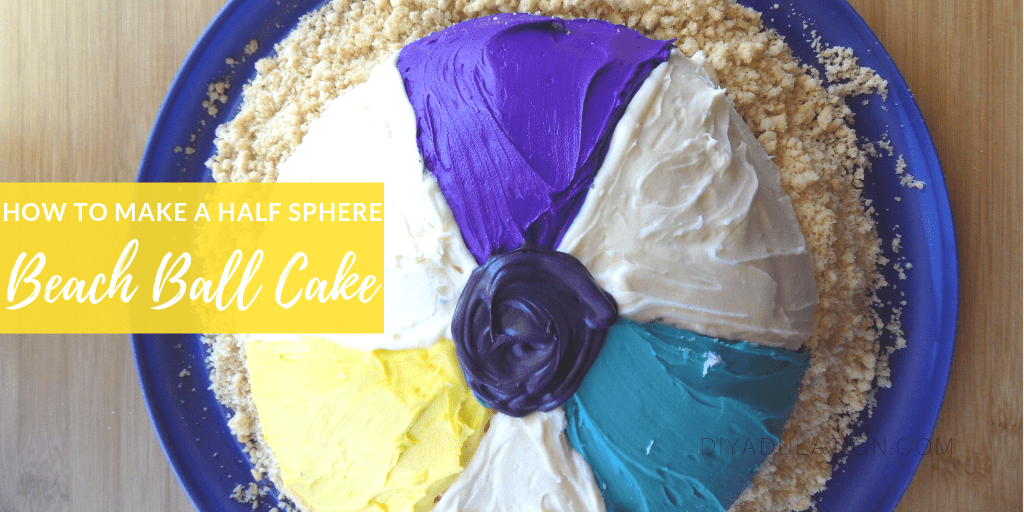
This half sphere beach ball cake is so much fun and absolutely perfect for your summer celebration. Whether you’re throwing a pool party or a summer birthday, this cake is sure to be a hit. No one has to know how totally easy it is to make.

See where I’m linking up!

Don’t Forget to Pin It!

Beach Ball Cake on Sandy Platter with text overlay - How to Make a Half Sphere Beach Ball Cake


More Ideas You’ll Love:

DIY Mini Patriotic Party Hat Headbands

The 4th of July is an awesome summer holiday that Americans look forward to celebrating every year. We also get hyper-focused on the fireworks fun and forget that there’s a whole day of sunshine (hopefully) before you get to that part. This year, don’t forget some of the smaller fun details like favors and games. These DIY mini patriotic party hat headbands are the perfect frugal place to start.

Affiliate links may be used in this post. Ordering a product through these links may result in a commission. Read the full disclosure here.

Glittery Red White and Blue Party Hat Headbands with text overlay - Festive DIY Mini Patriotic Party Hat Headbands


[bctt tweet=”Fireworks are cool and all but don’t forget about the rest of the party this 4th of July! These DIY mini patriotic party hat headbands make a festive and frugal favor for your Idependence Day Celebration!” username=”diyadulation”]


I love all things mini and that 100% includes party hats. I first fell in love with these mini party hats from the Dollar Tree when I made these adorable headbands for St. Patrick’s Day. Don’t ask me why, but it took me this long to realize that I could totally do the same thing for Independence Day!

What’s great about holidays like this is that no matter what outfit your guests are rocking, these party hats will totally match. Everyone wears red, white, and blue for the Fourth so you can have the perfect party accessory for everyone. Personally, I’m going to sporting my party hat with these rad guitar sun glasses that I also found at Dollar Tree. (Yes, I have a problem and I’ve accepted that.)


Patriotic Stars and Garland Mini Party Hat Headband

Since these are made with hot glue, you can put them together in minutes for an awesome addition to your 4th of July celebration. You also won’t mind if the kiddos end up destroying them during the fun because they’re so cheap to make. Double-score!


Patriotic Decorations and Pack of Headbands

Patriotic Party Hat Headbands Materials

*Note* I found all of my patriotic supplies at Dollar Tree.


Mini Party Hats and Headbands Removed from Packaging

Step 1

First, remove any packaging from your mini hats and headbands.


Blue Mini Party Hat next to Headband and Scissors

Step 2

Next, select one headband and one hat to start with.

Step 3

Then use your scissors and cut the stretchy band from the hat. If you cut close to the knots on either side you can slip it under the staples.


Headband Glued to Inside of Blue Mini Party Hat

Step 4

Now glue your mini party hat to your headband with hot glue so that it sits angled slightly from the center of the headband. You want the hat to sit to the left or right side of the top of your head when wearing the headband.

Tip:


Patriotic Garland Glued Around Blue Mini Party Hat

Step 5

After your hat is glued to the headband, it’s time to decorate it. Start by cutting a length of patriotic garland and gluing it around the hat as pictured.


Glitter Stars and Patriotic Garland Glued on Red Mini Party Hat

Step 6

Then choose a large and a small glittery foam stars and glue them to the the front of the hat on top of the garland. Start by gluing the largest star on first and then gluing the smaller one so that it slightly overlaps the larger one.

Note:

Step 7

Lastly, repeat steps 2 through 6 to create your remaining party hat headbands. The materials above make at least 6 party hat headbands if you get a second 3-pack of headbands (or have 6 already laying around).


Glittery Red White and Blue Party Hat with text overlay - Festive DIY Mini Patriotic Party Hat Headbands

How cool and festive are these DIY mini patriotic party hat headbands?! I know the Fourth is still a few weeks away but I’ve already been wearing mine around the house. Yes, I look as crazy (and totally awesome) as you’re picturing. I’d love to see you and your family rocking these babies on Independence Day. Tag me @diyadulation on Instagram and let me see it. Don’t worry. I’ll share us wearing ours that day too, along with a reminder to let me see yours!

See where I’m linking up!

Don’t Forget to Pin It!

Glittery Red White and Blue Party Hat with text overlay - Festive DIY Mini Patriotic Party Hat Headbands


More Ideas You’ll Love: