Rainbow DIY Flower Mirrors Wall Art

It’s time to finally tackle those boring walls in your kid’s room without spending a fortune on wall art. Instead, head to your local Dollar Tree and grab the materials to make these awesome and bright rainbow DIY flower mirrors!

Affiliate links may be used in this post. Ordering a product through these links may result in a commission. Read the full disclosure here.

Collage of Rainbow Flower Mirrors on Bright Backgrounds with text overlay - Rainbow DIY Flower Mirrors Wall Art


[bctt tweet=”No more boring walls! Find out how to create fun and colorful wall accessories on a budget with this rainbow DIY flower mirrors wall art tutorial!” username=”diyadulation”]


My daughter is starting to get bored with her walls, so much so that she’s started hanging some weird things on it. As “pretty” as that juice bottle label is, I figured it was time to give her some unique wall art that didn’t come from a beverage or the million other strange places she’s finding her decorations.

Recently I saw these flat wooden flowers at our Dollar Tree and boom! Awesome wall decor idea. Since the centers of the flowers were empty, I wanted to add a little something more. You can always find small mirrors at the Dollar Tree because of the popularity for weddings and other events so I grabbed a few of those to add that missing element.


Close Up of Rainbow Flower Mirror

All that is left to make some fun and colorful pieces of wall art are some paint and Modge Podge. Within a day you have awesome new pieces of decor to replace that craziness happening on my daughter’s walls.


DIY Flower Mirrors Materials

Rainbow Flower Mirrors Materials

Step 1

First, remove any packaging and labels from your wooden flowers.


Orange Painted Petal on Wooden Flower

Step 2

Then begin painting your flower petals starting with your orange paint. Pretend there are invisible lines running down the petal indentations while painting. This helps you separate the petals.


Wooden Flower with Orange and Yellow Painted Petals next to Paint Pallet

Step 3

Next, paint the yellow petal on your wooden flower. It should be the petal to the right of your orange flower petal.


Wooden Flower with Rainbow Painted Petals next to Paint Pallet

Step 4

Continue painting the petals of your flower in the order pictured above (orange, yellow, green, blue, purple, and pink).


Painted Rainbow Flower Drying

Step 5

After your flower is painted, set it aside and allow the paint to dry.


Rainbow Flower with Coat of Mod Podge

Step 6

Once your paint is dry, coat your entire painted flower in a layer of Mod Podge and allow it to dry.


Rainbow Flower next to Upside Down Mirror

Step 7

Next, remove the foam feet from the bottom of your mirror. Then adhere the mirror to the center of the dry rainbow flower with E6000.


Mirror Glued to Rainbow Flower

Step 8

Allow your glue to dry 24 hours before hanging your flower mirror.

Repeat these steps to make as many flower mirrors as you need. I only made 2 but I totally want to head back to the Dollar Tree to grab the materials to make a few more. My daughter loves them for her room!


Flower Mirrors on Pink Background with text overlay - Rainbow DIY Flower Mirrors Wall Art

These rainbow DIY flower mirrors are the perfect easy wall decor for a kids room or a play room. Of course, if you’re like me, they also look great in the living room to brighten it up. Instead of messing around with adding a hanger to the back of the flower, use a Command Picture Strip to hang them on the wall. The small size work fine because these aren’t very heavy even with the mirror attached. Clean them as needed with a slightly damp cloth and you’re good to go!

See where I’m linking up!

Don’t Forget to Pin It!

Flower Mirrors on Pink Background with text overlay - Rainbow DIY Flower Mirrors Wall Art


More Ideas You’ll Love:


Make Chores Easy with a Picture Chore Chart

Are you looking for a way to streamline the chores and routine process for your kids without constant nagging from you? Now you can make chores easy with a picture chore chart. It is perfect for non-readers, visual learners, and kiddos who are just lazy and don’t want to read each task.

Affiliate links may be used in this post. Ordering a product through these links may result in a commission. Read the full disclosure here.

Collage of Chore Charts with text overlay - Make Chores Easy with a Picture Chore Chart


[bctt tweet=”Struggling to get your kiddos to complete their chores and routines each day without frustration? Now you can make chores easy with a picture chore chart!” username=”diyadulation”]

I’ve had a ton of chore charts over the years. My oldest has always been really good about following them so I assumed the same method would work for my youngest kiddos. For many years I kept trying the same thing hoping for different results. Then I’d get frustrated at constantly having to remind and nag them about completing their chores and routines.

All it led to was a houseful of frustrated people and nothing getting done. Then one day it hit me how ridiculous I was being. I expected a one-size-fits-all learning and responsibility style of all of my kids. These picture chore charts change it up and make it simple for even my 5 year old to know exactly what is expected of him.

Every morning, they go through their routine and move the chores/activities over as they complete them. During the school year, they check them again after school and once again after dinner. During the summer, I structure the checks around meals because it’s the easiest to remember. Before bed each night, reset the chore charts so that they are ready the next morning.

Picture Chore Chart Printables with text overlay - Grab Your Free Chore Charts


Picture Chore Chart Materials
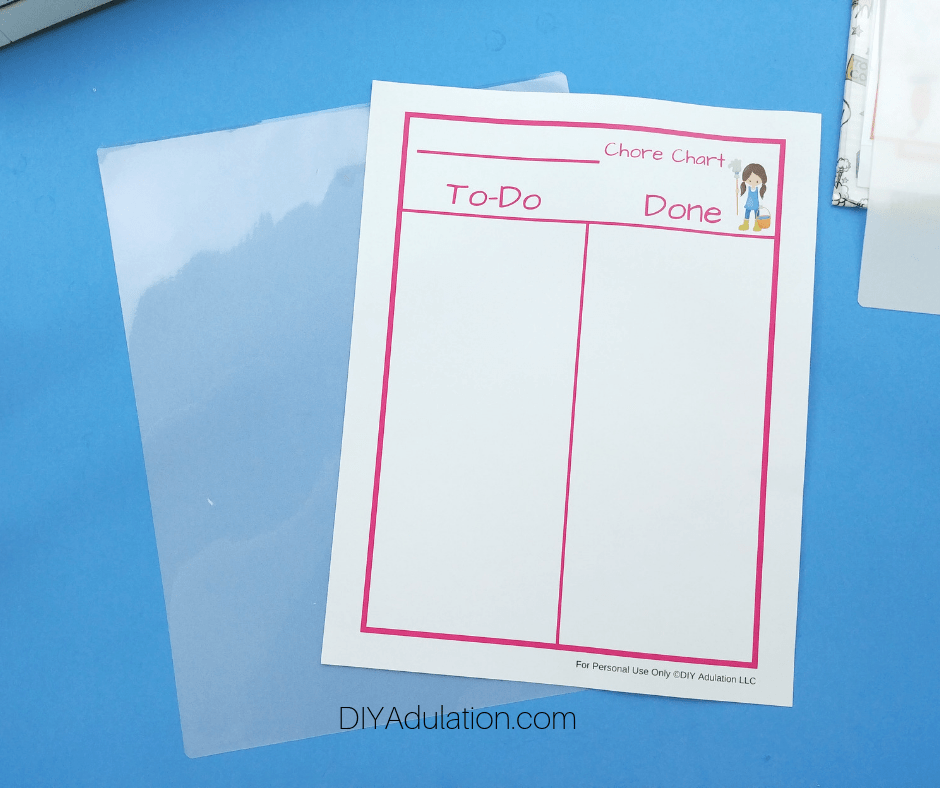
 

Printed Pink Chore Chart Next to Laminating Folder

Step 1

First, print out your chore chart. Get it free when you sign up right here:
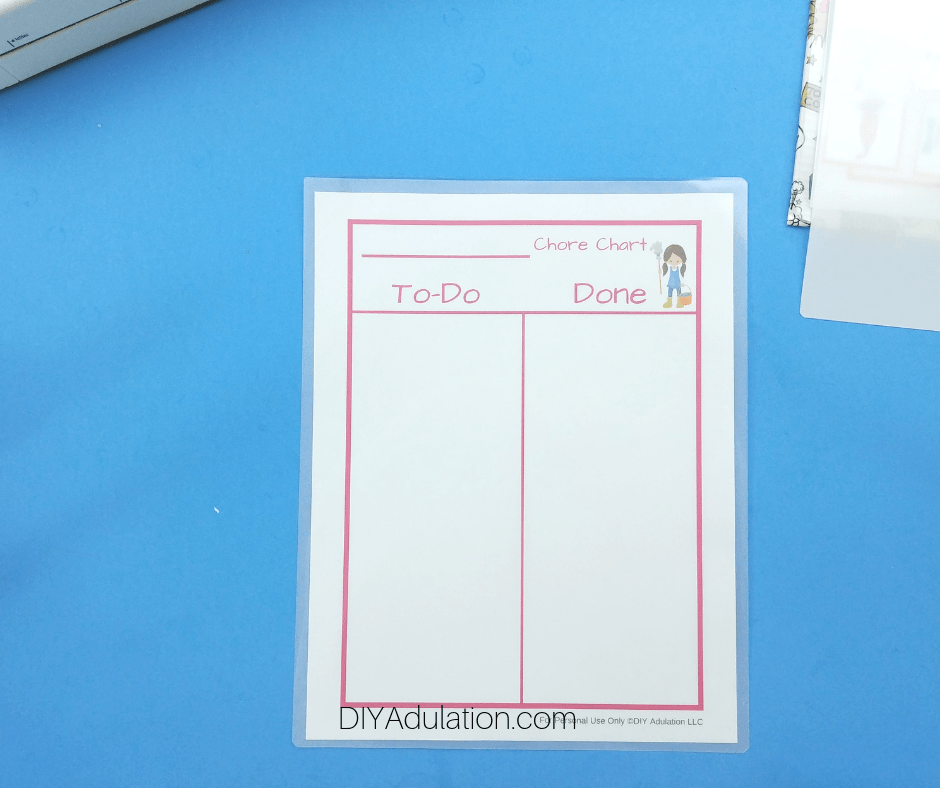
Printed Pink Chore Chart Inside of Laminating Folder

Feeding Pink Chore Chart into Laminator

Step 2

Next, place your chore chart into a lamination folder and feed it into your laminator.


Printed Sheet of Chore Squares

Step 3

Set your laminated chore chart aside and pull out the chore squares.


Cut Out Chore Squares

Step 4

Cut all of the chore squares apart, including the blank ones. You can laminate these blank to update with a dry erase as needed, or your can personalize them with pictures of your own for any chores and activities not included in the picture chore squares.


Cut Out Chore Squares Placed on Laminating Folder

Step 5

After all of your squares are cut out, open up a lamination folder and carefully align them on the sheet. Be sure to include space between each one so that they remain sealed when you cut them out later.


Step 6

Again, feed the sheet through your laminator but do so very carefully. Until they are laminated, the squares can shift inside the folder.


Cutting Laminated Chore Squares

Cut Out Laminated Chore Squares

Step 7

Next, cut out your laminated chore squares with a paper cutter or scissors. If your rows are not very straight, I recommend using scissors so that you don’t accidentally slice through one that isn’t in line with the others.


Package of Hook and Loop Fastener Dots

Step 8

After all of your laminated chore squares are cut apart, pull out your package of adhesive hook and loop fastener dots.
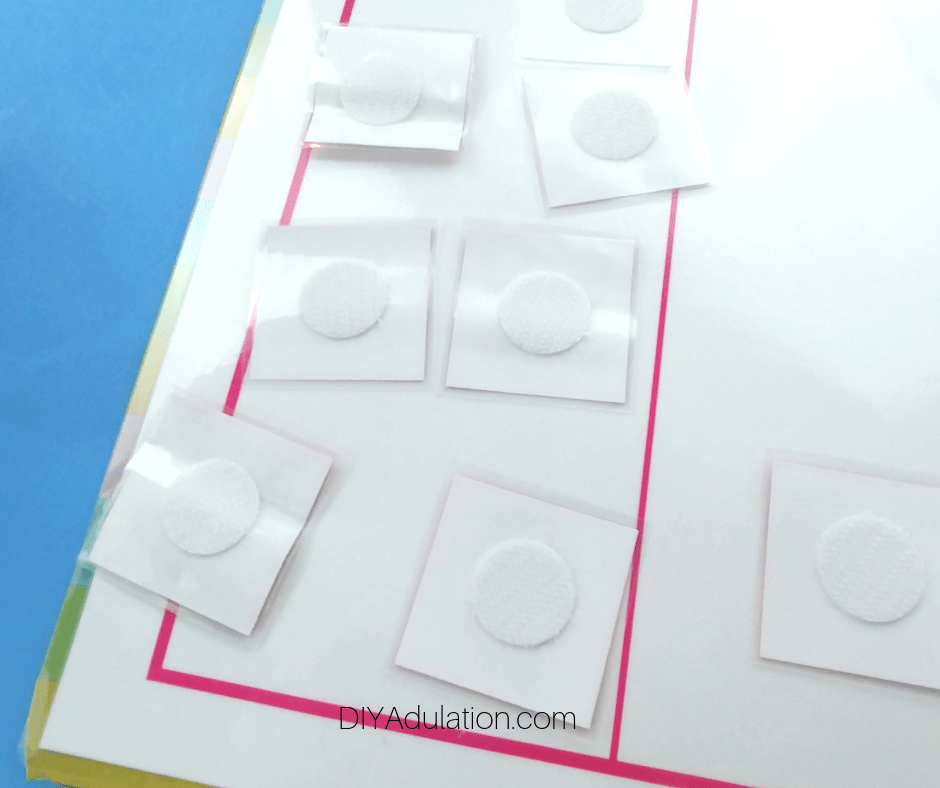
 

Hook and Loop Fastener Dots on Back of Chore Squares

Step 9

Place one loop dot (the soft ones) on the back of each laminated chore square that you are adding to your chore chart.


2 Hook and Loop Fastener Dots on Back of Each Chore Squares

Step 10

Then attach the hook dots to 10 of the soft ones carefully so that they are stacked with the sticky side facing out.


Chore Squares on Laminated Chore Chart

Step 11

Place the chore squares on the “To-Do” side of the laminated chore chart lined up so that you have to columns of 5. Carefully pull off the chore squares so that the hook dots stay attached to the chore chart. Press firmly back over the hook dots to further secure them to the chart.
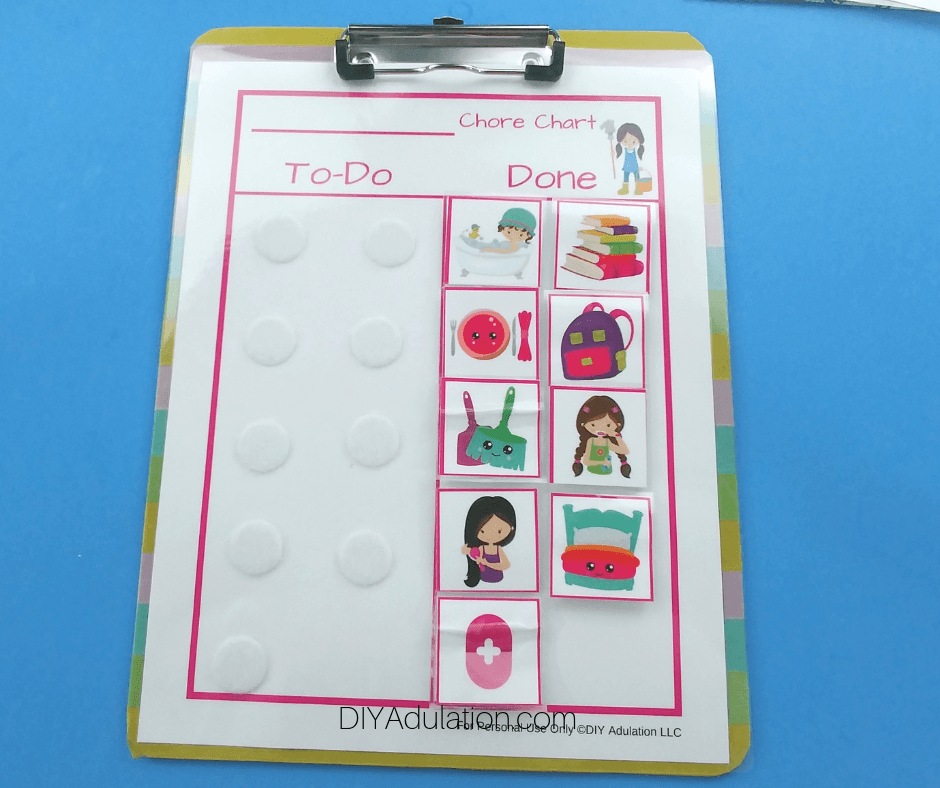
 

Hook and Loop Fasteners Attached to Chore Chart

Step 12

Repeat steps 10 and 11 on the “Done” side of the chore chart.

Step 13

Keep seasonal chores/activities such as sports or practicing an instrument in a resealable bag taped to the bottom of the clipboard.


Plain Clipboard next to Rolls of Washi Tape

Step 14

Set your chore chart and chore squares to the side and pull out your clipboard and washi tape.


Colorful Striped Clipboard

Close up of Striped Clipboard

Step 15

Remove any packaging from your clipboard and use the washi tape to create a design on the clipboard. I went with colorful stripes for my daughter’s clipboard but used comic book patterned duct tape on my son’s clipboard. Kids are more responsive to a new system when you customize it to their tastes.


Pink Chore Chart and Chores on Clipboard

Step 16

Lastly, clip your chore chart on the clipboard and attach the chore squares to the “To-Do” side. Write your child’s name with a dry erase marker on the top of the chore chart.


Picture Chore Chart Printables with text overlay - Grab Your Free Chore Charts

How to Hang Your Chore Chart

Most clipboards lend themselves to being hung on hooks, nails, or push pins easily. If you have these already available, simply use them. If you worry about kiddos taking the chore charts off of the wall then I recommend using Command picture strips to hang them on the wall. This still gives kids access to the chore charts without fear that they’ll run off and lose them.


Pink Laminated Chore Chart on Clipboard with text overlay - Make Chores Easy with a Picture Chore Chart

If you’ve been struggling to get your kiddos to complete their chores and routines each day without frustration, then give these a try. You can make chores easy with a picture chore chart that can be customized by child and also by season. Don’t forget to incorporate resetting them each evening into your bedtime routine. Click here to get access to the free printable chore charts and chore squares. There are 2 colors sets available: pink and purple or orange and blue. Don’t worry, you’ll get both so you can make charts for all of your kiddos.

See where I’m linking up!

Don’t Forget to Pin It!

Pink Laminated Chore Chart on Clipboard with text overlay - Make Chores Easy with a Picture Chore Chart


More Ideas You’ll Love:

DIY Mini Patriotic Party Hat Headbands

The 4th of July is an awesome summer holiday that Americans look forward to celebrating every year. We also get hyper-focused on the fireworks fun and forget that there’s a whole day of sunshine (hopefully) before you get to that part. This year, don’t forget some of the smaller fun details like favors and games. These DIY mini patriotic party hat headbands are the perfect frugal place to start.

Affiliate links may be used in this post. Ordering a product through these links may result in a commission. Read the full disclosure here.

Glittery Red White and Blue Party Hat Headbands with text overlay - Festive DIY Mini Patriotic Party Hat Headbands


[bctt tweet=”Fireworks are cool and all but don’t forget about the rest of the party this 4th of July! These DIY mini patriotic party hat headbands make a festive and frugal favor for your Idependence Day Celebration!” username=”diyadulation”]


I love all things mini and that 100% includes party hats. I first fell in love with these mini party hats from the Dollar Tree when I made these adorable headbands for St. Patrick’s Day. Don’t ask me why, but it took me this long to realize that I could totally do the same thing for Independence Day!

What’s great about holidays like this is that no matter what outfit your guests are rocking, these party hats will totally match. Everyone wears red, white, and blue for the Fourth so you can have the perfect party accessory for everyone. Personally, I’m going to sporting my party hat with these rad guitar sun glasses that I also found at Dollar Tree. (Yes, I have a problem and I’ve accepted that.)


Patriotic Stars and Garland Mini Party Hat Headband

Since these are made with hot glue, you can put them together in minutes for an awesome addition to your 4th of July celebration. You also won’t mind if the kiddos end up destroying them during the fun because they’re so cheap to make. Double-score!


Patriotic Decorations and Pack of Headbands

Patriotic Party Hat Headbands Materials

*Note* I found all of my patriotic supplies at Dollar Tree.


Mini Party Hats and Headbands Removed from Packaging

Step 1

First, remove any packaging from your mini hats and headbands.


Blue Mini Party Hat next to Headband and Scissors

Step 2

Next, select one headband and one hat to start with.

Step 3

Then use your scissors and cut the stretchy band from the hat. If you cut close to the knots on either side you can slip it under the staples.


Headband Glued to Inside of Blue Mini Party Hat

Step 4

Now glue your mini party hat to your headband with hot glue so that it sits angled slightly from the center of the headband. You want the hat to sit to the left or right side of the top of your head when wearing the headband.

Tip:


Patriotic Garland Glued Around Blue Mini Party Hat

Step 5

After your hat is glued to the headband, it’s time to decorate it. Start by cutting a length of patriotic garland and gluing it around the hat as pictured.


Glitter Stars and Patriotic Garland Glued on Red Mini Party Hat

Step 6

Then choose a large and a small glittery foam stars and glue them to the the front of the hat on top of the garland. Start by gluing the largest star on first and then gluing the smaller one so that it slightly overlaps the larger one.

Note:

Step 7

Lastly, repeat steps 2 through 6 to create your remaining party hat headbands. The materials above make at least 6 party hat headbands if you get a second 3-pack of headbands (or have 6 already laying around).


Glittery Red White and Blue Party Hat with text overlay - Festive DIY Mini Patriotic Party Hat Headbands

How cool and festive are these DIY mini patriotic party hat headbands?! I know the Fourth is still a few weeks away but I’ve already been wearing mine around the house. Yes, I look as crazy (and totally awesome) as you’re picturing. I’d love to see you and your family rocking these babies on Independence Day. Tag me @diyadulation on Instagram and let me see it. Don’t worry. I’ll share us wearing ours that day too, along with a reminder to let me see yours!

See where I’m linking up!

Don’t Forget to Pin It!

Glittery Red White and Blue Party Hat with text overlay - Festive DIY Mini Patriotic Party Hat Headbands


More Ideas You’ll Love: