DIY Eclectic Glass Bead Necklace with Owl Pendant

Long necklaces are a fantastic accessory. They can be layered with matching pieces for an instant outfit update. That also makes the the perfect statement piece which is definitely what this DIY eclectic glass bead necklace with owl pendant is!

Affiliate links may be used in this post. Ordering a product through these links may result in a commission at no extra cost to you. Read the full disclosure here.

Collage of Photos of Owl Pendant on Beaded Necklace with text overlay: DIY Eclectic Glass Bead Necklace with Owl Pendant


[bctt tweet=”This DIY eclectic glass bead necklace with owl pendant is the perfect statement piece for your quirky, casual weekend style! Find out how to make it now!” username=”diyadulation”]

I am a huge proponent of embracing your weird. That’s why I love choosing clothes and accessories that have a touch of flair to them. From my floral TARDIS sleeveless top to my favorite peacock bracelet, my style is definitely a little quirky but in a subtle way. (For example, I have a Hello Kitty dress where she is literally the design in the lace but it isn’t instantly noticeable.)

If this sounds like your style, or you’re brave enough to step outside of your comfort zone, you definitely need to make this awesome necklace. Wear it with a plain colored tee-shirt and a funky skirt for the perfect casual weekend outfit.


Close up of Owl Pendant on Necklace

Materials


Assortment of Glass Beads Next to Owl Bead

Step 1

First choose 14 pairs of beads that roughly match. The pairs don’t have to be exact matches. Keep the colors and sizes similar and that’s enough.


Owl Bead with Long Eye Pin Through It

Step 2

Next, thread the long eye pin through the hole in your large owl bead.

Note:


Owl Bead with Loop at the Top

Step 3

Then, use the round nose pliers to twist the end on the long eye pin into a double loop.


Assortment of Glass Beads Next with Cut Brown Cording

Step 4

Now, cut a length of cording that is roughly 24 inches long.


Owl Bead on Brown Cord

Step 5

Thread your owl bead onto the cording and slide it to the center.


Owl Bead on Brown Cord with Knots

Step 6

Add a knot on either side of your owl so that you have a 1 inch gap between the knots.


Owl Pendant and Yellow Beads on Brown Cord

Close Up of Beads on Brown Cording

Close Up of Knot Next to Beads on Brown Cording

Step 7

Then begin threading on your beads, one pair at a time. Alternate between colors and sizes for visual interest in your necklace.

Step 8

After you finish threading your beads, tie a knot taught the end of the last bead on each side of your necklace.


Jump Ring Tied to Brown Cording

Close Up of Jump Ring Tied to Brown Cording

Step 9

Next, measure another 4-6 inches from the last bead on one side of your necklace (depending on how low you want your necklace to hang) and tie your jump ring to the necklace.


Close Up of Jump Ring and Lobster Clasp Tied to Brown Cording

Step 10

Repeat step 9 on the opposite side of your necklace with the lobster clasp.


Clasped End of Beaded Necklace

Step 11

Lastly, trim the excess cording from your necklace by the jump ring and the lobster clasp.


Owl Pendant on Beaded Necklace with text overlay: DIY Eclectic Glass Bead Necklace with Owl Pendant

As I said above, I originally made this necklace with pink and I hated it mixed with the yellow beads. Since I couldn’t remove those, the pendant had to get switched. I definitely want to make another one of these DIY eclectic glass bead necklace with owl pendant in pinks and blues so that I can use the awesome hot pink owl you see above. Feel free to customize it to your own favorite colors. Simply make sure your glass beads coordinate with the pendant and you’re good to go.

See where I’m linking up!

Don’t Forget to Pin It!

Collage of Photos of Owl Pendant on Beaded Necklace with text overlay: DIY Eclectic Glass Bead Necklace with Owl Pendant


More Ideas You’ll Love:

Nature Inspired DIY Decor Projects for Fall

The natural beauty of fall is undeniable, especially in the Midwest. Everything takes on gorgeous earthy tones that invoke feelings of peace. Now, you can add some of that serenity into your autumn decor with these nature inspired DIY decor projects for fall.

Collage of Nature Decor Ideas with text overlay: Nature Inspired DIY Decor Projects for Fall

The beauty of autumn always inspires reflection in me. Lately, I’ve have been craving serenity and simplicity in our lives. Somewhere along the journey, we got caught up in chaos and the bustle of the day-to-day.

This fall I’m changing that. I want us to make a conscious effort to slow down and enjoy simpler things like time with each other and nature. We’re too plugged in. What’s funnier is that we have all of this stuff taking up space in our home that we don’t even use.

[bctt tweet=”Are you up for the challenge to slow down and truly connect this season? Use these nature inspired DIY decor projects for fall as gorgeous daily reminders.” username=”diyadulation”]

These nature inspired DIY decor projects for fall are going to be a front and center reminder of what I’m striving for this fall. Natural beauty, enjoying moments instead of stuff, and growing together as a family.

If that sounds like something your home and family could use too, join me. Make a few of these awesome decor pieces as a beautiful reminder to slow down this season.


Birch bark candle with acorns

DIY Birch Bark Candle Holder (H2O Bungalow)

This candle holder is beautiful, partially because she uses real birch bark to make it! You can totally make it with faux birch bark instead but she has awesome tips to make working with the real thing a breeze.


Natural autumn vignette with teal pumpkin

Fall Decor using Cotton Stems and Birch Bark (Faeries and Fauna)

Everything about this gorgeous decor is calming and peaceful. The natural colors with specks of dark brown thrown in help you create a beautiful neutral vignette that embodies exactly what you’re striving for this season.


Bowl of brussel sprouts next to books and artichokes

Get Ready for Fall Decorating (Cedar Hill Farmhouse)

While this one isn’t a tutorial, it is still inspiring to see how she incorporates fresh fruits and vegetables into her fall decor. It is such a simple and budget-friendly way to make your home gorgeous for autumn.


Grapevine wreath with pumpkins, cotton, and ribbon

Plaid Fabric Pumpkin Wreath (Curly Crafty Mom)

This wreath a absolutely beautiful with a capital B. It is the perfect example that sometimes less is more. She allows the beauty of the grapevine wreath to shine through and compliment the pumpkins and cotton stems.


Sheaf of wheat with ribbons and gourds on a black door

Fall Wheat Wreath (Across the Blvd.)

It doesn’t get much more back to nature than this fall wheat wreath. From the long shafts of wheat to the burlap ribbon she uses, it will transport you to serenity every time it welcomes you home.


Fall leaf glass display on table

Simple Fall Leaf Glass Display (Kreativ K)

I love that she uses browned leaves in this creative display. Too often we get caught up in the “pretty colors” like red, orange, and yellow. I’m guilty of it too. This easy project proves that nature is always beautiful.


Small mirror next to candle and bird decoration

Give A Mirror A Natural Look With Pine Cones (Shoppe No. 5)

Continue showing that beautiful autumn brown some love with this wonderful mirror makeover. It’s hard to believe that something so gorgeous can come from pine cones! You can use the same technique on any frame as well to create a piece for your home that is truly one of a kind.


Wooden stick hello fall wreath hanging on door

Hello Fall Harvest Wreath + FREE Printable (Made in a Day)

Do you have some sticks laying around your yard? Turn them into the perfect fall wreath with this tutorial. It is warm and inviting which is exactly what this season calls for.


Collage of Nature Decor Ideas with text overlay: Nature Inspired DIY Decor Projects for Fall

Are you up for the challenge to slow down and truly connect this season? Purposefully unplug as a family so that you can rediscover what matters to you and deepen your love and understanding of each other. If so, then place these nature inspired DIY decor projects for fall around your home as gorgeous reminders of your goal.

Don’t forget to check out this week’s Merry Monday link party below for even more inspiration and natural fall decor. Be sure to share your own projects and tips with us as well!

Don’t Forget to Pin It!

Collage of Nature Decor Ideas with text overlay: Nature Inspired DIY Decor Projects for Fall

How to Turn Birthday Cards into Picture Frames

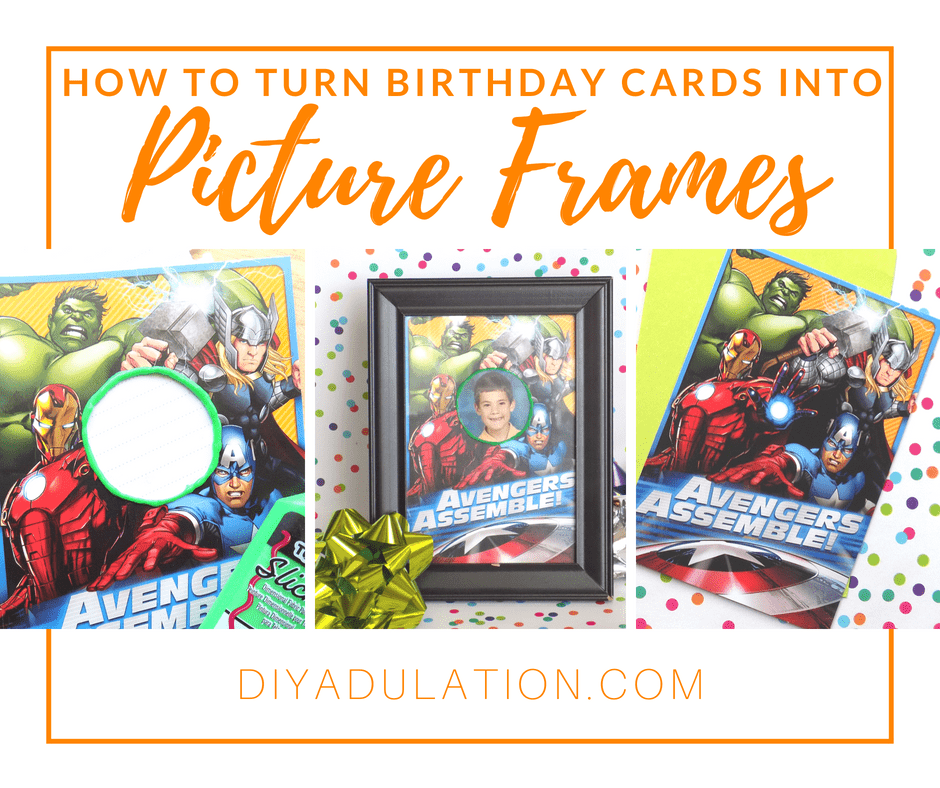
It happens every year. You invite friends and family to celebrate your kiddo’s birthday and after everything is said and done, you have a pile of thoughtful birthday cards that your child has already forgotten. You don’t want to toss them but you also don’t feel like storing them in a box for years to come. Find out how to turn birthday cards into picture frames that capture your child’s birthday and become a fun piece of decor for your home.

I was compensated by Dollar Tree for this post. This post also contains affiliate links and I will be compensated if you make a purchase after clicking on my links. Read the full disclosure here.

Collage of Photos of Avengers Birthday Card Photo Frame inside of Frame Next to Gift Bows with text overlay: How to Turn Birthday Cards into Picture Frames


[bctt tweet=”Do you have a stack of birthday cards you feel too guilty to throw out? Find out how to turn birthday cards into picture frames that you’ll want to keep! #ad” username=”diyadulation”]

Let’s face it, when you spend your hard earned money on something, you don’t really want to think about it being carelessly tossed away. Too often this happens with birthday cards.

That’s why I’m so excited about Dollar Tree carrying Expressions from Hallmark for $1 each and Heartline from Hallmark for 2 for $1! Seriously, I am a bit of a Dollar Tree addict. If I can get it at my local store, I probably am.


Kindness is Rare Card on Polka Dot Background

Layered Robot Birthday Card on Polka Dot Background

Birthday Cards and Envelopes on Polka Dot Background

Expressions and Heartline Cards by Hallmark

These new cards, available starting today, are absolutely gorgeous and available for a multitude of occasions all without breaking the bank. Even better, they are high quality and sturdy. Some even come with my personal favorite embellishment: glitter!!


Ariel and Avengers Birthday Cards on Polka Dot Background

You can also find them with your kid’s favorite characters on them. It makes them the perfect budget-friendly option for all of those birthday parties you get invited to during the school year.


Elephant Card on Polka Dot Background

When you aren’t blowing your budget on cards, it makes it so much easier when you think about them getting tossed or shoved in a drawer somewhere. Of course, you can prevent that in your own house now. Keep reading to find out how how to turn birthday cards into picture frames with this easy tutorial.

Materials

Step 1

First, determine where you want your photo to show on your card front.


Close Up of Circle Drawn on Avengers Card

Step 2

Then trace a circle in that spot in pencil on the front of the card.


Close Up of Circle Drawn on Avengers Card with Hole in the Middle

Step 3

Next, punch a hole in the center of the circle with your awl.


Circle Cut Out of Avengers Card

Step 4

After you punch your circle, carefully wedge your scissors in the hole and cut out your traced circle.

Note:


School Pictures of Little Boy

Step 5

Then, test your photo behind your cutout to ensure that the opening is sufficient. If not, trim it as needed.


Avengers Card with Circle Cut Out on Scrap Paper

Step 6

Remove your photo and place your card open, with the inside facing down, on a scrap piece of paper.

Tip:


Avengers Card with Green Puff Paint Next to It

Step 7

Now, add a line of puff paint around the edge of your cut out area to create a “frame”.


Painted Avengers Card on Red Serving Tray

Step 8

Carefully lift your painted card from the scrap paper and set the opening over a can or bowl to dry.

Note:


Scrap Paper with Green Painted Ring on It

Note:


Photo Taped Inside of Birthday Card

Step 9

After your paint is dry, center your photo in the cutout opening and tape into place.


Avengers Card Photo Frame next to Glue Runner

Step 10

Then use your glue runner to attach the inside of the card together.


Avengers Birthday Card Photo Frame inside of Frame

Step 11 (Optional)

Lastly, place your card in a picture frame and hang it on the wall.


Avengers Birthday Card Photo Frame inside of Frame Next to Gift Bows with text overlay: How to Turn Birthday Cards into Picture Frames

Now that you know how to turn birthday cards into picture frames, you can feel better about that stack of cards after every birthday party. Now that you can get amazing, high quality Expressions and Heartline Hallmark cards from Dollar Tree, you can feel good about your budget. It’s a win-win!

Check out the amazing designs now on the Dollar Tree Website and let me know which is your favorite in the comments! (If you can pick just one, that is. I certainly can’t.)

See where I’m linking up!

Don’t Forget to Pin It!

Collage of Photos of Avengers Birthday Card Photo Frame inside of Frame Next to Gift Bows with text overlay: How to Turn Birthday Cards into Picture Frames


More Dollar Tree Ideas You’ll Love: