Hello Kitty Sugar Cookies with a DIY Cookie Cutter

Can you believe tomorrow is the last day of the 4th annual 12 Days of Christmas Blog Hop? Of course, you can’t have a Christmas blog hop without sharing delicious treats and that’s what we’re doing today. Find out how to make these colorful Hello Kitty Sugar cookies with a DIY cookie cutter!

Collage of Hello Kitty Sugar Cookies with text overlay - Hello Kitty Sugar Cookie and DIY Cookie Cutter

Welcome to Day 10 of the Fourth Annual 12 Days of Christmas Series!

DIY Christmas Ideas and Recipes you can use this year! DIY Christmas Decor and Games Ideas #12daysofChristmas

We have teamed up with 50 plus bloggers to bring you a oodles of DIY Ideas and Recipes to make your holiday season merrier. There are 12 different posts in the series and we have spread them out over a four week period with three posts per week. Now is the time to subscribe!

GO HERE for the complete list of Dates and Topics plus a collection of most popular holiday ideas including ornaments, games, recipes and more from all 50 plus talented bloggers!

It’s Day 11 and we have been in the kitchen making something sweet to share!


Hello Kitty Sugar Cookies

I absolutely love Hello Kitty (which you may have deduced from my candy tree ornament). I’m one of those nerds that actually contemplated traveling across the country to check out the themed food truck that hit California.

It’s ridiculous how cute she is and clearly I’m not the only one because of the sheer amount of Hello Kitty stuff you can find. That’s great news for you, though, because that makes the DIY cookie cutter for this a lot easier to make.

Find a book, scrapbook paper, or some other flat surface with a large Hello Kitty picture and you’re set. If you don’t have one, check your kids’ stuff. 

Close Up of Hello Kitty Sugar Cookies

Materials and Ingredients

Hello Kitty Book with Embellishments

Step 1

First, find a large Hello Kitty picture. I used a fun book I received for my birthday this year.

Large Piece of Foil next to Scissors and Foil Box

Step 2

Next, cut a large piece of foil from the roll.

Folded Piece of Foil next to Hello Kitty Book

Step 3

Now fold your piece of foil accordion style so that it is roughly 1.5-2 inches thick.

Folded Piece of Foil next to Book

Step 4

 Then fold your foil strip in half long-ways.

Foil Molded Around Picture of Hello Kitty
Close Up of Molded Foil

Step 5

After you have folded your foil, loosely form around your Hello Kitty picture and tuck the overlap of foil.

Close Up of Tape on Molded Foil

Step 6

Once you’ve measured, tape the overlap to secure it in place.

Taped Foil Molded Around Hello Kitty Picture

Step 7

Finally, firmly form your cookie cutter to the Hello Kitty picture.

Step 8

After you have finished your cookie cutter, set it to the side and mix up your sugar cookie dough. I used this easy no-chill recipe from Katrina’s Kitchen.

Note:

This is also when you want to preheat your oven according to your sugar cookie recipe.

Rolled Out Dough Next to Rolling Pin

Step 9

After your dough is mixed up, roll out 1/3 of it on a lightly floured surface until it is roughly 1/4 inch thick.

Step 10

Then, sprinkle sugar granules on top and gently pat into the dough.

Cookie Cutter in Dough

Step 11

Now begin cutting out your sugar cookies and placing them on a parchment lined baking sheet. The recipe I used (and most sugar cookie cutout recipes) does not rise much so your can place them fairly close together on the pan.

Raw Hello Kitty Cookies on Cookie Sheet

Step 12

Once your tray is full, bake according to your sugar cookie recipe.

Tip:

If you are using the same recipe I did, your cookies will need around 10 minutes.

Baked Hello Kitty Sugar Cookie with Blue Sprinkles

Step 13

Allow your cookies to cool before moving on.

Colorful Sprinkled Rolled Out Dough

Notes:

Don’t forget to use multiple types of sprinkles. Clear sugar granules are best for the colored Hello Kitty sugar cookies because the colors show up best on them.

You need the extra sugar because these do not have the traditional icing that sugar cookies have. If you don’t add them, they won’t be very sweet.

Red Bow on Sugar Cookie

Step 14

When you’re ready to start decorating, pull out your clear/lighter colored sugar covered cookies and use your red food pen to draw a bow on the top right of the cookies.

Black Icing Eyes on Sugar Cookie

Step 15

Next, add black eyes to your cookies.

Hello Kitty Face on Sugar Cookie
Decorated Hello Kitty Sugar Cookie

Step 16

Lastly, add black whiskers and use icing to attach a yellow M&M to the center of your cookies.

Tip:

You do not need to decorate all of the cookies with a face. Having the decorated ones next to the colorful ones will make it clear what they are.

Pile of Hello Kitty Sugar Cookies
Lined Up Hello Kitty Sugar Cookies
Hello Kitty Sugar Cookies with text overlay - Hello Kitty Sugar Cookie and DIY Cookie Cutter

These Hello Kitty sugar cookies turned out amazingly! I definitely recommend using the same recipe I did. They are the softest sugar cookie cutouts I have ever tasted yet they still hold up to all of the decorating. Of, and did I mention they’re totally delicious? Try them for yourself today!

Hello Kitty Sugar Cookies with text overlay - Hello Kitty Sugar Cookie and DIY Cookie Cutter

Scroll down for even more Sweet Treats to make this holiday season!


How to Turn Birthday Cards into Picture Frames

It happens every year. You invite friends and family to celebrate your kiddo’s birthday and after everything is said and done, you have a pile of thoughtful birthday cards that your child has already forgotten. You don’t want to toss them but you also don’t feel like storing them in a box for years to come. Find out how to turn birthday cards into picture frames that capture your child’s birthday and become a fun piece of decor for your home.

I was compensated by Dollar Tree for this post. This post also contains affiliate links and I will be compensated if you make a purchase after clicking on my links. Read the full disclosure here.

Collage of Photos of Avengers Birthday Card Photo Frame inside of Frame Next to Gift Bows with text overlay: How to Turn Birthday Cards into Picture Frames


[bctt tweet=”Do you have a stack of birthday cards you feel too guilty to throw out? Find out how to turn birthday cards into picture frames that you’ll want to keep! #ad” username=”diyadulation”]

Let’s face it, when you spend your hard earned money on something, you don’t really want to think about it being carelessly tossed away. Too often this happens with birthday cards.

That’s why I’m so excited about Dollar Tree carrying Expressions from Hallmark for $1 each and Heartline from Hallmark for 2 for $1! Seriously, I am a bit of a Dollar Tree addict. If I can get it at my local store, I probably am.


Kindness is Rare Card on Polka Dot Background

Layered Robot Birthday Card on Polka Dot Background

Birthday Cards and Envelopes on Polka Dot Background

Expressions and Heartline Cards by Hallmark

These new cards, available starting today, are absolutely gorgeous and available for a multitude of occasions all without breaking the bank. Even better, they are high quality and sturdy. Some even come with my personal favorite embellishment: glitter!!


Ariel and Avengers Birthday Cards on Polka Dot Background

You can also find them with your kid’s favorite characters on them. It makes them the perfect budget-friendly option for all of those birthday parties you get invited to during the school year.


Elephant Card on Polka Dot Background

When you aren’t blowing your budget on cards, it makes it so much easier when you think about them getting tossed or shoved in a drawer somewhere. Of course, you can prevent that in your own house now. Keep reading to find out how how to turn birthday cards into picture frames with this easy tutorial.

Materials

Step 1

First, determine where you want your photo to show on your card front.


Close Up of Circle Drawn on Avengers Card

Step 2

Then trace a circle in that spot in pencil on the front of the card.


Close Up of Circle Drawn on Avengers Card with Hole in the Middle

Step 3

Next, punch a hole in the center of the circle with your awl.


Circle Cut Out of Avengers Card

Step 4

After you punch your circle, carefully wedge your scissors in the hole and cut out your traced circle.

Note:


School Pictures of Little Boy

Step 5

Then, test your photo behind your cutout to ensure that the opening is sufficient. If not, trim it as needed.


Avengers Card with Circle Cut Out on Scrap Paper

Step 6

Remove your photo and place your card open, with the inside facing down, on a scrap piece of paper.

Tip:


Avengers Card with Green Puff Paint Next to It

Step 7

Now, add a line of puff paint around the edge of your cut out area to create a “frame”.


Painted Avengers Card on Red Serving Tray

Step 8

Carefully lift your painted card from the scrap paper and set the opening over a can or bowl to dry.

Note:


Scrap Paper with Green Painted Ring on It

Note:


Photo Taped Inside of Birthday Card

Step 9

After your paint is dry, center your photo in the cutout opening and tape into place.


Avengers Card Photo Frame next to Glue Runner

Step 10

Then use your glue runner to attach the inside of the card together.


Avengers Birthday Card Photo Frame inside of Frame

Step 11 (Optional)

Lastly, place your card in a picture frame and hang it on the wall.


Avengers Birthday Card Photo Frame inside of Frame Next to Gift Bows with text overlay: How to Turn Birthday Cards into Picture Frames

Now that you know how to turn birthday cards into picture frames, you can feel better about that stack of cards after every birthday party. Now that you can get amazing, high quality Expressions and Heartline Hallmark cards from Dollar Tree, you can feel good about your budget. It’s a win-win!

Check out the amazing designs now on the Dollar Tree Website and let me know which is your favorite in the comments! (If you can pick just one, that is. I certainly can’t.)

See where I’m linking up!

Don’t Forget to Pin It!

Collage of Photos of Avengers Birthday Card Photo Frame inside of Frame Next to Gift Bows with text overlay: How to Turn Birthday Cards into Picture Frames


More Dollar Tree Ideas You’ll Love:

Glittery and Colorful Unicorn Birthday Card

Do you know how you automatically make something a thousand times cooler? You make it mini! Logically, that means when you take something that’s already awesome and make it mini… omgosh! It is coolness overload. That is exactly what this glittery and colorful unicorn birthday card delivers.

Affiliate links may be used in this post. Ordering a product through these links may result in a commission at no extra cost to you. Read the full disclosure here.

Collage of Glittery and Colorful Unicorn Birthday Card with text overlay: Glittery and Colorful Unicorn Birthday Card


[bctt tweet=”Know anyone in your life who acts like the little girl from Despicable Me over unicorns? This glittery and colorful unicorn birthday card is for them!” username=”diyadulation”]

For the longest time, I was fairly blase about unicorns. They were fine but not something that pulled out my giddy girl squeal. I blame it on my reservations (borderline down-right fear) of horses.

As they grow in popularity, though, something awesome is happening. They are full of bright rainbow colors and sparkles and pretty much everything that speaks to me on every level.

When something aligns that much with your personality at its core, how can you not get sucked in? If you have a friend, daughter, coworker… pretty much anyone who acts like the little girl from Despicable Me over unicorns, then this is the perfect handmade card for them!


Surprise Unicorn Card on Purple Background

Note: This looks like a lot of steps but most of them go by incredibly fast. The longest time commitment is in the coloring phase. Once you finish that, the rest flies by.

Materials

Step 1

First, cut your piece of white cardstock in half, bisecting the 11″ edge. Set 1 half aside. You need it in step 13.

Step 2

Next, take the clear unicorn stamp from your set and mount it to your acrylic block.


Stamped Unicorns on White Paper Next to Ink Pad and Stamp

Step 3

Then stamp your unicorn with black pigment ink throughout the entire half sheet of cardstock.

Step 4

Clean your stamp and place it back with your stamp set. Then attach the small star stamp from the set to your acrylic block.


Stamped Stars and Unicorns on White Paper Next to Ink Pads

Step 5

Stamp your star throughout your half sheet of cardstock using hot pink pigment ink.


Stamped Stars and Unicorns on White Paper Next to Ink Pads and Stamps

Step 6

Again clean your stamp but leave it attached to your acrylic block. Use it to stamp more stars on your cardstock using teal pigment ink.


Stamped Stars and Unicorns on White Paper Next to Ink Pads and Stamp Set

Step 7

Finish stamping your stars by cleaning your stamp again and adding the last stars with magenta pigment ink.

Step 8

Next, pull out your colored pencils set and pull out pencil colors that match the stamped stars and also a bright yellow, gold, and silver colored pencils.


Colorful Unicorns and Stars on White Paper

Step 9

Use your pencils to color in your stamped unicorns, alternating between colors. I used 1 main color for each unicorn then rotated between combining the main color with bright yellow, gold, or silver on the horns.


Black Outlined Colorful Unicorns

Step 10

After you finish coloring your unicorns, go back over the stamped outlines with your black fine tip marker.


Colorful Unicorns and Stars on 2 Pieces of White Paper

Step 11

Then cut your stamped and colored cardstock piece in half again.


Glitter Stars on Unicorn Card

Step 12

Choose one half (whichever is your favorite) and add Stickles to each of the stamped stars. Set the sheet aside to dry.

Step 13

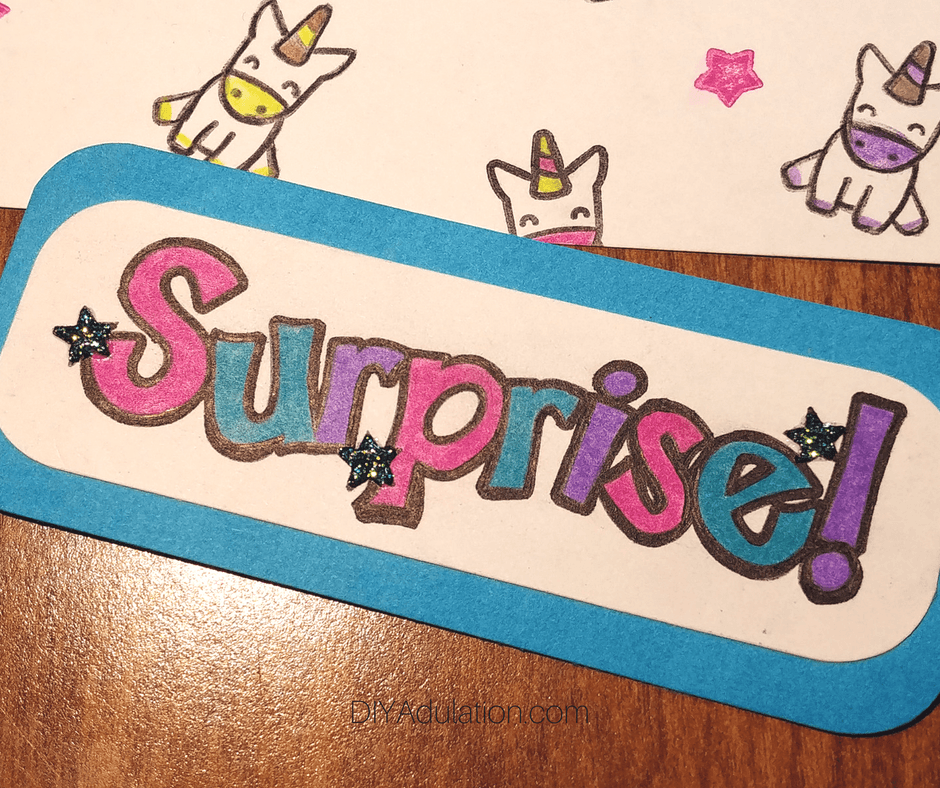
Pull out the second half of white cardstock and cut a small rectangle from it that is slightly larger than the “Surprise” stamp in your birthday stamp set.


Stamped Surprise next to Unicorn Paper and Teal Paper

Step 14

Attach the “Surprise” stamp to your acrylic block and stamp it with black pigment ink in the center of your white piece of cardstock.

Note:

Step 15

Round the corners on the word-stamped piece of cardstock.


Colorful Letters of the word Surprise

Step 16

Then color each letter of the word with the same colored pencils you used on your unicorns.


Surprise Stamp Matted on Teal Cardstock

Step 17

Next, mat your stamped and colored word onto teal cardstock using a glue runner. Trim any edges so that they look as pictured above.

Step 18

Again, round the edges of the teal cardstock to match the white cardstock.


Darkened Outline of Colorful Letters

Step 19

Now, darken the outline on your word “Surprise” with a black fine-tip marker.


Stickles on Surprise Stars

Step 20

Add Stickles to the stars on the word “Surprise” as you did on the stars in step 12. Allow them to dry.


Yellow Card with Unicorn Cardstock and Surprise Saying

Step 21

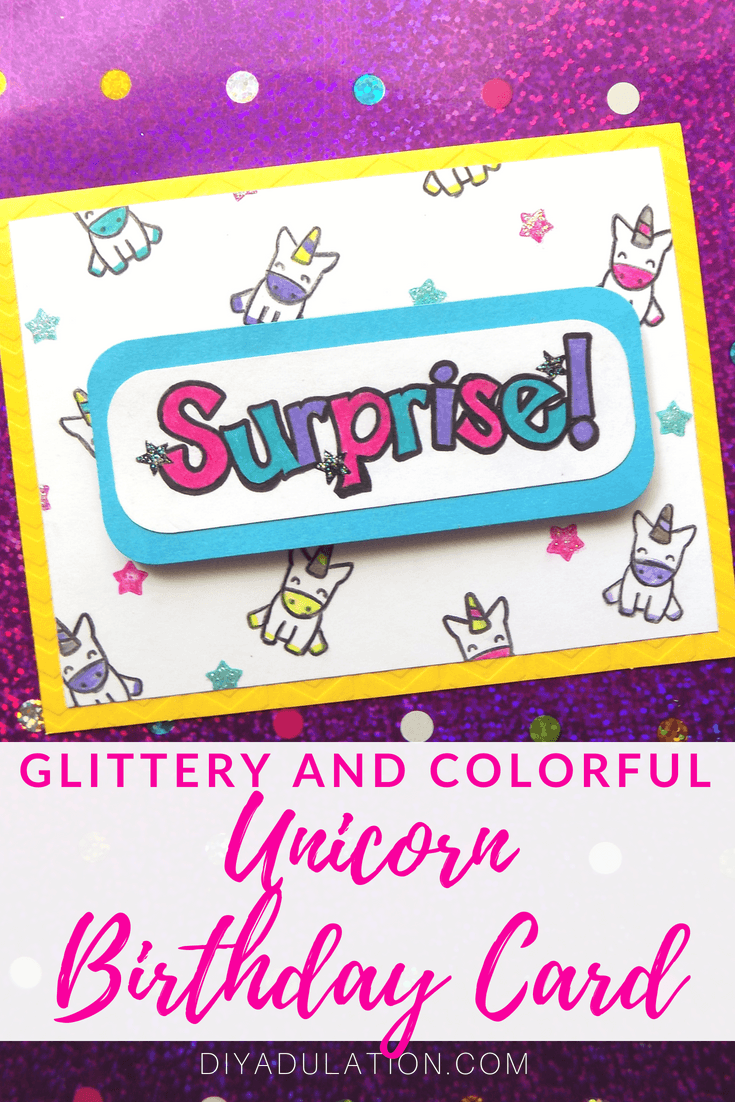
After your Stickles have dried, pull out your stamped elements and a bright yellow card form.

Step 22

Use your card form as a measure to determine how much, if any, you need to trim from your unicorn stamped cardstock and trim it.


Glue x on White Paper

Colorful Unicorns Cardstock Attached to Yellow Card Next to Glue Runner

Step 23

Now, attach your unicorn stamped cardstock to the front of the yellow card form, centered, with your glue runner.


White Foam Dots on the Back of Teal Paper

Step 24

Next, flip over your matted teal cardstock and add an adhesive foam dot to each each corner. Also add one to the center for support.


Close Up of Surprise Unicorn Card

Surprise Unicorn Card

Step 25

Lastly, attach it to the center of your unicorn card as pictured above.


Glittery and Colorful Unicorn Birthday Card with text overlay: Glittery and Colorful Unicorn Birthday Card

Seriously, how much fun is this glittery and colorful unicorn birthday card?! Plus, since it says “Surprise” you could use it for other occasions outside of birthdays. Give it as thank you card and write, “You’re Awesome!” Pretty much any occasion you can think of to say surprise will absolutely work for this card. By the way, if you aren’t already following my on Instagram head over there now for sneak peeks into upcoming awesome projects like these!

See where I’m linking up!

Don’t Forget to Pin It!

Collage of Glittery and Colorful Unicorn Birthday Card with text overlay: Glittery and Colorful Unicorn Birthday Card


More Ideas You’ll Love: