Adorable and Easy Pipe Cleaner Butterfly Craft

It’s officially Spring and that means bright and cheerful craftiness! Let’s start with something for kiddos like an adorable and easy pipe cleaner butterfly craft. This kids craft is super easy and only needs some of those pipe cleaners I know you have lying around and scissors.

Affiliate links may be used in this post. Ordering a product through these links may result in a commission. Read the full disclosure here.

Collage of Pipe Cleaner Butterflies with text overlay - Adorable and Easy Pipe Cleaner Butterfly


[bctt tweet=”Looking for a fun and easy spring craft to make with the kiddos? This adorable pipe cleaner butterfly craft is the perfect quick and easy creation!” username=”diyadulation”]

My tiny humans are always playing with pipe cleaners. Sometimes, I swear, I don’t even know where they came from (like didn’t we use all of those at Christmastime?). I think part of the draw is that you can turn them into anything. Your imagination is the limit.

They have made bracelets, glasses, animal tails, clothes for dolls, springs… the list goes on and on. While I love letting them create freely, sometimes it’s fun to pass on my own knowledge and watch their eyes light up. That’s exactly what happened with this pipe cleaner butterfly craft. It went from, “That’s so cool, how did you make it” to, “Mom look! That was so easy!”

Of course, the youngest played with his for about 5 minutes before pulling it apart and turning it into something else but that’s also part of the fun. Much like play dough you can create, destroy, and recreate again and again. So grab the pipe cleaners and gather the little ones around the table for some fun and colorful spring creating.


Pipe Cleaner Butterfly next to Flowers

Pipe Cleaner Butterfly Materials


2 Purple Pipe Cleaners with Ends twisted together

Step 1

First, grab 2 pipe cleaners of the same color and twist 1 set of ends together.


Close Up of Secured Ends of Purple Pipe Cleaners

Step 2

Next, straighten the 2 pipe cleaners into one line and flatten the twisted joint so that it is flush with the pipe cleaner line.


Twisted Loop in Purple Pipe Cleaner

Step 3

Then form a loop at one end of the joined pipe cleaners and twist once to secure.


2 Loops in Purple Pipe Cleaner

Step 4

Add a second loop next to the first loop and, again, twist it one to secure. This creates your first wing.


Purple Pipe Cleaner Butterfly Wings

Step 5

Repeat steps 3 and 4 with the rest of your joined pipe cleaners to create the second wing. Wrap any excess pipe cleaner ends around the center to secure in place.


Yellow Pipe Cleaner Wrapped Around Center of Purple Pipe Cleaner Butterfly Wings

Step 6

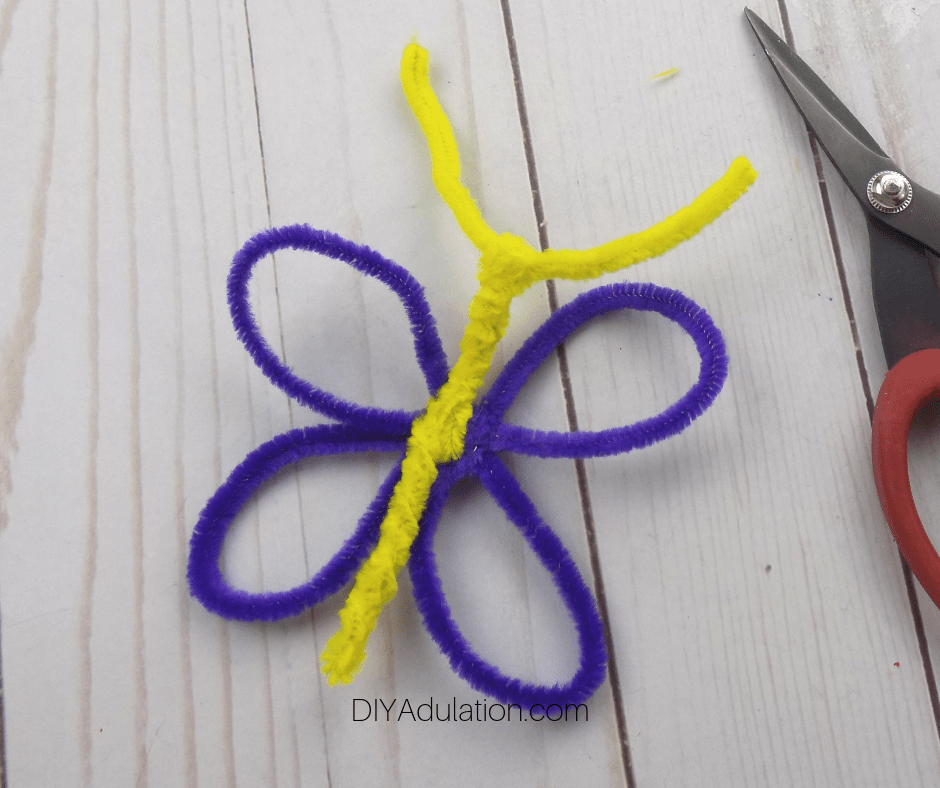
Next, grab one pipe cleaner in a different color and secure it to the middle of your butterfly wings by wrapping it 2-3 times around the center of them.


Yellow Pipe Cleaner with Small Loop on Top on Purple Pipe Cleaner Butterfly Wings

Step 7

Then fold your pipe cleaner in on itself to form the butterfly body and twist it together. Leave a small loop at the top as pictured.


Pipe Cleaner Butterfly next to Small Piece of Yellow Pipe Cleaner and Scissors

Step 8

Now cut a smaller piece of pipe cleaner in the same color as your butterfly body.

Mom Note:


Pipe Cleaner Butterfly with Antennae Attached

Step 9

Thread the small piece of pipe cleaner through the loop at the top of your butterfly body and twist the open loop you left in step 7 to secure it.
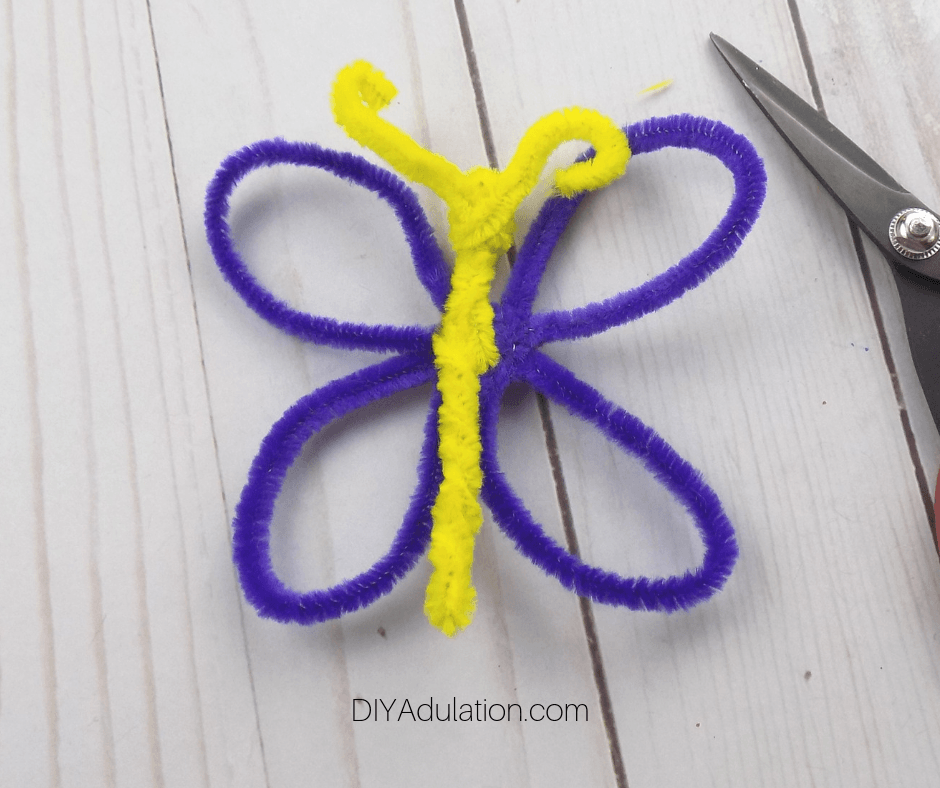
 

Pipe Cleaner Butterfly with Curled Antennae

Step 10

Lastly, curl the ends of the small piece of pipe cleaner to look like antennae for your butterfly.


Pipe Cleaner Butterfly next to Pipe Cleaner Flowers

Close up of Pipe Cleaner Butterfly with text overlay - Adorable and Easy Pipe Cleaner Butterfly

The great thing about this adorable and easy pipe cleaner butterfly craft is that once you can shape and bend the wings once it is made. Pull the wings slightly together to create a creature that looks as though it is ready to take flight. You can also make multiple pipe cleaner butterflies and thread them together to create a mobile. Or simply let the kiddos take flight on a playful adventure and run around the house with their creations. No matter what you choose, these adorable little critters are sure to be a fun craft to make with the kiddos.

See where I’m linking up!

Don’t Forget to Pin It!

Close up of Pipe Cleaner Butterfly with text overlay - Adorable and Easy Pipe Cleaner Butterfly


More Ideas You’ll Love:

Low and No Prep Easy Craft Ideas for Kids

School breaks always hold a lot of promise for fun and family time. Execution leaves a something to be desired sometimes. If your plans aren’t quite what you hoped, whip out the craft supplies and try out these easy craft ideas for kids.

Affiliate links may be used in this post. Ordering a product through these links may result in a commission. Read the full disclosure here.

Collage of Craft Projects with text overlay - Fun and Easy Craft Ideas for Kids


[bctt tweet=”These easy craft ideas for kids are the perfect low-prep activities to keep in your arsenal for school breaks, snow days, and more.” username=”diyadulation”]

Before we get onto the crafts, I want to remind you that the Merry Monday link party is now bi-weekly. If you’re looking to link up, you can add your newest posts for the week to the party here.

Now, let’s get onto the crafty fun with these easy craft ideas for kids. They’re all super easy and you likely already have the supplies on hand. I love doing crafts with the kids because they always enjoy it (even if they’ve made it a hundred times) and it is a great to spend time together as a family. These are some of our favorites.


Painted canvas next to painted rocks

DIY Painted Canvas Play Set

This adorable easy craft takes rock painting to the next level. Create painted scenes on canvas and then paint rocks to coordinate and BOOM! Instant pretend play set. Save money and buy in bulk with those canvas multi-packs!


Glittery notebook next to pen

Fun and Glittery DIY Notebook

Does your kiddo love writing or drawing? If so, teach her how to make her own glittery DIY notebook with this easy tutorial.


Pompom monsters next to craft supplies

DIY Mini Pompom Monsters

These little pompom monsters are not only super cute, they also double as fun stickers. The backing on the feet can totally come off to stick to notebooks, folders, or anything else you let kiddos put stickers on.


Glittery Boys Door Sign

Easy DIY Bedroom Door Sign

Let your little ones get crafty and put their personal touch on their rooms with this simple craft. Some sticky foam and sticker letters is all you need to create this DIY bedroom door sign.


Hanging children's artwork

DIY Children’s Artwork Display

Tired of the billions of artwork pieces laying around the house from the kids? This kids craft idea is perfect for organizing all of that artwork on bedroom/playroom walls easily.


Paper flowers hanging on a wall

DIY Kids Paper Flower Wall Art

Build your own colorful garden indoors with these giant paper flowers. They’re colorful, pretty, and super fun to make. It’s a great way to brighten up boring walls.


Googly eye framed monogram

DIY Googly Eye Monogram

What is it with kids having overflowing collections of googly eyes? These fun monograms are an easy way to use some of them up in a new and creative way.


Stamp next to stamped paper

Make Your Own Coloring Book

You’re never too old for coloring books. Now you can easily create custom coloring books with these easy tutorial. Make them as simple or complex as you want and then grab the crayons.


Collage of Craft Projects with text overlay - Fun and Easy Craft Ideas for Kids

These easy craft ideas for kids are the perfect low-prep activities to keep in your arsenal for school breaks, snow days, and more. I recommend storing kids crafts supplies in these plastic organizers for easy storage and organization. It’s what we use and the kiddos know what art supplies they can use (without getting into yours) and everything is at your fingertips when you need it.

See where I’m linking up!

Don’t Forget to Pin It!

Collage of Craft Projects with text overlay - Fun and Easy Craft Ideas for Kids


More Ideas You’ll Love:

Paper Plate Preschool Rainbow Craft

Don’t let the frigid weather and lack of park days get you down. If you’re looking for a fun, springtime kid’s craft to belay this cold snowy weather then you’ll love this paper plate preschool rainbow craft. It’s inexpensive, easy to make, and a bright and colorful reminder that warmer weather will be here soon.

Affiliate links may be used in this post. Ordering a product through these links may result in a commission. Read the full disclosure here.

Collage of Paper Plate Rainbow Crafts with text overlay - Paper Plate Preschool Rainbow Craft


[bctt tweet=”If you’re looking for a fun, springtime kid’s craft to brighten up this cold snowy weather then you’ll love this paper plate preschool rainbow craft!” username=”diyadulation”]

Even though it’s March over here, it sure doesn’t feel like it. It has been cold and snowy and, frankly, I’m over it. At this rate, spring break is going to look more like winter break.

It’s no secret that the winter is my least favorite season. Give me sunshine and soaring temperatures any day. Since I can’t control the weather we’re bringing some brightness into our home with this super cute rainbow craft.


Paper Plate Preschool Rainbow Crafts on Polka Dot Background


Paper Plate and Colored Pencils next to Scissors

Preschool Rainbow Craft Materials


Paper Plate with Lines on It next to Pen

Step 1

First, draw 2 lines down the center of the plate as pictured. You want them to extend to the wavy outside of the plate edge.


Paper Plate with Lines Cut in It next to Scissors

Step 2

Next, poke a hole in the center of the lines and cut along each one.

Note:


Paper Plate Half Circles Cut out of It next to Scissors

Step 3

Then cut around the outer edge of the of the plate from the end of each line using the scalloped edge as a guide. This should leave 2 half circles cut out of the plate as pictured.


Rainbow Colored on Center of Paper Plate Next to Scissors

Step 4

After you’ve cut out the half circles, color lines on the center piece of the paper plate in the colors of the rainbow (red, orange, yellow, green, blue, indigo, violet).


Watercolor Rainbow on Center of Paper Plate

Step 5

Once the colors are drawn on the plate, use a paint brush dipped in water to turn the lines into watercolor. Have kiddos rinse the brush in between colors to keep them from blending.

Step 6

Allow the water to dry before moving on.


Stapled Edge of Paper Plate

Step 7

Next, fold the edge on one side of the paper plate over on one side to pop the rainbow up and staple into place.

Top View of Stapled Rainbow Paper Plate

Step 8

Repeat step 7 on the second side of the paper plate.

Step 9

Once your edges are stapled, line with glue around them.


Cotton Glued to Half Rainbow Paper Plate Edge

Step 10

Then pull apart and fluff up cotton balls and stick them to the glued edges.


Cotton Glued to Around Rainbow Paper Plate Edge

Step 11

Continue adding fluffed up cotton balls until the edge of the plate is covered.


Preschool Rainbow Craft Paper Plates

Step 12

Allow everything to dry before playing.

Tip:


Close Up of Paper Plate Preschool Rainbow Craft

Rainbow Clouds Craft for Kids

Close Up of Paper Plate Rainbow Crafts with text overlay - Paper Plate Preschool Rainbow Craft

This paper plate preschool rainbow craft is perfect for spring or St. Patrick’s Day. Display your creations by poking a small hole in the top and threading with string. Then hang them from the ceiling for a colorful and pretty “sky”. It’s the perfect way to bring a little spring inside while it’s still so cold and dismal outside.

See where I’m linking up!

Don’t Forget to Pin It!

Close Up of Paper Plate Rainbow Crafts with text overlay - Paper Plate Preschool Rainbow Craft


More Ideas You’ll Love: