DIY Monogram Stenciled Sharpie Mug

How many Sharpie mug tutorials do you have saved on Pinterest?

Now tell me how many of those you have made.

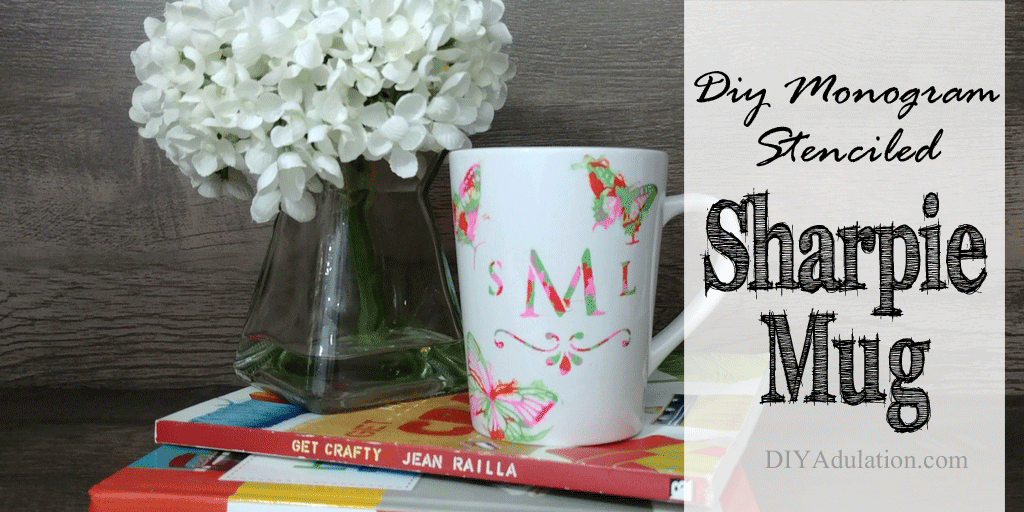
Don’t feel bad. I have a ton pinned, too, and I’ve made… zero. I haven’t made any, until now. That’s what makes this new blog hop so much fun. We are finally making those pins we keep saving but never find the time to make. This month I made a DIY monogram stenciled Sharpie mug based on this awesome tutorial from Delicious and DIY.

Affiliate links may be used in this post. Ordering a product through these links may result in a commission at no extra cost to you. Read the full disclosure here.


Find out how to make this DIY monogram stenciled Sharpie mug. It is seriously easy and can be customized to your style. Then check out the rest of the Pinterest Challenge Blog Hop!


[bctt tweet=”Find out how easy it is to make this #DIY #monogram stenciled #Sharpiemug!” username=”diyadulation”]

Find out how to make this DIY monogram stenciled Sharpie mug. It is seriously easy and can be customized to your style. Then check out the rest of the Pinterest Challenge Blog Hop!

Materials


Find out how to make this DIY monogram stenciled Sharpie mug. It is seriously easy and can be customized to your style. Then check out the rest of the Pinterest Challenge Blog Hop!

Step 1

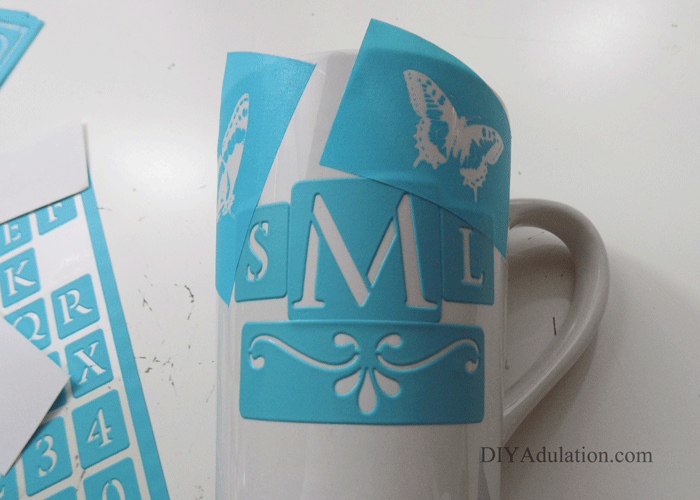
Start by placing your large middle initial stencil on your mug as pictured.


Find out how to make this DIY monogram stenciled Sharpie mug. It is seriously easy and can be customized to your style. Then check out the rest of the Pinterest Challenge Blog Hop!

Step 2

Next, add you first initial in the small stencil to the left of your middle initial.

Tip:

  • It is okay if the stencils overlap. Do what works for your design.


Find out how to make this DIY monogram stenciled Sharpie mug. It is seriously easy and can be customized to your style. Then check out the rest of the Pinterest Challenge Blog Hop!

Step 3

Finish the monogram by adding your last initial in the small stencil to the right of your middle initial.


Find out how to make this DIY monogram stenciled Sharpie mug. It is seriously easy and can be customized to your style. Then check out the rest of the Pinterest Challenge Blog Hop!

Step 4

Add the decorative underline stencil beneath your monogram.


Find out how to make this DIY monogram stenciled Sharpie mug. It is seriously easy and can be customized to your style. Then check out the rest of the Pinterest Challenge Blog Hop!

Step 5

Then begin adding your butterfly stencils.


Find out how to make this DIY monogram stenciled Sharpie mug. It is seriously easy and can be customized to your style. Then check out the rest of the Pinterest Challenge Blog Hop!

Step 6

Continue until you have the desired number of butterflies.

Step 7

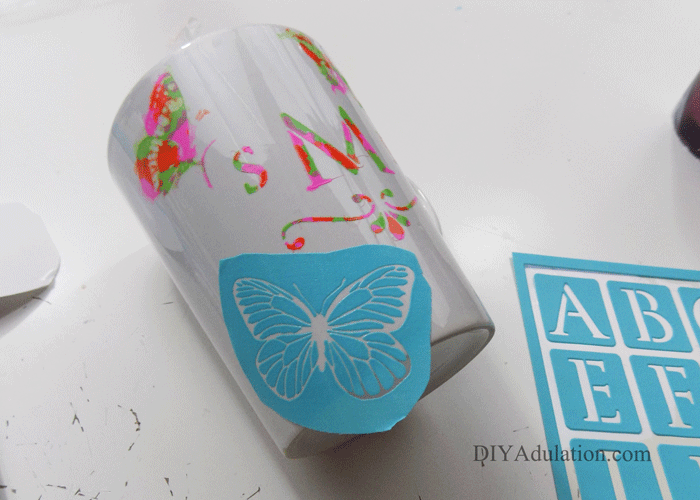
Pull out your pink, green, and orange paint markers. If they are new, press the tip down repeatedly on a piece of paper until the paint comes out.


Find out how to make this DIY monogram stenciled Sharpie mug. It is seriously easy and can be customized to your style. Then check out the rest of the Pinterest Challenge Blog Hop!

Step 8

Start adding paint by dabbing your green paint marker at random over your stencils.


Find out how to make this DIY monogram stenciled Sharpie mug. It is seriously easy and can be customized to your style. Then check out the rest of the Pinterest Challenge Blog Hop!

Step 9

Next, do the same with your pink paint marker.


Find out how to make this DIY monogram stenciled Sharpie mug. It is seriously easy and can be customized to your style. Then check out the rest of the Pinterest Challenge Blog Hop!

Step 10

Lastly, fill in the remaining areas of your stenciled design with your orange paint marker.


Find out how to make this DIY monogram stenciled Sharpie mug. It is seriously easy and can be customized to your style. Then check out the rest of the Pinterest Challenge Blog Hop!

Step 11

Carefully start removing your stencils while your paint is still wet.

Tip:

  • Some of the paint ran a little but since I was going for a watercolor look, this added to it. If you are going for a crisp design, go lighter on your paint when dabbing on the stencils.

Step 12

Continue until all of your stencils are removed from the mug.


Find out how to make this DIY monogram stenciled Sharpie mug. It is seriously easy and can be customized to your style. Then check out the rest of the Pinterest Challenge Blog Hop!

Find out how to make this DIY monogram stenciled Sharpie mug. It is seriously easy and can be customized to your style. Then check out the rest of the Pinterest Challenge Blog Hop!

Note:

  • I didn’t like the look with only 2 butterflies after the stencils were removed so I added a 3rd butterfly.


Find out how to make this DIY monogram stenciled Sharpie mug. It is seriously easy and can be customized to your style. Then check out the rest of the Pinterest Challenge Blog Hop!

Step 13

Allow your paint to dry completely before moving on.

Step 14

Bake your cup in the over according to the tutorial on Delicious and DIY.

Tips:

  • Although she doesn’t say this, I put my cup in the cold oven while it pre-heated. I worried that putting a cold cup (it is winter, after all) in a hot oven would make it crack.
  • After the timer went off, I turned off the oven and cracked the door. This allowed the cup to cool down slowly, again to prevent it from cracking.


Find out how to make this DIY monogram stenciled Sharpie mug. It is seriously easy and can be customized to your style. Then check out the rest of the Pinterest Challenge Blog Hop!

Find out how to make this DIY monogram stenciled Sharpie mug. It is seriously easy and can be customized to your style. Then check out the rest of the Pinterest Challenge Blog Hop!

Find out how to make this DIY monogram stenciled Sharpie mug. It is seriously easy and can be customized to your style. Then check out the rest of the Pinterest Challenge Blog Hop!

Find out how to make this DIY monogram stenciled Sharpie mug. It is seriously easy and can be customized to your style. Then check out the rest of the Pinterest Challenge Blog Hop!

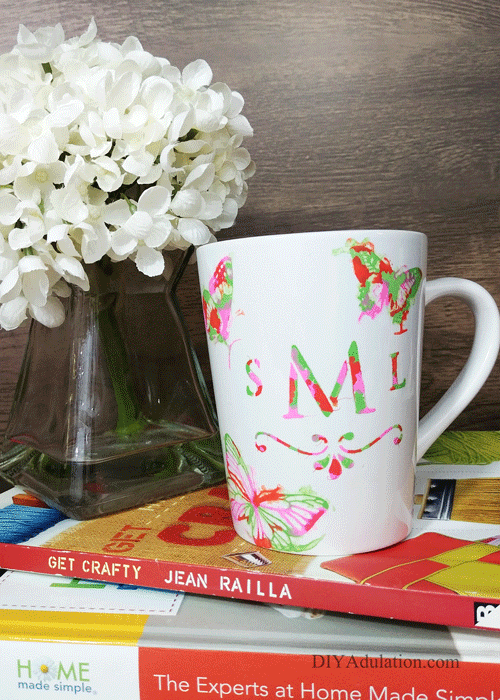
That’s all there is to this DIY monogram stenciled Sharpie mug. It is seriously easy and can be customized to your style. Don’t forget to check out Delicious and DIY to show her some love for the awesome idea! Then come back here and check out the other creations in the Pinterest Challenge Blog Hop. Hopefully we’ll inspire you to start making all of those awesome ideas you keep pinning.

See where I’m linking up!

Don’t Forget to Pin It!

Find out how to make this DIY monogram stenciled Sharpie mug. It is seriously easy and can be customized to your style. Then check out the rest of the Pinterest Challenge Blog Hop!

To join next month’s challenge, click here to sign-up ⇒ February Pinterest Challenge


Now let’s see what other things Pinterest inspired! Head over and visit the other hosts to see what they crafted, cooked, built, or tried!

Pinterest Challenge

Erlene – My Pinterventures • Shirley – Intelligent Domestications

Michelle – Our Crafty Mom • Molly – Just a Little Creativity

Marie – DIY AdulationJenny – Cookies Coffee and Crafts

Joanne – Our Unschooling JourneyEmily – Domestic Deadline

Roseann – This Autoimmune Life • Trisha – Blowing Away Out West

Sam – Raggedy Bits • Lynne – My Family Thyme • Beverly – Across the Blvd.

Debra – Shoppe No. 5 • Lauren – Mom Home Guide • Emily – Domestic Deadline

Heather – Glitter on a Dime •  Gwen – Geez, Gwen! • Blake – Style Island 

Kristie – Teadoodles • Kelly – Under A Texas Sky • Candice – Fearlessly Creative Mammas

Chelc – Inside the Fox Den • Megan – C’mon Get Crafty


DIY Etched Family Mickey Plate

We are taking a break from our New Years goals today with an easy tutorial for Disney fans. We are taking our family to Disney World next year so I am already getting pumped. None of my kids have been yet so this is going to be such a delightful experience full of memories for them. This DIY etched family Mickey plate is an excellent way to surprise your kiddos with a Disney vacation announcement. It is also a fun and thoughtful, personalized gift for any Disney lover. Of course, it is so cool you will want to make one to keep as well. Luckily this DIY is inexpensive to make so you don’t have to choose between keeping on for you and gifting it.

Affiliate links may be used in this post. Ordering a product through these links may result in a commission at no extra cost to you. Read the full disclosure here.

This DIY etched family Mickey plate is such an easy and inexpensive gift that any Disney fan would love to receive. It is also the perfect way to surprise kids with a Disney vacation announcement.


[bctt tweet=”This #DIY etched family #Mickey plate is an easy gift that any #Disneyfan would love!” username=”diyadulation”]

Materials


This DIY etched family Mickey plate is such an easy and inexpensive gift that any Disney fan would love to receive. It is also the perfect way to surprise kids with a Disney vacation announcement.

Step 1

Start by layering strips of painters tape on a cutting mat (or other protected surface). Do this with the sticky-side of the tape facing up.

Step 2

Next, measure the width of your plate (the flat part only) with your ruler.


This DIY etched family Mickey plate is such an easy and inexpensive gift that any Disney fan would love to receive. It is also the perfect way to surprise kids with a Disney vacation announcement.

Step 3

Then draw 2 parallel lines on your tape strips the same length as your plate width. Place them roughly 2 inches apart from each other vertically.

Step 4

Continue sketching your design by drawing ears on the top parallel line.


This DIY etched family Mickey plate is such an easy and inexpensive gift that any Disney fan would love to receive. It is also the perfect way to surprise kids with a Disney vacation announcement.

Step 5

Next, draw a semi-circle below the bottom parallel line.

This DIY etched family Mickey plate is such an easy and inexpensive gift that any Disney fan would love to receive. It is also the perfect way to surprise kids with a Disney vacation announcement.

Optional:

  • You can write and established date in the center of your bottom parallel line. I didn’t like the way mine looked so I chose to cut it from the final design.


This DIY etched family Mickey plate is such an easy and inexpensive gift that any Disney fan would love to receive. It is also the perfect way to surprise kids with a Disney vacation announcement.

Step 6

After you have sketched your design, start placing your letters centered between your parallel lines.

Tips:

  • The letters should be placed so that you can read them. Don’t try to place them backwards.
  • Start with the center letter in the last name and work your way out to keep your design centered.


This DIY etched family Mickey plate is such an easy and inexpensive gift that any Disney fan would love to receive. It is also the perfect way to surprise kids with a Disney vacation announcement.

Step 7

Continue adding your letters until the entire name is spelled out.


This DIY etched family Mickey plate is such an easy and inexpensive gift that any Disney fan would love to receive. It is also the perfect way to surprise kids with a Disney vacation announcement.

Step 8

Next, begin cutting out your design with a utility knife, starting with your letters.


This DIY etched family Mickey plate is such an easy and inexpensive gift that any Disney fan would love to receive. It is also the perfect way to surprise kids with a Disney vacation announcement.

Step 9

Continue cutting out your design until the entire thing is cut out.

Tip:

  • Make sure that your parallel lines have a little bulk to them. See the picture for reference.


This DIY etched family Mickey plate is such an easy and inexpensive gift that any Disney fan would love to receive. It is also the perfect way to surprise kids with a Disney vacation announcement.

Step 10

Now, center your design on the bottom of your plate with the sticky side facing the plate.

Step 11

Smooth your design onto your plate and ensure that every edge if firmly pressed down so that you get clean lines during etching.


This DIY etched family Mickey plate is such an easy and inexpensive gift that any Disney fan would love to receive. It is also the perfect way to surprise kids with a Disney vacation announcement.

Step 12

After putting on protective gloves, cover your design with etching solution.

Step 13

Let the etching solution set the amount of time recommended on the packaging.


This DIY etched family Mickey plate is such an easy and inexpensive gift that any Disney fan would love to receive. It is also the perfect way to surprise kids with a Disney vacation announcement.

Step 14

Next, put your protective gloves on and rinse the etching solution off of your plate and remove your tape.


This DIY etched family Mickey plate is such an easy and inexpensive gift that any Disney fan would love to receive. It is also the perfect way to surprise kids with a Disney vacation announcement.

This DIY etched family Mickey plate is such an easy and inexpensive gift that any Disney fan would love to receive. It is also the perfect way to surprise kids with a Disney vacation announcement.

Dry off your DIY etched family Mickey plate and you are done. This is such an easy and inexpensive gift that any Disney fan would love to receive. This is also a great DIY project to personalize for kids. If you choose to do that, I recommend doing it with their first names instead of the last name. They will be crazy excited to have an awesome plate just for them. These babies are also dishwasher safe so clean-up is a breeze. If you want to kick the surprise up a notch, be sure to gift this DIY alongside these delicious Sparkly Peanut Butter Caramel Chocolate Truffles. What goes better with a fancy plate than a fancy dessert?

See where I’m linking up!

Don’t Forget to Pin It!

This DIY etched family Mickey plate is such an easy and inexpensive gift that any Disney fan would love to receive. It is also the perfect way to surprise kids with a Disney vacation announcement.

Quick and Easy Colorful DIY Party Hats

I have a confession: I am 31 years old and still love fun party hats. If you look at pictures from my kids’ birthdays you will always find me rocking one. Why? It is because they are playful and that is a side of us that I don’t think we should ever lose. Instead of buying those playful cones for your next party, it is time to take it up a notch. These colorful DIY party hats are easy to make and quickly. They come together in minutes and can be customized to your unique party theme. If you want to really add to the colorful fun, use brightly colored staples like I did. They’re so pretty you’ll want guests to see them on the hats.

Affiliate links may be used in this post. Ordering a product through these links may result in a commission at no extra cost to you. Read the full disclosure here.

Instead of buying those playful cones for your next party, take it up a notch. These colorful DIY party hats are easy to make and come together in minutes. They can easily be customized to your unique party theme, too!


[bctt tweet=”Instead of buying those playful cones for your next party, take it up a notch with these colorful #DIY #partyhats!” username=”diyadulation”]

Materials


Instead of buying those playful cones for your next party, take it up a notch. These colorful DIY party hats are easy to make and come together in minutes. They can easily be customized to your unique party theme, too!

Step 1

First, take a corner of your paper and roll it in on itself to create a cone.

Step 2

Staple the seam to hold the form in place.


Instead of buying those playful cones for your next party, take it up a notch. These colorful DIY party hats are easy to make and come together in minutes. They can easily be customized to your unique party theme, too!

Step 3

Next, trim the excess paper off of the bottom so that you have an even cone.

Tips:

  • To make this easier, trim in sections. Do not try to get the excess off in one long cut.
  • If you struggle getting it even, you can hid the unevenness by gluing garland around the bottom in step 11.


Instead of buying those playful cones for your next party, take it up a notch. These colorful DIY party hats are easy to make and come together in minutes. They can easily be customized to your unique party theme, too!

Step 4

Add a second staple to the seam of your cone to further secure it.


Instead of buying those playful cones for your next party, take it up a notch. These colorful DIY party hats are easy to make and come together in minutes. They can easily be customized to your unique party theme, too!

Step 5

Now punch a small hole on the left and right of your hat.

Tips:

  • I like to use my Cropadile for this because I can set it for a consistent depth. You want your holes to be around ½ an inch from the edge of the cone.
  • Keep your staples in the back, center of your cone as a placement guide for your holes.


Instead of buying those playful cones for your next party, take it up a notch. These colorful DIY party hats are easy to make and come together in minutes. They can easily be customized to your unique party theme, too!

Step 6

Next, cut a length of cord that is 18” long. This may seem like a lot but the thicker cord (ie: the prettier cord) isn’t as stretchy as the thin white cord you find on store bought hats. You want to make sure these fit comfortably on your guests’ heads.


Instead of buying those playful cones for your next party, take it up a notch. These colorful DIY party hats are easy to make and come together in minutes. They can easily be customized to your unique party theme, too!

Step 7

Now thread one end of your cord through the left hole from the outside of the cone towards the inside.


Instead of buying those playful cones for your next party, take it up a notch. These colorful DIY party hats are easy to make and come together in minutes. They can easily be customized to your unique party theme, too!

Step 8

Then tie a double knot in the threaded end and trim the excess.


Instead of buying those playful cones for your next party, take it up a notch. These colorful DIY party hats are easy to make and come together in minutes. They can easily be customized to your unique party theme, too!

Instead of buying those playful cones for your next party, take it up a notch. These colorful DIY party hats are easy to make and come together in minutes. They can easily be customized to your unique party theme, too!

Step 9

Next, thread the opposite end of your cord through the second punched hole. Again, double know the end and trim the excess.


Instead of buying those playful cones for your next party, take it up a notch. These colorful DIY party hats are easy to make and come together in minutes. They can easily be customized to your unique party theme, too!

Step 10

Add a dab of hot glue to the top of your cone.


Instead of buying those playful cones for your next party, take it up a notch. These colorful DIY party hats are easy to make and come together in minutes. They can easily be customized to your unique party theme, too!

Step 11

Lastly, press a small piece of garland into the glue.

Note:

  • If the bottom of your cone is uneven, this is also the step to glue garland around the bottom of your cone. Make sure that your cord is pulled down while gluing to ensure the hat can still be worn.


Instead of buying those playful cones for your next party, take it up a notch. These colorful DIY party hats are easy to make and come together in minutes. They can easily be customized to your unique party theme, too!

Instead of buying those playful cones for your next party, take it up a notch. These colorful DIY party hats are easy to make and come together in minutes. They can easily be customized to your unique party theme, too!

Instead of buying those playful cones for your next party, take it up a notch. These colorful DIY party hats are easy to make and come together in minutes. They can easily be customized to your unique party theme, too!

Instead of buying those playful cones for your next party, take it up a notch. These colorful DIY party hats are easy to make and come together in minutes. They can easily be customized to your unique party theme, too!

Instead of buying those playful cones for your next party, take it up a notch. These colorful DIY party hats are easy to make and come together in minutes. They can easily be customized to your unique party theme, too!

Instead of buying those playful cones for your next party, take it up a notch. These colorful DIY party hats are easy to make and come together in minutes. They can easily be customized to your unique party theme, too!

Repeat this for as many party hats as you need. Feel free to mix patterns and colors, too. These colorful DIY party hats don’t need to be exactly the same. That is party of the fun. Now there are no limits on the creative party themes you can come up with. Don’t limit yourself to children’s birthday parties, either. Be a trendsetter and inspire your friends and family to embrace the playfulness. Make these colorful DIY party hats for your birthdays and New Years parties, too.

See where I’m linking up!

Don’t Forget to Pin It!

Instead of buying those playful cones for your next party, take it up a notch. These colorful DIY party hats are easy to make and come together in minutes. They can easily be customized to your unique party theme, too!