DIY Floral Note Cards | Fun and Colorful Papercraft

Sometimes you need a sweet note card to send to family and friends. Not a thank you card or special occasion card, simply an elegant way to send a note. These DIY floral note cards are the solution. They are colorful and fun, sure to brighten up the recipient’s day. With your Cricut, these babies are a breeze to make too. Get a stock going that you can pull from as needed.

Affiliate links may be used in this post. Ordering a product through these links may result in a commission at no extra cost to you. Read the full disclosure here.

Striped Floral Note Cards with Text Overlay: DIY Floral Note Cards


[bctt tweet=”These #DIY #floral note #cards are colorful and fun, sure to brighten up the recipient’s day.” username=”diyadulation”]

This year I’m on a mission to send more cards just because. In 2012 I received a card that had a Hello Kitty Pez Dispenser in it. The card was from my husband’s cousin, who I had only met a handful of times. She had seen the Pez Dispenser while out at the store and thought of me. It was such a kind gesture that sticks with me to this day. Imagine something as simple as a card having that kind of impact on someone’s life. How could you not want to spread that kind of joy? These DIY floral note cards are a wonderful way to do that.


Pink Striped Playful Card with Flower and Butterfly Embellishments on the Front

DIY Floral Note Cards Materials


Orange Striped Greeting Card with Flower and Butterfly Embellishments

Step 1

First, cut 2 scalloped cards out of each of the striped cardstock paper. Mine are 4 inches tall.

Step 2

Next, cut out 2 inside card layers each from the hot pink cardstock and light blue cardstock.

Step 3

Attach the hot pink cardstock inserts to the inside of the scalloped pink striped cards with your glue runner.

Step 4

Then attach the light blue cardstock inserts to the inside of the scalloped orange cards.


Close up of Simple Orange Striped Greeting Card with Flower Embellishments on the Front

Step 5

Next, add rub-on words in the oval opening on the front of each card.

Tip:

  • If your words are on the same sheet, cut them apart before rubbing them on. This keeps you from accidentally adhering the words you are not working with to the card.


Close up of Delight Striped Pink Greeting Card with Flower and Butterfly Embellishments on the Front

Step 6

Lastly, add one flower and one butterfly embellishment to each card.


Set of Floral Note Cards

Set of Floral Note Cards

Set of Floral Note Cards

Set of Floral Note Cards with Text Overlay: DIY Floral Note Cards

When is the last time you received surprise mail for no reason? Even if it was years ago, you likely remember it like it was yesterday. Now that you have DIY floral note cards, whose day are you going to brighten with them? I challenge you to send one to a friend or family member this month for no reason. Knowing that someone is thinking about you is such an easy way to bring happiness. 

See where I’m linking up!

Don’t Forget to Pin It!

Set of Floral Note Cards with Text Overlay: DIY Floral Note Cards


More Ideas You’ll Love:

DIY Whalecome Baby Card

Easy Handmade Thank You Cards

Doctor Who Inspired Greeting Card

Washi Tape Cupcake Birthday Card – Two Purple Couches

DIY Credit Card Keychains for Debt Free Living

You may be wondering how DIY credit card keychains can help you with debt free living. When you’re ready to get serious and truly eliminate your debt for good, you cut up your credit card. Why? It is because if you have a debt problem you are using credit cards as a crutch.

Affiliate links may be used in this post. Ordering a product through these links may result in a commission at no extra cost to you. Read the full disclosure here.

Heart Credit Card Keychain on Table Next to a Yellow Notebook with Text Overlay: DIY Credit Card Keychain for Debt-Free Living


[bctt tweet=”Find out how #DIY credit card keychains can help you with debt-free living! #debtfree” username=”diyadulation”]

Any time that something happens that you can’t pay cash for, you whip out a credit card. You aren’t paying them off every month and your debt is growing. It is time to get rid of the crutch and cut your credit cards into tiny little pieces.

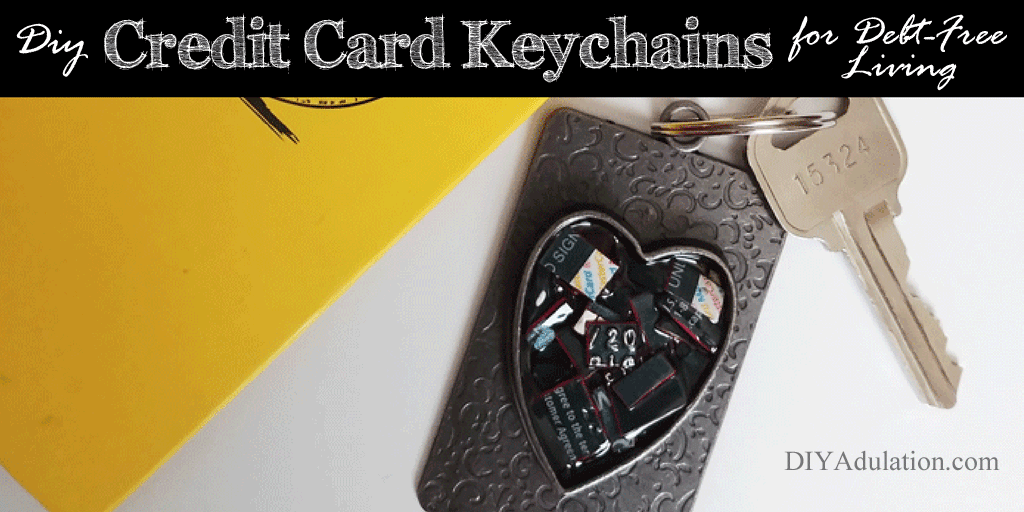
Then turn them into these DIY credit card keychains so that you are reminded of your debt free goal every time you pull out your keys.

Cutting up your credit cards is hard. Trust me. We have $40,000 in debt (not counting our house). Of that, $36,000 is student loan debt. I have been out of school for almost 10 years and we are still paying on student loans. That is crazy to me!

On top of that, anytime we needed to fix a car or new clothes for the kids, we put it on a credit card. Something had to give and it was time to make a change.

Step 1 was ditching those credit cards. Now our safety net has to be cash and that’s terrifying. You have to make the choice, though, that you don’t ever want to be here again. These DIY credit card keychains are the perfect reminder of that emotion and that goal.


Heart Credit Card Keychain next to Yellow Notebook

DIY credit card keychains

Materials


Tiny pieces of cut up credit cards

Step 1

The first step is the hardest. Cut up all of your credit cards into tiny little pieces.


Heart Pendant with gel inside of it next to a bottle of Jewelry Pendant Gel

Step 2

Then add some jewelry gel to the keychain base.


Jewelry Pendant Gel Spread Out in Base of Heart Pendant

Jewelry Pendant Gel Spread Out in Base of Rectangle Keychain Base

Step 3

Next, spread out the gel to cover the bottom inside of your keychain base.


Cut up pieces of credit card inside heart pendant

Cut up pieces of credit card inside rectangle keychain base

Step 4

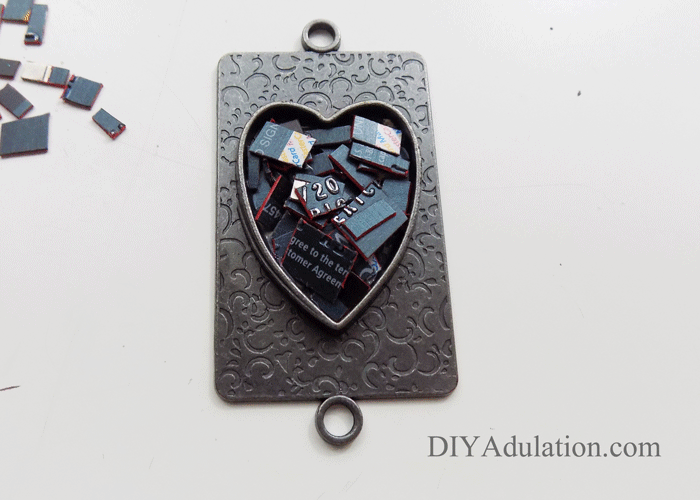
Add the tiny pieces of credit card to the cavity of your keychain base.


Credit Card Pieces inside heart pendant covered in final layer of jewelry pendant gel

Credit Card Pieces inside rectangle keychain base covered in final layer of jewelry pendant gel

Step 5

Then cover the credit card pieces in more jewelry gel.


Credit Card Pieces inside rectangle keychain base covered in final layer of jewelry pendant gel with bubbles removed

Tip:


Keychains covered in jewelry pendant gel side-by-side

Step 6

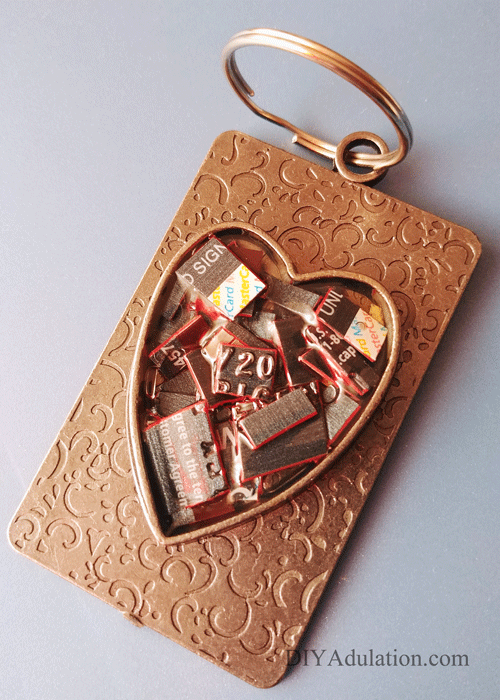
Next, set the keychain bases aside to dry according to the package instructions. Mine had to dry for 24 hours.


Dried heart keychain with bottom eye snapped off

Step 7 (Optional)

After your base has dried, if you are using a bracelet charm like me, use pliers to snap off the bottom ring.

Step 8 (Optional)

Then file the area down so that there are no sharp edges.
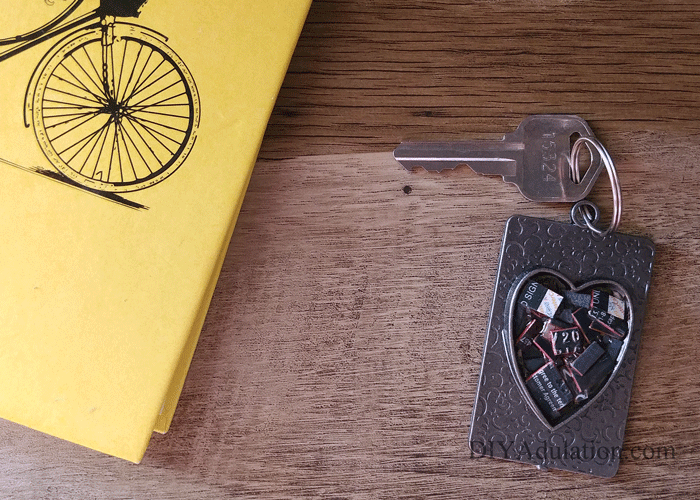
 

Key ring attached to rectangle keychain base

Heart Credit Card Keychain with Key Ring Attached

Step 9

Lastly, attach your key ring and put your keychain on your keys.


Heart Credit Card Keychain next to Yellow Notebook

Heart Credit Card Keychain next to Yellow Notebook

Heart Credit Card Keychain on bright yellow background

Close Up of Heart Credit Card Keychain with text at the top: DIY Credit Card Keychain for Debt Free Living

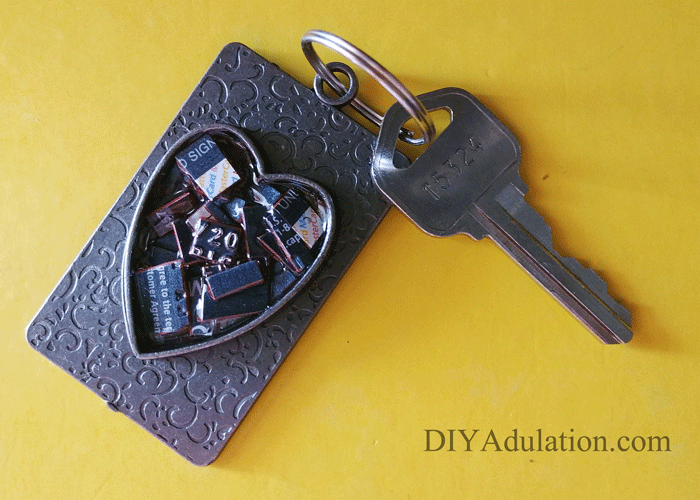
Are you ready to finally get out of debt once and for all? Stop giving your hard earned money to credit card companies. Cut up those credit cards and turn them into a reminder of what you’re fighting for. These DIY credit card keychains are the visual stimulus you need to keep you from falling back on that crutch. Don’t forget, I adhere to the plan laid out in Dave Ramsey’s The Total Money Makeover. If you haven’t checked it out yet, I highly recommend it.

See where I’m linking up!

Don’t Forget to Pin It!

Heart Credit Card Keychain on Table Next to a Yellow Notebook with Text Overlay: DIY Credit Card Keychain for Debt-Free Living


More Ideas You’ll Love:

Clever Upcycles to Get Your Home Organized + MM 190

Get organized on a budget with these clever upcycles to get your home organized. These awesome ideas prove that you don’t have to spend a fortune on fancy organization products to wrangle your stuff. Instead, you can find items you already have around the house and turn them into functional pieces that keep everything where you need it.

Upcycled Organization Ideas Collage


[bctt tweet=”Now, you can save money while you get organized with these clever #upcycles to get your home #organized!” username=”diyadulation”]

You see me write a lot about how being organized saves you money. It keeps you from unnecessary purchases, makes your life run more smoothly, and frankly is good for your piece of mind. Now, you can save money while you get organized with these clever upcycles to get your home organized.


Coastal Rectangle Receipt Holder on a Table

Coastal Box for Saving Receipts (Across the Blvd)

Now that tax time is here, a lot of people are scrambling to get all of their financial documents and receipts in order. This beautiful DIY will make finding those receipts a breeze next year.


Framed Peg Board with Craft Supplies Organized on it

DIY Framed Pegboard (Intelligent Domestications)

Anyone else need more organized craft supplies? Then this upcycle is for you! It is amazing how much you can fit in a small space when it is well organized.


Mini Dresser Organizer between office supply organizers on a desk

DIY Desk Organizer (Domestically Creative)

Speaking of the office, this adorable little upcycle is perfect for organizing your stamps, paper clips, and other small office supplies neatly on your desk.


Blue Decorative Container with the words Trash Bags on it

Trash Bag Storage Dispenser/Container (Chas’ Crazy Creations)

We usually keep our trash bags in the box they came in. It works as far as organization goes but this easy upcycle would save us much more space under our sink. Find out how easy it is to make at the link above!


Hanging Wooden Chalkboard with magnetic notes on it and towels hanging on the hooks

Easy DIY Magnetic Chalkboard for the Kitchen (Anika’s DIY Life)

Okay, not only does this help you organize your kitchen but it is also gorgeous while doing it. Can’t you already picture it hanging on your wall?


Hand Lifting Edge of Large Folder with Stencils inside

How to Store and Organize Stencils (H2O Bungalow)

This DIY isn’t technically an upcycle but it’s so clever I had to include it. Finally organize all of your stencils in an effective and beautiful way with this tutorial.


3 Metal Keys with Confetti Covered Tops

Colorful Confetti Keys (Sparkle Living)

Wondering how this tutorial helps get you organized? When you use a different confetti on each key it becomes fun a color-coded system for your keys. No more trying them all to figure out which one goes to the garage or the shed.


Jars of Nail Polish Organized on a Spice Rack

How to Make a Nail Polish Rack (Duct Tape & Denim)

Do you have an old spice rack lying around? Turn it into useful storage for all of those nail polish jars with this easy upcycled idea!


Upcycled Organization Ideas Collage

Now you can save money while you organize. These clever upcycles to get your home organized are easy to make and inexpensive. Think of how much time you will save when you don’t have to go searching through the house for the things you need. Now it’s time to get the party started. Link up your awesome new posts below at the Merry Monday link party. Then hop around to be inspired by what everyone is sharing. See you down there!


Don’t Forget to Pin It!

Upcycled Organization Ideas Collage