Candy DIY Gift Tags with Photo Inserts

It’s time for more awesome candy Christmas crafts. You’ve taken care of your tree, your food, and your porch. Now it’s time to add some of that sweetness to your gift-giving too. These candy DIY gift tags with photo inserts are not only adorable but also easy for little ones to help pass out gifts. Double score!

Affiliate links may be used in this post. Ordering a product through these links may result in a commission. Read the full disclosure here.

Collage of Candy Gift Tags Attached to Bow on Present with text overlay - Candy DIY Gift Tags with Photo Inserts


[bctt tweet=”Don’t forget to add some sweetness to your gift-giving too this season. These candy DIY gift tags with photo inserts are adorable and easy for little ones!” username=”diyadulation”]


Welcome to Day 9 of the Fourth Annual 12 Days of Christmas Series!

DIY Christmas Ideas and Recipes you can use this year! DIY Christmas Decor and Games Ideas #12daysofChristmas

We have teamed up with 50 plus bloggers to bring you a oodles of DIY Ideas and Recipes to make your holiday season merrier. There are 12 different posts in the series and we have spread them out over a four week period with three posts per week. Now is the time to subscribe!

GO HERE for the complete list of Dates and Topics plus a collection of most popular holiday ideas including ornaments, games, recipes and more from all 50 plus talented bloggers!

It’s Day 9 and we are sharing Pretty Gift Wrapping Ideas!


Get Your Glitter On!

Turns out that the only thing I love more than candy is glitter. These adorable gift tags are packed with it. Unlike other projects, though, this glitter won’t get everywhere because you’re wrapping it in cellophane.

As every crafter knows, there’s not much you can do about the constant parade of glitter that lives in your house. However, these candy DIY gift tags let you transport the glittery fun without the mess coming along too. (Unless you use glitter ribbon on your gifts, but that’s your call. I won’t judge.)


Candy Gift Tag on Glittery Gift Bow

Candy DIY Gift Tags Materials


Condiment Container Lids Next to Glitter Glue

Step 1

First, remove the condiment container lids from your packaging it they came in a set with the containers.


Glitter Glue on Condiment Container Lid

Step 2

Next, outline one color of your swirl with Stickles.


White and Teal Glitter Glue on Condiment Container Lid

White and Teal Glitter Glue on Condiment Container Lid next to Glitter Containers

Step 3

Then fill in the blank areas with a second color of Stickles.

Step 4

Set your lid aside to dry.


Red Glitter Glue on Condiment Container Lid

Red and White Glitter Glue on Condiment Container Lid

Step 5

Repeat steps 2 through 4 for your remaining lids.

Note:


Girls Picture Cut from Additional Photos Next to Scissors

Step 6

After your lids have dried, pull out your photos.

Note:


Glitter Candy Lid on Girls Photo next to Pencil

Step 7

Next, use one of your lids as a template and trace a circle on your photo with a chalk pencil.


Close Up of Chalk Lines on Photo

Tip:


Cut Out Circle School Photo

Step 8

After you have traced your circle, cut it out.

Tip:


Close Up of Glue on Back of Lid

Step 9

Next, add a small amount of glue to the inside of your lid.


Girls Photo on Back of Lid

Step 10

Press your photo circle into the glue and set aside to dry.

Step 11

While you glue dries, finish adding photos to the rest of your candy DIY gift tags.


Girls Photo in Lid on Piece of Cellophane

Step 12

After you glue has dried, cut a piece of cellophane and place your tag (photo side up) in the center of it.


Cellophane Wrapped Around Candy Lid and One End Tied

Step 13

Then wrap your cellophane around the lid and twist one side of the cellophane then secure one edge with a piece of thread.


Cellophane Tied Around Candy Lid

Step 14

Next twist the remaining side of cellophane and again secure with a piece of thread.


Cellophane Tied Around Candy Lid Next to Scissors

Step 15

Trim any excess thread from your knots before moving on.


Thread Through Knot on Cellophane

Hanger on Photo Gift Tag

Step 16

Slip an additional piece of thread through one knot on your gift tag and create a hanger.

Optional:


Candy Gift Tag on Glittery Gift

Step 17

Repeat steps 12 through 16 until you have finished all of your gift tags.


Photo Gift Tag on Glittery Gift

Photo Gift Tag on Glittery Gift Bow

Close up of Photo Gift Tag Attached to Bow on Present with text overlay - Candy DIY Gift Tags with Photo Inserts

Admit it! Just looking at these glittery candy DIY gift tags makes you feel happier inside. Your gifts will absolutely shine with them dangling from the bows this year. You can totally use these for group gifts too. For example, we have a few that are for the entire family this year and all I did was add a photo of all of us in the lid. The same goes for couples’ gifts or gifts for all of your kids. No more trying to scratch out 5 names as tiny as possible on the tag.

Bonus Tip:

See where I’m linking up!

Don’t Forget to Pin It!

Close up of Candy Gift Tag Attached to Bow on Present with text overlay - Candy DIY Gift Tags with Photo Inserts

Scroll down for many more Pretty Gift Wrapping Ideas!


DIY Wintergreen Cranberry Wood Wick Candle

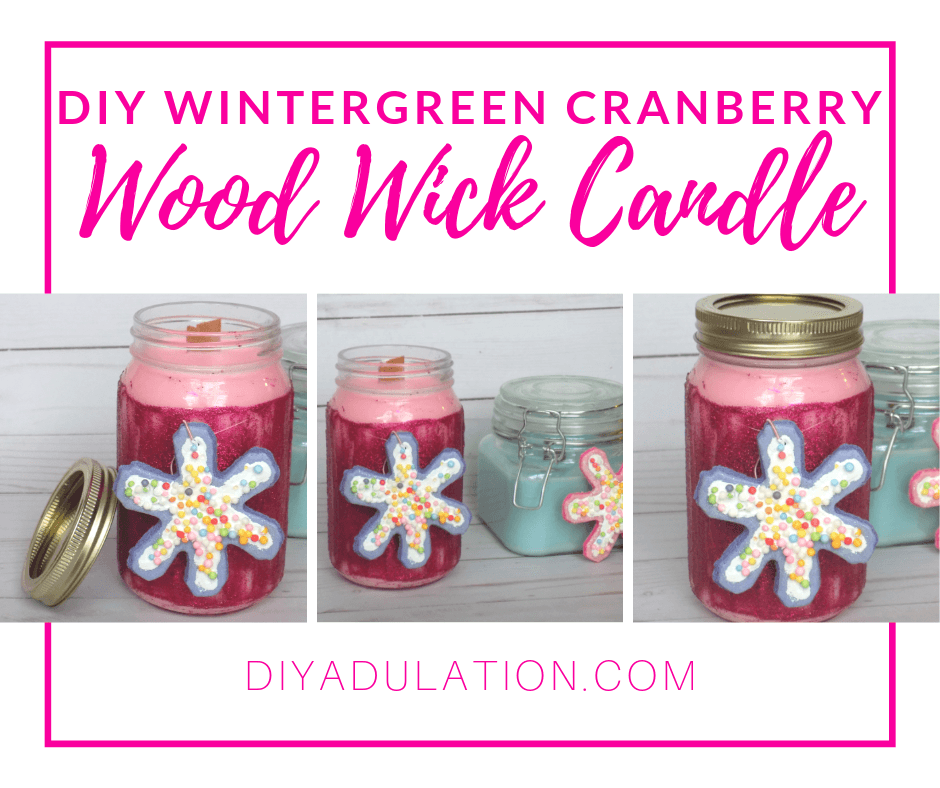
Gifts in a jar are such an easy way to gift awesomeness during the holidays. Even better, the possibilities are pretty much endless so you can make gifts for everyone on your list. This DIY wintergreen cranberry wood wick candle is the perfect jar gift for all of your friends, grandparents, and mommas on your list.

Affiliate links may be used in this post. Ordering a product through these links may result in a commission. Read the full disclosure here.

Glittery Jar Candle with text overlay - DIY Wintergreen Cranberry Wood Wick Candle


[bctt tweet=”Surprise the friends, grandparents, and mommas on your list with this DIY wintergreen cranberry wood wick candle! It’s the perfect frugal gift in a jar. #12daysofchristmas” username=”diyadulation”]


Welcome to Day 8 of the Fourth Annual 12 Days of Christmas Series!

DIY Christmas Ideas and Recipes you can use this year! DIY Christmas Decor and Games Ideas #12daysofChristmas

We have teamed up with 50 plus bloggers to bring you a oodles of DIY Ideas and Recipes to make your holiday season merrier. There are 12 different posts in the series and we have spread them out over a four week period with three posts per week. Now is the time to subscribe!

GO HERE for the complete list of Dates and Topics plus a collection of most popular holiday ideas including ornaments, games, recipes and more from all 50 plus talented bloggers!

It’s Day 8 and we are sharing Christmas In A Jar Ideas!


Wood Wick Candles with Snowflake Cookie Ornaments

The first time I made this, I used cosmetic grade glittery mica powder to color the candle. It’s looked awesome and shimmery… until it cooled. Then, all of the color was at the bottom. Boo.

I decided to skip the glitter and try a new version of dye. Thankfully, the wax dye worked so much better. If you’re new to making your own dyed candles, skip any of the powder colorant. It simply doesn’t work.

Since I had to lose the glitter in the candle itself, I decided to add it to the jar instead. With this DIY wintergreen cranberry wood wick candle, you get a beautiful and wonderfully scented candle AND you get your glitter fix too.


Pink Glitter Jar Candle next to Lid

DIY Wintergreen Cranberry Wood Wick Candle Materials

Step 1

First, put a 1 cup of water into a small cooking pot and heat it over medium-high heat.

Step 2

While your water starts to boil, add 4 cups of wax flakes into your pouring pot.


Wax Flakes Melting inside of Pour Pot

Step 3

Once your water is boiling, place your pouring pot into it and turn the heat down to medium.


Melted Wax inside of Pour Pot

Step 4

Continue heating your wax flakes until they are completely melted.


Wax Dye Chips in Melted Wax

Step 5

After your wax flakes are melted, stir in a few flakes of your wax coloring at a time until you achieve your desired color.

Note:


Dyed Melted Wax in Pour Container

Step 6

Once you have colored your melted wax, stir in 10-12 drops of Wintergreen fragrance oil.

Step 7

Then stir in 5-8 drops of Cranberry fragrance oil.


Wood Wick in Metal Stabilizer

Step 8

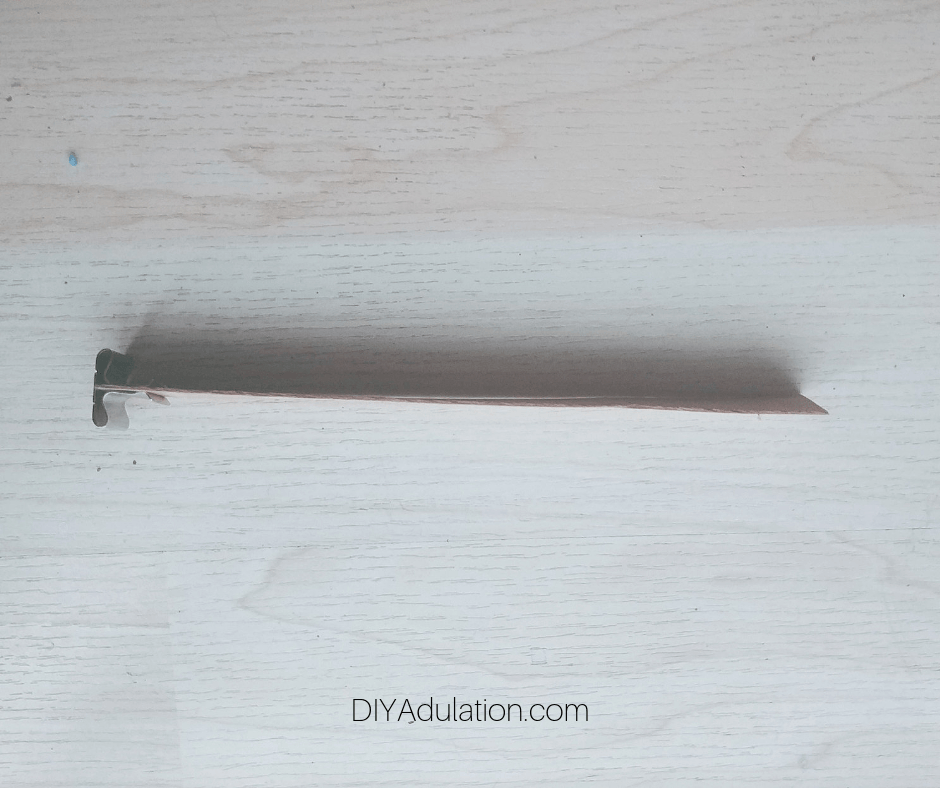
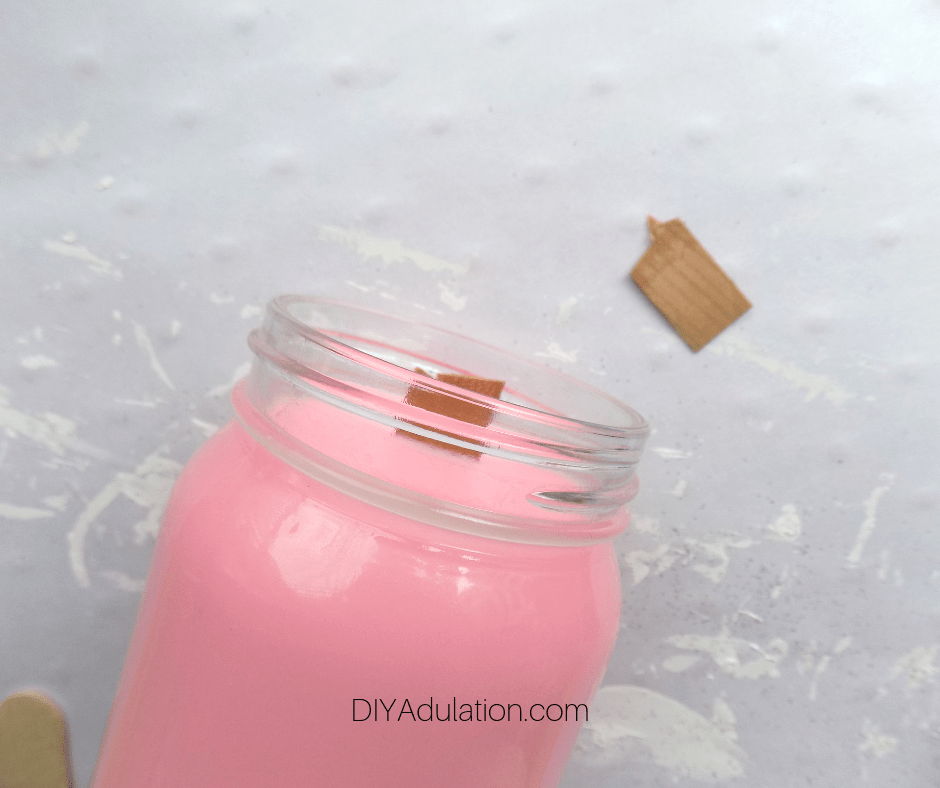
Keep your wax on the stove while you prep your jar starting with placing your wood wick inside the metal stabilizer.

Step 9

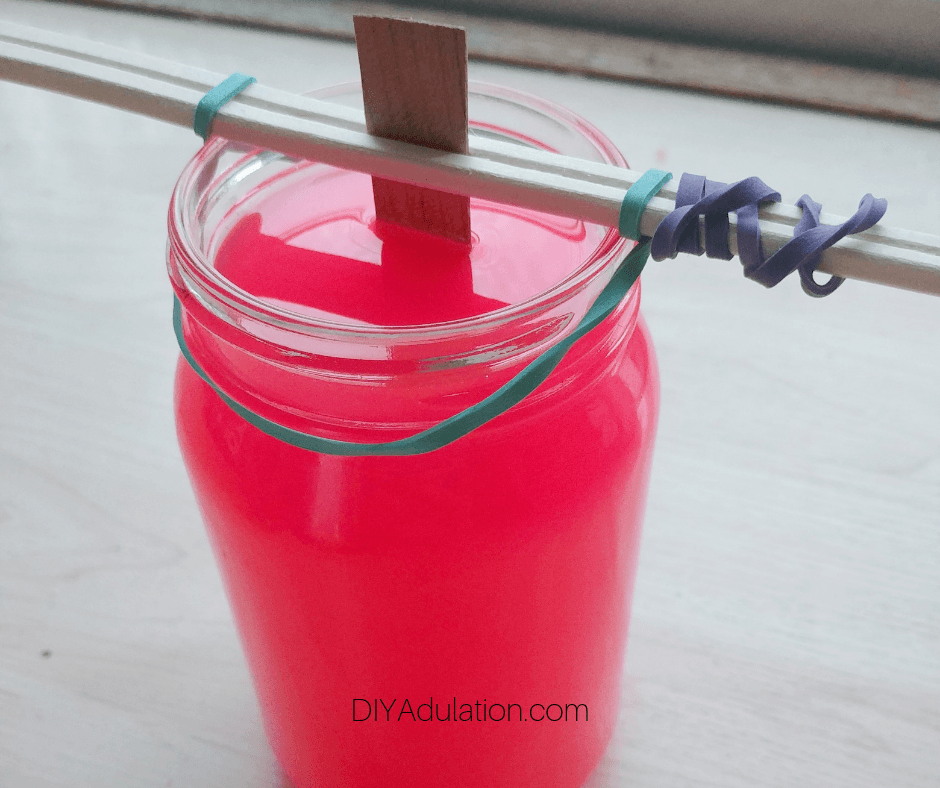
Next, slip a rubber band around the top of your jar.

Step 10

Then slide the top of your wood wick into your chopsticks.

Tip:


Close Up of Rubber Band Securing Chopsticks

Wooden Wick Secured in Place in Jar

Step 11

Now, place you wick inside the jar resting the chopsticks on the lip. Then twist the edges of your rubber band and slip it on each side of the chopsticks one side at a time to secure them (and your wick) in place.


Melted Wax In Jar with Stabilized Wick

Step 12

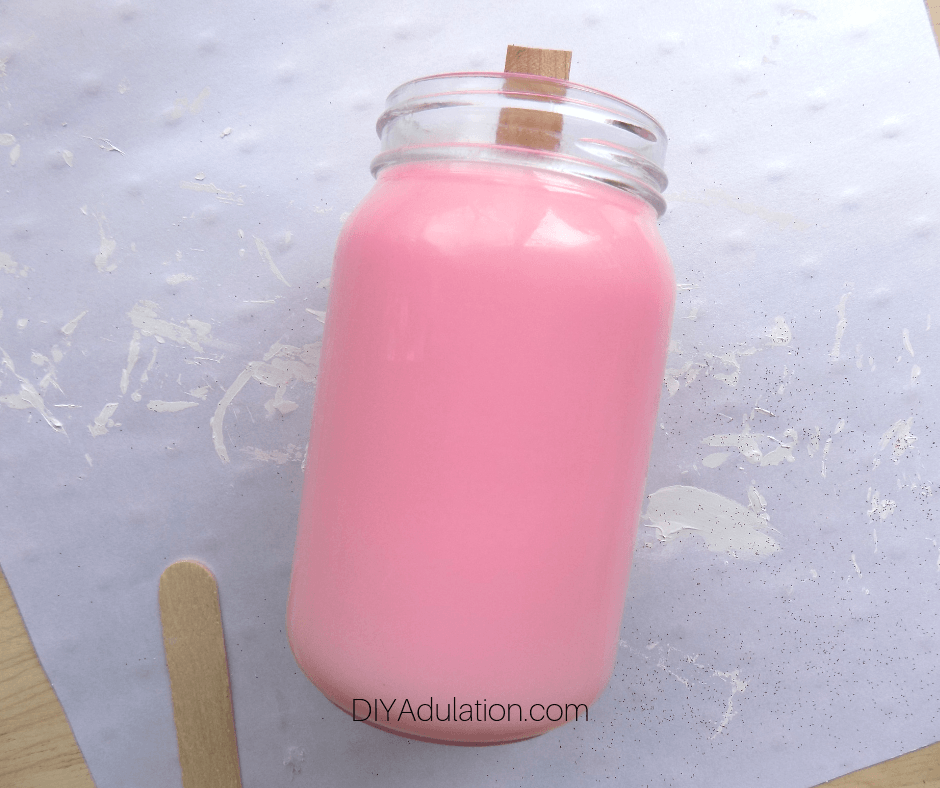
Once your wick is secured in place, carefully pour your wax into your jar and set the candle aside to cool.


Jar Candle with Wood Wick on Side

Step 13

After your candle has completely cooled, carefully remove the rubber band and chopsticks.


Trimmed Wood Wick on Jar Candle

Step 14

Next, trim your wick so that it’s about 1/4 inch from the wax.


Pink Jar Candle next to Glitter Paste Container

Glitter Paste on Jar Candle

Step 15

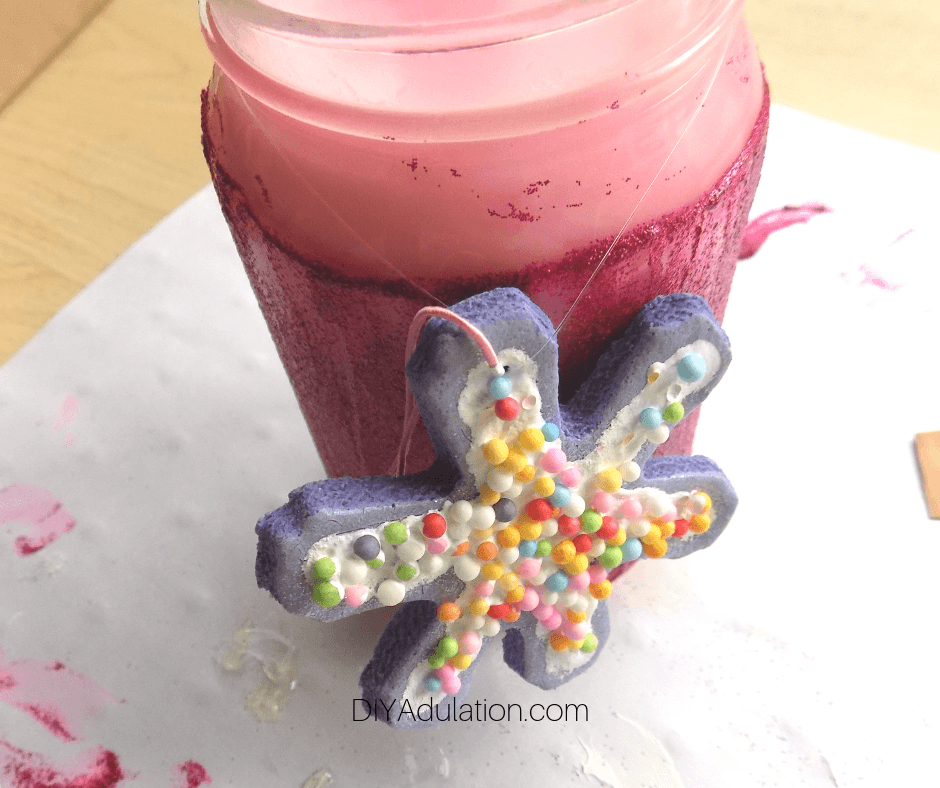
Now, coat the outside of your jar with glitter paste. Use your finger to remove any excess along the top and bottom edges.

Step 16

Allow your glitter paste to dry before moving on.


Clear Thread through Purple Snowflake Cookie Ornament

Purple Snowflake Cookie Ornament Hanging on Jar Candle

Step 17

Lastly, tie one of your snowflake cookie ornaments around the lip of the jar with clear nylon thread.


Lidded Wood Wick Candles with Snowflake Cookie Ornaments

Step 18

Before gifting, be sure to reattach the lid to your jar to protect the wick. Unlike regular wicks, wooden wicks can break off especially during the wrapping, transporting, and unwapping of gifts. The lid will keep the wooden wick from getting broken.

Glittery Jar Candle with text overlay - DIY Wintergreen Cranberry Wood Wick Candle

I wish digital screens could be scratch and sniff so you could smell how amazing this candle smells. It is festive and sweet to fill your (or your friends and family’s) home with holiday scents this season. Now it’s time to check out the other awesome gifts in a jar ideas for everyone else on your list this year. Finish off gifts for everyone on your list with the ideas below!

See where I’m linking up!

Don’t Forget to Pin It!

Glittery Jar Candle with text overlay - DIY Wintergreen Cranberry Wood Wick Candle


Scroll down for many more Christmas In A Jar Ideas you are sure to love!


DIY Candy Clip-On Earrings

Are you trying to save money on your holiday gifts without giving up on style? Don’t think you’re limited to sewing an elaborate quilt or making coasters. These DIY candy clip-on earrings are absolutely adorable, super easy to make, and the perfect handmade gift for any of the little princesses on your list!

Affiliate links may be used in this post. Ordering a product through these links may result in a commission. Read the full disclosure here.

Candy Cabochon Earrings on Pastel Cards with text overlay - DIY Candy Clip-On Earrings


[bctt tweet=”Save money on gifts without losing style when you make these DIY candy clip-on earrings! They are the perfect fun gift for the girls on your list this year!” username=”diyadulation”]


It’s our Second Day of the Fourth Annual 12 Days of Christmas Series!

DIY Christmas Ideas and Recipes you can use this year! DIY Christmas Decor and Games Ideas #12daysofChristmas

We have teamed up with 50 plus bloggers to bring you a oodles of DIY Ideas and Recipes to make your holiday season merrier. There are 12 different posts in the series and we have spread them out over a four week period with three posts per week. Now is the time to subscribe!

GO HERE for the complete list of Dates and Topics plus a collection of most popular holiday ideas including ornaments, games, recipes and more from all 50 plus talented bloggers!

It’s Day 2 and we are sharing DIY Gift Ideas!


Candy Clip-On Earrings on Pastel Cards

I love clip-on earrings for little girls because it keeps you from making the choice to pierce before you’re ready. My daughter absolutely loves those plastic ones that come in dress up kits but they aren’t very durable. They also aren’t always practical for school, holiday gatherings, or other occasions she might want to dress up.

These DIY candy clip-on earrings are an easy solution that makes a great gift! Your little girl will love getting dressed up with these babies immediately after finding them in her stocking on Christmas morning.

DIY Candy Clip-On Earrings Materials


Pile of Candy Cabochons

Step 1

First, empty all of your cabochons into a pile.


Paired Up Candy Cabochons

Step 2

Then, make 3+ pairs that you want to turn into earrings.

Note:


Blank Silver Clip-On Earring Bases

Step 3

Next, pull out the same number of clip-on earring blanks for each set of cabochons.

Step 4

Then, open an earring blank and place a small amount of E6000 onto the flat front of it.


Blank Silver Clip-On Earring Base Glued to Candy Cabochon

Step 5

Next, press a cabochon into firmly into the E6000 on the earring blank.

Tips:

Step 6

Repeat steps 4 and 5 until you have the desired number of earring sets made.


Candy Clip-On Earrings Drying on Paper Plate

Step 7

Set your earrings aside and allow the E6000 to dry for 24 hours before placing on your tags.

Tip:


Open Pastel Card

Pastel Card Cut In Half

Step 8

While you wait for your earrings to dry, pull out your card and cut it in half.


Pastel Card Half Cut In Half

Step 9

Then, take one half of your card and cut it in half again.


Corner Rounder and Scissors Next to Pastel Cards

Close Up of Slits Cut Into Cards

Step 10

Next, round the corners of each half and cut 3 pairs of slits in them. Use cabochons of the same size as your earrings to measure the distance between slits.


Candy Earrings on Pastel Card

Back of Clip-On Earrings on Card

Step 11

After your earrings have dried, slide them through the slits on your paper tags so that the pretty side of the earrings is on the front.


Candy Cabochon Earrings on Pastel Cards with text overlay - DIY Candy Clip-On Earrings

These DIY candy clip-on earrings are so much fun! I totally want to make a regular pair of matching ones for me. (If I do, I’ll totally share how to make them with you too.) They are also so inexpensive to make that you could easily make a huge batch of them as party favors or gifts for your daughter’s Girl Scout troop.

Now it’s time to check out the other awesome handmade gift ideas from my friends below! Get DIY ideas for everyone on your list this year and Christmas is done!

See where I’m linking up!

Don’t Forget to Pin It!

Candy Cabochon Earrings on Pastel Cards with text overlay - DIY Candy Clip-On Earrings


Scroll down for many more DIY Gift Ideas!