Day 3: Cardboard Toy Box

If you been following along with our 31 Days of Saving on Holiday Spending series, you already know about the perks for subscribers.  Today, you can get the exclusive tutorial for this Cardboard Toy Box emailed right to your inbox!  If you want to go ahead and sign up you can sign up here: **Update** All freebies from this 31 Days List have been moved to the VIP Library for subscribers. Sign up for free here!

31 Days of Saving on Holiday


Here is a sneak peak of the tutorial for you, in case you’re not convinced.


“If you’re lacking storage for all of your kids’ toys, then this DIY gift serves two purposes for you!  (Don’t you love gifts that multitask?)  A personalized toy box will make your kids ecstatic yet help you keep toys out of sight and rooms clean(er) as well.  If you’re handy with a saw and drill, then making a wooden toy box is certainly an option.  When you are on a tight holiday gift budget, though, even a DIY wooden one can be too expensive.  Here is an insanely fugal alternative for you: a cardboard toy box.

Chances are that you already have all of the materials for this lying about your house which would make this gift 100% free!  It is so easy to make and requires little, if any, cutting.  Plus, in the end, you will have a completely custom piece that you know will match your kid’s room.”


toy-box-horizontal

Sign up now to get this tutorial and all of the other awesome freebies available to subscribers! I would love to see how you decorate yours!  Share your creations with me on the Facebook page.

31 Days of Saving on Holiday Gifts: the free course to help you have you best holiday season yet! From building a strong budgetary foundation to finding small and large ways to save, this will help you knock your holiday gifts out of the park without breaking the bank!


If you missed the introduction to this series, check it out at 31 Days of Saving on Holiday Gifts.

Check out #write31days

Find out more about #write31days!

Autumn Scarecrow Note Holder

It is fun to dress up your home for autumn but that doesn’t mean dressing it up can’t also be functional.  You still have grocery lists, to-do lists, letters to mail… the list goes on and on.  Wouldn’t it be great to have a way to keep all of your notes and lists in one place that is actually festive and pretty to look at?  (If you said no, I’m worried about you, unless you haven’t had your coffee yet, in which case I understand completely.)  This adorable autumn scarecrow note holder does just that and you can make it in about 10 minutes!

Decorating your house for fall doesn't mean you have to sacrifice function for festive. This adorable autumn scarecrow note holder has both!

[bctt tweet=”Decorating your house for fall doesn’t mean you have to sacrifice function for festive. This adorable #autumn #scarecrow note holder has both!”]

Materials

Decorating your house for fall doesn't mean you have to sacrifice function for festive. This adorable autumn scarecrow note holder has both!

Step 1

Place one craft stick on your work surface at an angle and then glue 6 craft sticks perpendicular to it. (See picture above.)
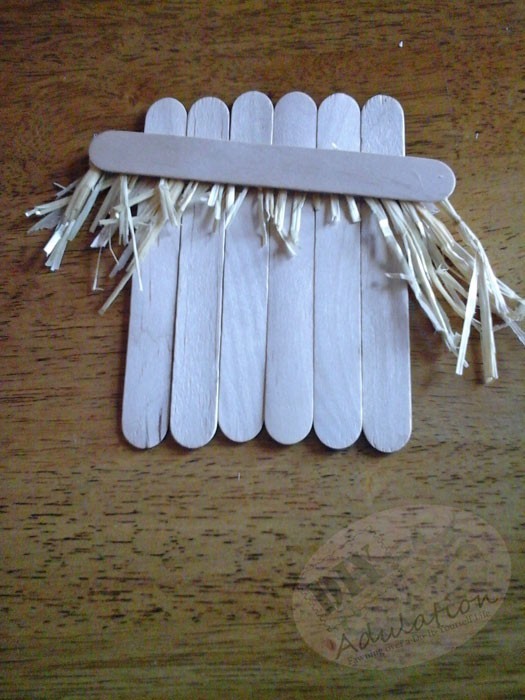
 

Decorating your house for fall doesn't mean you have to sacrifice function for festive. This adorable autumn scarecrow note holder has both!

Step 2

Glue some straw to another craft stick to create the “hair”.  The pieces on the outside edges should be longer and the pieces in the middle should be kept short. (Think fringy bangs.)  Once your straw is in place, glue craft sticks (straw side down) to your scarecrow parallel with the existing perpendicular stick.


Decorating your house for fall doesn't mean you have to sacrifice function for festive. This adorable autumn scarecrow note holder has both!

Step 3

Glue down you 2 black buttons for eyes.  Next, glue your orange heart button upside down for the nose.


Decorating your house for fall doesn't mean you have to sacrifice function for festive. This adorable autumn scarecrow note holder has both!

Step 4

Paint on the mouth as pictures using your black paint.


Decorating your house for fall doesn't mean you have to sacrifice function for festive. This adorable autumn scarecrow note holder has both!

Step 5

Paint the top of your craft sticks green for the hat as pictured.


Decorating your house for fall doesn't mean you have to sacrifice function for festive. This adorable autumn scarecrow note holder has both!

Step 6

Paint the perpendicular stick brown and allow paint to dry completely.

Tip:

  • If you do not have sealed craft sticks (mine were not) it may require a second coat of both green and brown paint.


Decorating your house for fall doesn't mean you have to sacrifice function for festive. This adorable autumn scarecrow note holder has both!

Step 7

Flip your scarecrow over.  Break the last craft stick in half and glue it to the back as pictured.  This helps to stabilize your scarecrow.


Decorating your house for fall doesn't mean you have to sacrifice function for festive. This adorable autumn scarecrow note holder has both!

Step 8

Glue on your clothespin being sure that it can be pressed open from the front of your scarecrow.


Decorating your house for fall doesn't mean you have to sacrifice function for festive. This adorable autumn scarecrow note holder has both!

Step 9

Next, glue your embellishments to the lower right side of the brim.  I layered 2 leaves and a dimensional acorn, but you can do it in any variety you like.


Decorating your house for fall doesn't mean you have to sacrifice function for festive. This adorable autumn scarecrow note holder has both!

Step 10

Glue on your length of burlap ribbon to hang it by and enjoy.

Note:

  • If you are concerned about the back of the scarecrow being “ugly” simply cut a piece of matching felt to size and glue it over top of the entire back.  Since it will be against the wall, I wasn’t concerned about it.

Decorating your house for fall doesn't mean you have to sacrifice function for festive. This adorable autumn scarecrow note holder has both!

This little guy is just too stinking cute!  You will love having him greet you on your wall every day.  Maybe he’ll even get you a little excited about your to-do list! (Or not, but either way you’ll have something adorable to look at.)

Don’t want the autumn craft fun to end?  Get more ideas here!

Affiliate links may be used in this post. Ordering a product through these links may result in a commission. Read the full disclosure here.

See where I’m linking up!


DIY Free-Form Journal

There are many things going on in your life that can weigh on you. Sometimes you can’t tell people these things and sometimes you just need to vent right now. The kids are driving you crazy or your friend hurt your feelings. The regular lines of communication aren’t there because your spouse is deployed and you are feeling isolated. You shouldn’t carry all of that hurt and frustration around. It keeps you from being the best you possible. This DIY free-form journal helps you let go of all of that in a safe place. In addition, it is the second tutorial in the journey to wellness (in preparation for the first ever Military Spouse Wellness Summit). This has now ended.

Affiliate links may be used in this post. Ordering a product through these links may result in a commission. Read the full disclosure here.


Hurt and frustration keep you from being the best you possible. This DIY free-form journal can help you let go of all of that in a safe place. Find out how!


[bctt tweet=”A DIY free-form journal can help you let go of frustration in a safe place. Find out how now!” username=”diyadulation”]


Hurt and frustration keep you from being the best you possible. This DIY free-form journal can help you let go of all of that in a safe place. Find out how!

What a Free-Form Journal Is Not


Hurt and frustration keep you from being the best you possible. This DIY free-form journal can help you let go of all of that in a safe place. Find out how!

What a Free-Form Journal Is


Hurt and frustration keep you from being the best you possible. This DIY free-form journal can help you let go of all of that in a safe place. Find out how!

Materials


Hurt and frustration keep you from being the best you possible. This DIY free-form journal can help you let go of all of that in a safe place. Find out how!

Step 1

First, cut a length of ribbon 4 inches longer than the height of your composition book.  Next, attach it to the top left corner of your composition book cover.


Hurt and frustration keep you from being the best you possible. This DIY free-form journal can help you let go of all of that in a safe place. Find out how!


Step 2

Next, use your composition book to measure you decorative paper.  Once you have measured it cut 2 pieces to those measurements.


Step 3

Put a layer of Mod Podge on the front and back covers of your composition book.  Next place your decorative paper on top.

Hurt and frustration keep you from being the best you possible. This DIY free-form journal can help you let go of all of that in a safe place. Find out how!


Tip:

  • This entire project works best if you lay your composition book open with the covers facing up.


Hurt and frustration keep you from being the best you possible. This DIY free-form journal can help you let go of all of that in a safe place. Find out how!


Step 4

After attaching your paper put another coat of Mod Podge over the decorative paper.  Next add any embellishments you chose.

Hurt and frustration keep you from being the best you possible. This DIY free-form journal can help you let go of all of that in a safe place. Find out how!

Note:

  • I just added letter stickers to mine because I loved the paper and didn’t want to cover it much but you can use any stickers, die cuts, or chipboard that you want.


Hurt and frustration keep you from being the best you possible. This DIY free-form journal can help you let go of all of that in a safe place. Find out how!

Step 5

Finally, add a sealer coat of Mod Podge to your entire notebook and allow it to dry.

Tip:

  • If you notice that your paper is bubbling, add a sheet of wax paper over top and stack a heavy book on it.  Once the Mod Podge has dried, the wax paper will peel right off leaving your design intact.


Hurt and frustration keep you from being the best you possible. This DIY free-form journal can help you let go of all of that in a safe place. Find out how!

Hurt and frustration keep you from being the best you possible. This DIY free-form journal can help you let go of all of that in a safe place. Find out how!

Hurt and frustration keep you from being the best you possible. This DIY free-form journal can help you let go of all of that in a safe place. Find out how!

Hurt and frustration keep you from being the best you possible. This DIY free-form journal can help you let go of all of that in a safe place. Find out how!

Hurt and frustration keep you from being the best you possible. This DIY free-form journal can help you let go of all of that in a safe place. Find out how!

Hurt and frustration keep you from being the best you possible. This DIY free-form journal can help you let go of all of that in a safe place. Find out how!

Hurt and frustration keep you from being the best you possible. This DIY free-form journal can help you let go of all of that in a safe place. Find out how!

Now you have a fantastic new free-form journal.  Use the ribbon you attached to keep your place easily.  Any time you begin feeling frustrated, overwhelmed, or anything in-between simply pull out your new tool for being the best you possible. This is another excellent tool that goes along with dealing with embarrassment (if you struggle with that like I do). Take control of your life today with this easy DIY.

See where I’m linking up!