DIY Planner Binder

If you follow DIY Adulation on any of our social media channels, you already know my passion for planning.  (If you aren’t following you should be.  Find DIY Adulation on these channels: Facebook * Twitter * Pinterest * Google+ * Instagram.  Don’t worry, I’ll wait for you here while you do that.)  Now that we’re all on the same page, here is the reveal of this awesome DIY planner binder that is beautiful and sparkly (just the way you love it)!

Affiliate links may be used in this post. Ordering a product through these links may result in a commission. Read the full disclosure here.

August is the start of a fresh planner in my house.  (Find out why here.) This year I’m actually changing from a smaller planner to an 8.5 x 11 planner.  These means needing a fresh new binder to hold it and the result is fantastic!  This DIY planner binder is so easy to make that you’ll want to start decorating all of your organizing binders.


This DIY planner binder is so easy to make that you’ll never go back to store bought!

[bctt tweet=”This DIY planner binder is so easy to make that you’ll never go back to store bought! #diy #plannerbinder”]

Materials


This DIY planner binder is so easy to make that you’ll never go back to store bought!

Step 1

Tip: I chose to put a piece of paper in the top of the clear pocket on the cover of the binder to keep it from sealing.  If you don’t care if the pocket is usable, you don’t have to do this.

Put a coat of Mod Podge on the front cover of your binder.

Step 2

With the binder on a protected surface, pour a generous amount of glitter over the entire front cover.

Step 3

Shake off excess and allow to dry completely.

**Repeat steps 1 through 3 until achieving your desired look.


This DIY planner binder is so easy to make that you’ll never go back to store bought!

Step 4

Fill in any gaps or light areas there might be by covering the areas with more Mod Podge and covering with glitter. Allow to dry completely.

Step 5

Put a final coat of Mod Podge on to seal the glitter and allow it to dry completely.

Tip: If you are still having trouble with glitter coming off on your hands after applying the last coat, spray the cover with a sealant spray.


This DIY planner binder is so easy to make that you’ll never go back to store bought!

Step 6

Place a piece of paper or newspaper over the glittered area and secure in to place with painters tape.


This DIY planner binder is so easy to make that you’ll never go back to store bought!

Step 7

Open binder and place on a protected area with the covers facing up.  Spray paint it and allow paint to dry.

Tip: Depending on the color of your paint and the color of your binder, it could take multiple coats to cover.  The white binder I used took 2 full coats and one touch-up.


This DIY planner binder is so easy to make that you’ll never go back to store bought!

Step 8

Carefully remove the tape and paper covering the glitter.  Fill with your choice of printable planners (I recommend our awesome Family Planner this one is no longer available) and you’re ready to go.


This DIY planner binder is so easy to make that you’ll never go back to store bought!


It is that easy to create you own custom DIY planner binder!  Personalize your colors, sizes, and more without the hefty price tag!  How will you personalize your planner?  Let me know in the comments and don’t forget to get a free copy of the Family Planner monthly calendar and cleaning schedule when you subscribe to our Newsletter!


This DIY planner binder is so easy to make that you’ll never go back to store bought!

This DIY planner binder is so easy to make that you’ll never go back to store bought!


See where I’m linking up!

DIY Stamped Patriotic Napkins

Summer is a time for celebrations, sun, and (hopefully) more time for crafting. These celebrations don’t have mean excess waste for you though. Cloth napkins are an excellent way to save money, save the planet, and prevent mounds of trash for you after a gathering. That doesn’t mean you can’t have something cute and festive to use, though. Even better, they also don’t have to cost you a fortune. These simple stamped patriotic cloth napkins are perfect for summer BBQ’s and celebrations.

Affiliate links may be used in this post. Ordering a product through these links may result in a commission. Read the full disclosure here.


Spruce up your summer BBQ easily! These patriotic napkins are so simple to make that you can get the kiddos involved in making them.


[bctt tweet=”Spruce up your summer BBQ easily with these patriotic napkins! #DIY #patriotic” username=”diyadulation”]


Spruce up your summer BBQ easily! These patriotic napkins are so simple to make that you can get the kiddos involved in making them.


Materials


Spruce up your summer BBQ easily! These patriotic napkins are so simple to make that you can get the kiddos involved in making them.

Step 1

Cut your towels into fourths.  If you would like you can hem the edges, but I like the look of the rough edges so I chose not to. (Don’t worry; they still hold up great even if you don’t hem them.)


Update:

  • We have been using these for a year now and they are still holding up great despite many washing and 3 rambunctious kids using them! 


Spruce up your summer BBQ easily! These patriotic napkins are so simple to make that you can get the kiddos involved in making them.

Spruce up your summer BBQ easily! These patriotic napkins are so simple to make that you can get the kiddos involved in making them.

Step 2

Dip your stamps in the fabric paint and stamp onto towel.

Tips:

  • It is easier to control your paint if you use a paintbrush to apply it to the stamps, especially the flag. This will let you place the separate colors where you choose. If you’re not worried about it, you can simply dip your stamp.
  • If you notice, I chose to do one flag and a bunch of stars. Feel free to change it up and do whatever pattern you want.  You will notice a difference in the ones I stamped and the ones the kiddos did.


Spruce up your summer BBQ easily! These patriotic napkins are so simple to make that you can get the kiddos involved in making them.


Step 3

Allow your paint to dry completely. 

Tip:

  • If you let your children help with this project, the napkins that they stamp will take probably take longer to dry. Kids tend to stamp the paint on thicker.


Spruce up your summer BBQ easily! These patriotic napkins are so simple to make that you can get the kiddos involved in making them.

Step 4

Once your napkins are completely dry, run them through the dryer on medium or high heat for a full cycle. This will help set the paint.


Spruce up your summer BBQ easily! These patriotic napkins are so simple to make that you can get the kiddos involved in making them.


Step 5

One you have set the paint, you can wash and dry them as usual. Next, just use at your next gathering and enjoy!


Spruce up your summer BBQ easily! These patriotic napkins are so simple to make that you can get the kiddos involved in making them.

Spruce up your summer BBQ easily! These patriotic napkins are so simple to make that you can get the kiddos involved in making them.

Spruce up your summer BBQ easily! These patriotic napkins are so simple to make that you can get the kiddos involved in making them.

Spruce up your summer BBQ easily! These patriotic napkins are so simple to make that you can get the kiddos involved in making them.

The stamps you choose to use can vary the look of these greatly. I like the messy look of the Tim Holtz stamp because it reminds me of all our flag has been through. If you want a cleaner look, choose a flag stamp with large, clear lines. These patriotic napkins are so simple to make that you can get the kiddos involved in making them. Kids will love using a napkin that they helped create and they will be happy to show them off at your summer parties. Want more fun patriotic crafts? Take a look at these DIY Patriotic Crafts to get your fix!

See where I’m linking up!

[optin-cat id=4955]

Easy and Colorful DIY Luau Invitations

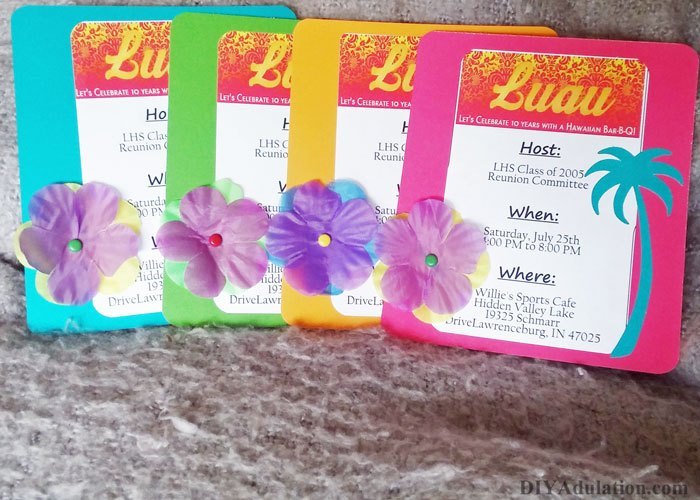
This year I am helping to organize our class reunion.  Anyone who has done this can attest to the amount of work it takes (not to mention time, money, and energy).  One of the easiest parts for us was coming up with a theme.  Since we scheduled it for late summer we knew we wanted a more casual and fun theme so we decided on a luau BBQ. While we had done electronic invitations already, some of our classmates expressed that they would like to receive paper invitations to have as keepsakes.  I love this kind of stuff so I offered to design and make them.  Thankfully, a couple of the other girls helped me to assemble them since we needed so many! These DIY luau invitations are so easy to make and festive that they will be perfect for your summer party!

Affiliate links may be used in this post. Ordering a product through these links may result in a commission. Read the full disclosure here.


Teal, Green, Yellow, and Pink Luau Invitations on Gray Background


[bctt tweet=”These DIY luau invitations are perfect for your summer party! #DIY #invitations #luau” username=”diyadulation”]


Luau Invitation Materials

DIY Luau Invitations Materials

**I have not included amounts in these because it will be dependent on the amount you need to make.  I can tell you that we needed 100 and I used roughly 7-8 leis, an entire pack of cardstock, and about 5 tape runners.

Step 1

Design and print out the information part of your invitations on regular printer paper, 2 to a page.

Step 2

Cut your cardstock in half, bisecting on the 11” side.  Also cut out your information sections.

Tip:


Close Up of Rounded Edges of Luau Paper

Step 3 (optional)

I chose to round the corners of both the information pieces and the cardstock pieces.  If you choose to do the same, you should do so before taping the pieces together.


Luau invitation paper attached to cardstock

Step 4

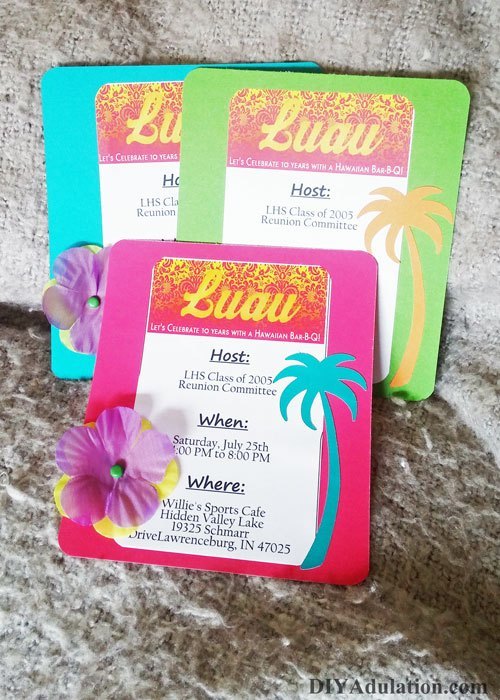
Tape the two pieces together for each invitation, centering the information on the cardstock.


Flowers from Hawaiian Lei


Step 5

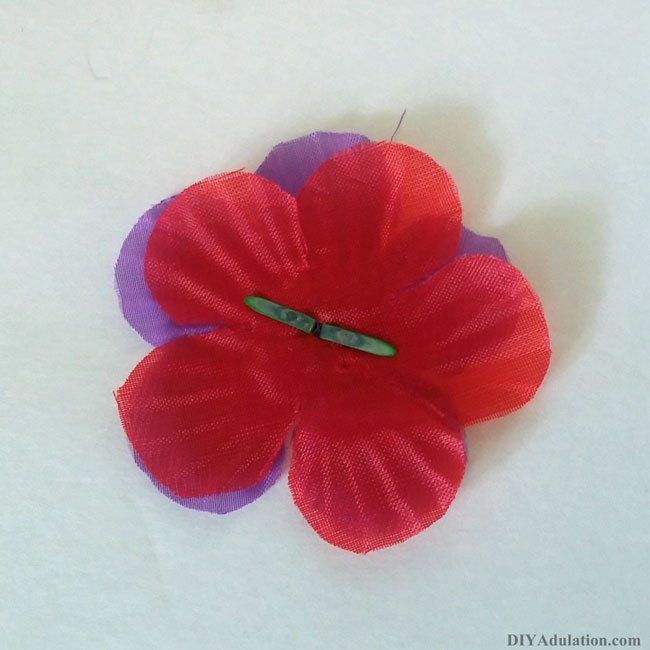
Prepare your flowers by cutting apart your leis (I got 3pks at the dollar store).  Then slide the flowers off of the string.

Tip:

Note: These leis have come in so handy! I’ve used them on a ton of projects like this adorable girl’s purse!


back of flowers with brad attached

Multi-color flower with brad in the center

Step 6

Assemble your flowers by placing two flowers of different colors together and securing them with a brad.

Tip:


Double Sided square sticker on invitation

Flower attached to bottom corner of luau invitation

Step 7

For each invitation, adhere a flower on the bottom left of your information with a mounting square.


Pink Luau Invitation with flower and paper palm tree attached

Step 8

Lastly, cut out green palm trees using your Cricut then attach 1 palm tree on the right of each invitation with the tape runner.


Teal, Pink, and Green Luau Invitations on Gray Background

Teal and Green Luau Invitations on Gray Background

That’s it!  I am so happy with how these turned out and again, they are just so simple to make. We were able to assemble around 60 of these in a couple of hours. If you are just having a personal bbq, these diy luau invitations should come together in minutes. If you are looking for more DIY fun you can find awesome creative summer ideas here!

See where I’m linking up!

Don’t Forget to Pin It!
Pink Luau Invitation with flower and paper palm tree attached with text overlay - DIY Luau Invitations