DIY Beaded Pipe Cleaner Bracelets

Can you imagine an activity that keeps the kiddos entertained for hours with little to no input from you? That’s exactly what these DIY beaded pipe cleaner bracelets do! Seriously, put all of the materials into a tray on the dining table and BOOM! You’ve got the perfect creative activity for them.

Affiliate links may be used in this post. Ordering a product through these links may result in a commission. Read the full disclosure here.

Collage of Photos of Beaded Bracelets next to Beads with text overlay - DIY Beaded Pipe Cleaner Bracelets


[bctt tweet=”Are you ready for hours of quiet play for your kiddos? These DIY beaded pipe cleaner bracelets are an easy and creative activity for your kiddos!” username=”diyadulation”]

Okay, so I just wanted something fun for the kids to do because, honestly, they were driving me crazy. Then I thought about this awesome activity I’d seen from my friend Heather at Glitter on a Dime. True to form, I changed it up a bit because my kiddos’ ages range from 5 to 10 and I wanted all of them to do it.


I put string in addition to pipe cleaners on the tray but to my surprise they all wanted to create with the pipe cleaners. The oldest didn’t want any input from me but the youngest 2 had me create the secure ends before they made their designs.

I had only hoped for 20 minutes of peace… seriously, my bar was that low. Instead, this kept all 3 of my kiddos busy for hours! Talk about an awesome surprise. Even better, because they didn’t use up all of the materials the first day, they continued to go back and create every day for 3 days.


Tray with beads and pipe cleaners in it

Beaded Pipe Cleaner Bracelets Materials


Orange Pipe Cleaner next to 2 Pony Beads

Step 1

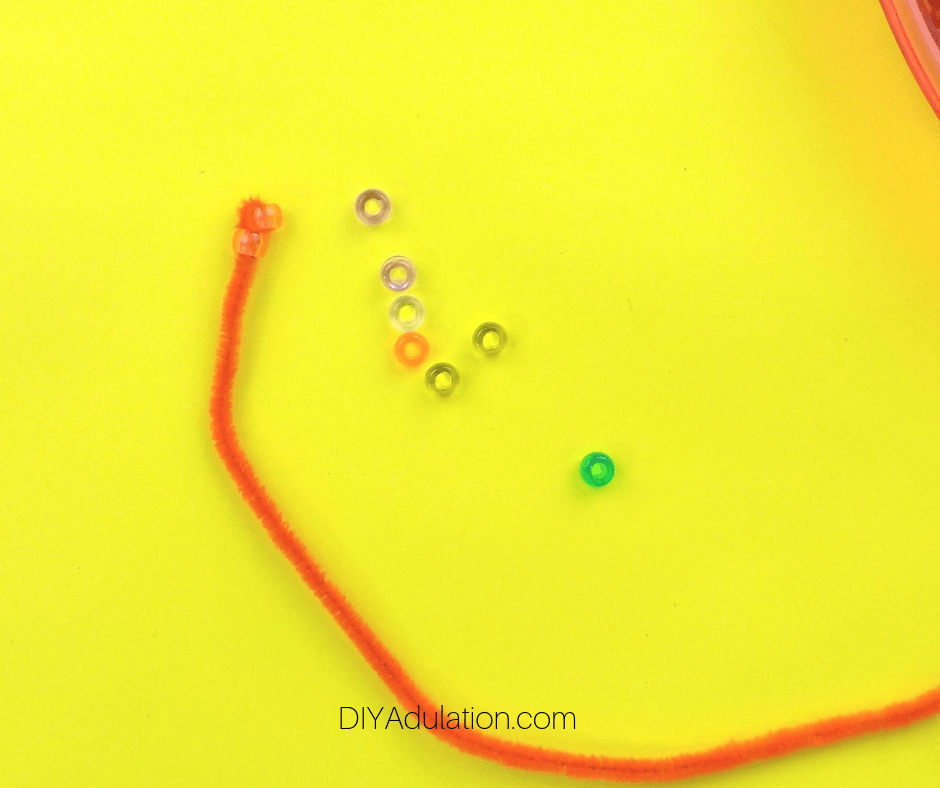
First, pull out a pipe cleaner and 2 pony beads.


Orange Pipe Cleaner with 2 Pony Beads on It

Step 2

Next, slide the pony beads onto the end of the pipe cleaner. Leave a small amount of space between them.

Step 3

Then fold a small end section of pipe cleaner over the pony bead closest to it.


Orange Pipe Cleaner with 2 Pony Beads Secured on End

Step 4

Holding the pipe cleaner in place, slide the second pony bead up over the folded piece of pipe cleaner until it is right next to the first pony bead. This creates a secure end of the bracelet to hold the rest of your beads in place.


Pony Beads Strung on Orange Pipe Cleaner

Step 5

Next, thread on your beads in the desired pattern. Don’t worry about the small holes of the shaped beads. The metal part of the pipe cleaner is very small and will fit through them.


Beaded Pipe Cleaner Looped into Bracelet

Step 6

When you have all of your beads threaded, take the end of the pipe cleaner and thread it through the first secured bead on your pipe cleaner to create a bracelet.


Close Up of Pipe Cleaner Secured Through Beads into Bracelet

Step 7

Then thread the pipe cleaner end from the opposite direction through the second pony bead you added to your pipe cleaner.


Beaded Pipe Cleaner Bracelet with Excess Removed

Step 8

Lastly, trim any excess pipe cleaner from your bracelet and enjoy!

Tip:


Beaded Pipe Cleaner Bracelets Next to Beads

Beaded Bracelets next to Beads with text overlay - DIY Beaded Pipe Cleaner Bracelets

If your kiddos love getting creative at all then they will go nuts for these DIY beaded pipe cleaner bracelets! They are such an easy activity to put together and literally buy you hours of peace. Is there anything mom craves more than that in the throws of summer break? I don’t think so.

See where I’m linking up!

Don’t Forget to Pin It!

Beaded Bracelets next to Beads with text overlay - DIY Beaded Pipe Cleaner Bracelets


Bring on the Crafts — A Craft & DIY Blog Hop

Come join this very creative craft & DIY blog hop to get more exposure for your crafty creations. Bring on the Crafts is brought to you by The Inspiration Vault and Craftify My Love

On the first Friday through Sunday of each month, a group of DIY and crafty bloggers join forces. Together Marie from The Inspiration Vault and Habiba from Craftify My Love they bring you the #BringontheCrafts blog hop. Each blogger creates a fun craft or DIY project to share that follows a monthly materials theme. July’s theme is Buttons & Beads! Each blogger chooses their own craft to make as long as they love it and it uses Buttons & Beads in the project.

Our July Co-hosts

Jenny at Cookies, Coffee and Crafts • Marie at DIY Adulation
Beverly at Across the Blvd • Gail at Purple Hues & Me • Kim at Day To Day Adventures

Join in on the fun! If you’d like to participate next month, you can request to join our Bring on the Crafts Facebook Group. Next month’s theme is Cutting Machines!

Not a blogger, but a creative mind none the less!? Don’t worry, share your awesome creations in our Craft Cult Facebook Group. This is also a great place to ask craft & DIY related questions and find inspiration for your next project.

Now let’s see all of those amazing craft and DIY projects!

You are invited to the Inlinkz link party!

Click here to enter

Free Printable Call Mom Safety Cards for Kids

Got a Disney trip coming up? If so, give yourself a little peace of mind with these free printable “Call Mom” safety cards for kids. They make sure your phone number is always close if your kiddos need it for any reason at all during your trip! Check out the additional safety tips for your little one’s safety while you’re here too.

Affiliate links may be used in this post. Ordering a product through these links may result in a commission. Read the full disclosure here.

Collage of Laminated Call Mom Cards nexts to Glitter Cabochons with text overlay - Free Printable _Call Mom_ Safety Cards for Kids


[bctt tweet=”Stress less on your next trip! Give yourself a peace of mind and your kiddos a helpful tool with these free printable “Call Mom” safety cards for kids.” username=”diyadulation”]

Losing a child, even for a few minutes is a terrifying experience as a mom. I have totally been there and I wouldn’t wish it on my worst enemy. Before we get to the tutorial, it’s important to know that these are a last resort in safety, especially for younger kids who are having difficulty remembering your phone number. It’s important to always talk to your kiddos about the rules and expectations for crowded places.

Things to Talk About with Your Kids:


Cut Apart Laminated Call Mom Cards

“Call Mom” Safety Cards Materials

Step 1

First, warm up your laminating machine so that it’s ready.


Printed Sheet of Call Mom Cards

Step 2

Then print out your call mom safety cards.


Cut Out Call Mom Cards next to Paper Cutter

Step 3

Next cut out each of your cards using a paper cutter.


Call Mom Card with Phone Number on it Next to Pen

Step 4

Once your cards are cut out, write your phone number on the number of cards you need. (In case you’re curious, nope, that’s not my number. Sorry. I’m sure you’re heartbroken.)

Tip:


Close Up of Call Mom Cards inside Lamination Folder

Step 5

Then open up a laminating envelope and place your cards inside. Be sure to leave space between each card to allow for them to seal all the way around.


Laminated Sheet of Call Mom Cards

Step 6

Next, run your laminating envelope with the cards inside through your lamination machine.


Cut Apart Laminated Call Mom Cards

Step 7

After your cards are laminated, cut them apart using scissors.

How to Use:

At the start of each day, place the cards inside your kiddos shoes. If at any point they become separated from you or lost, they can pull out this card and give the appropriate authorities/workers your number to call. The shoe ensures it doesn’t get lost throughout the day and the lamination protects it from sweaty or wet feet.

You also want to work with your kids early and often on learning basics like your phone number, first and last name, and home address. Of course, my oldest has a cell phone and has already forgotten my phone number so this might be necessary for older kids and pre-teens too.


Laminated Call Mom Cards nexts to Glitter Cabochons with text overlay - Free Printable _Call Mom_ Safety Cards for Kids

These free printable “Call Mom” safety cards for kids are such a useful resource for moms. In addition to giving kids a contact in case they get lost or separated from you in busy locations, they are great for when you travel to unfamiliar locations too. For example, just checking out a new city on vacation or stopping at a Target on the way to the beach for sunscreen. It’s simply an easy tool to give you some peace of mind.

See where I’m linking up!

Don’t Forget to Pin It!

Laminated Call Mom Cards nexts to Glitter Cabochons with text overlay - Free Printable _Call Mom_ Safety Cards for Kids


More Ideas You’ll Love:

Patriotic Glitter Sensory Jar for 4th of July

Are you looking for a fun and mesmerizing daytime activity for the kiddos this 4th of July? This patriotic glitter sensory jar is a great toy that offsets the craziness and volume of the fireworks. It’s also a fun way to introduce some calming down time if the kiddos start fighting or being mean during the rest of the daytime festivities.

Affiliate links may be used in this post. Ordering a product through these links may result in a commission. Read the full disclosure here.

Collage of Blue Glitter and Stars Sensory Jars with text overlay - Patriotic Glitter Sensory Jar


[bctt tweet=”This patriotic glitter sensory jar is a fun way to introduce calming down time if the kiddos start fighting during the rest of the daytime festivities.” username=”diyadulation”]

This year my family got some inflatable pools for the kiddos to play with on the Fourth. I know they are going to have a blast with the surprise but I also know that there are bound to be some tears and fighting because, hello, they’re my kids. I wanted a creative way to institute a time-out of sorts without totally ruing the fun.

That’s why I made this patriotic glitter sensory jar. It’s still like a toy and fun to shake and watch the swirls. However, it is also the perfect way to have one of the kiddos sit and calm down before going back to play.


Patriotic Glitter Sensory Jar on Blue Background

Of course it’s simply a bonus that I can swirl it and play with it when it’s not in use by the kiddos. Score! I could seriously watch the glitter swirling all day. Mommy time-outs are totally a thing, right?


Patriotic Sensory Jar Materials

Patriotic Glitter Sensory Jar Materials

Note: I got all of my supplies except the silver glitter, confetti, and E6000 at my local Dollar Tree.

Blue Glitter Glue in Jar next to Glitter Container

Step 1

First, empty your container of blue glitter glue into your jar.

Tip:

Step 2

Next, pour in your desired amount of loose silver glitter into the jar.


Blue Glitter Glue and Water Mixed in Jar

Step 3

Fill the rest of your jar with hot water stopping just short of the lip. Then put the lid back on and shake vigorously to combine.


Stars Confetti on Mixture in Jar

Step 4

Lastly, add your metallic stars confetti and again return the lid and shake to combine it all together.


Step 5

Then place a line of E6000 along the inside edge of your lid.

Tip:

Step 6

Screw your lid tightly onto your jar and allow to sit 24 hours for the glue to dry.


Glue on Jar Lid next to Patriotic Garland

Hand Holding Patriotic Glitter Sensory Jar with Garland on Lid

Step 7

After your glue has dried, use hot glue to attach a small amount of patriotic garland to the top of your patriotic glitter sensory jar.

Tip:


Hand Holding Patriotic Glitter Sensory Jar with Garland on Lid with text overlay - Patriotic Glitter Sensory Jar

Allow your mixture to cool before using the patriotic glitter sensory jar. The glitter will fall faster while the water is still hot. It swirls longer before falling once the mixture is cooled. If you don’t have any patriotic garland, don’t let that stop you from making this baby. It’s still a ton of fun even without the extra dash of festive. I use the leftovers from some of the other 4th of July crafts below so I already had it on hand. You know I can’t resist a bit of decoration on pretty much anything.

See where I’m linking up!

Don’t Forget to Pin It!

Blue Glitter Sensory Jar with text overlay - Patriotic Glitter Sensory Jar


More Ideas You’ll Love: