DIY Adulation

Fawning Over a Do-It-Yourself Life

  • Crafts
    • Papercrafts
    • Fabric Crafts
    • Paint Crafts
    • Recycled Crafts
    • DIY Crafts
  • Home
    • Home Decor
    • Organization
    • Recipes
    • Finances
    • Cleaning
  • Holidays
    • Spring Holidays
    • Summer Holidays
    • Autumn Holidays
    • Winter Holidays
  • Relationships
    • Self
    • Marriage
    • Parenting
    • Friends and Family
    • Kids
      • Kids Crafts
      • Kids Learning
      • Kids Activities
      • Back to School
      • Kids Parties
      • Kids Korner
  • Policies & Disclosures
  • Newsletter
  • About Me
  • VIP Resource Library

Glow in the Dark Ghost Handprint Shirt for Kids

10.10.2017 by Marie // Leave a Comment

What activity are you checking off of your family’s fall bucket list this weekend? Watching Hocus Pocus is always a necessity for our fall bucket list. Unfortunately, the kids don’t always have the patience to sit still for it especially since they have seen it so many times. This year I decided to combine it with a fun kid’s craft to help make it fun for all of us. This glow in the dark ghost handprint shirt did the trick. It stays within the Halloween theme and went great with our movie feature. Pair this easy craft with any of your favorite Halloween movie for a fun and festive family movie night!

Affiliate links may be used in this post. Ordering a product through these links may result in a commission at no extra cost to you. Read the full disclosure here.

Glow in the Dark Ghost Handprint Shirt for Kids: Pair this easy craft with any of your favorite Halloween movie for a fun and festive family movie night!


Kids will love making this Glow in the Dark Ghost Handprint Shirt! #diy Click To Tweet


Glow in the Dark Ghost Handprint Shirt for Kids: Pair this easy craft with any of your favorite Halloween movie for a fun and festive family movie night!

Materials for 1 Glow in the Dark Ghost Handprint Shirt

  • Plain Child’s Color T-shirt (Grab a 10-Pack Here)
  • White Fabric Paint
  • Glow in the Dark Fabric Paint (Note that we used the green version)
  • Scrap Piece of Cardboard

Step 1

First, remove any tags from your shirt.

Note:

  • If there is sticky residue left from stickers or tags wash it off of the shirt and dry it before moving on.

Step 2

Once your shirt is prepped, place a piece of cardboard inside of your shirt.

Step 3

Next, cover your child’s hand with a generous layer of white fabric paint.

Tip:

  • Use your finger, not a paint brush, to apply the white paint to your child’s hand.


Glow in the Dark Ghost Handprint Shirt for Kids: Pair this easy craft with any of your favorite Halloween movie for a fun and festive family movie night!

Step 4

Firmly press the paint-covered hand onto the shirt.

Tips:

  • When you pull the hand back, pull it straight up.
  • You may need to brace the shirt so that it doesn’t pull up with your child’s hand.

Step 5

Repeat steps 3 and 4 until you have the desired number of “ghosts” on your shirt.

Tip:

  • Vary the direction of the handprints as you place them on the shirt to create visual interest.


Glow in the Dark Ghost Handprint Shirt for Kids: Pair this easy craft with any of your favorite Halloween movie for a fun and festive family movie night!

Step 6

After you have finished adding handprints, Mom, carefully outline each handprint in glow in the dark paint.


Glow in the Dark Ghost Handprint Shirt for Kids: Pair this easy craft with any of your favorite Halloween movie for a fun and festive family movie night!

Step 7

Next, add a face to each ghost with glow in the dark paint.

Step 8

Set the shirt on a flat surface to let the paint dry.

Note:

  • We let ours dry for 24 hours.


Step 9

Lastly, toss the shirt in the dryer on high for 5-10 minutes.


Glow in the Dark Ghost Handprint Shirt for Kids: Pair this easy craft with any of your favorite Halloween movie for a fun and festive family movie night!

Glow in the Dark Ghost Handprint Shirt for Kids: Pair this easy craft with any of your favorite Halloween movie for a fun and festive family movie night!

Your child will love this glow in the dark ghost handprint shirt. When you’re ready to wash it, be sure to turn it inside out to help the design last longer for your child. Another fun option for this project is to purchase over-sized shirts for your kids and let them make glow in the dark sleep shirts. They will totally want to wear them for the next Halloween movie night (and every other night, for that matter). Not ready for the kid’s crafting fun to end? The whole family will love this Easy DIY Monster Owl Halloween Tree! It’s a great way to get the kids involved in creating some not-so-spooky Halloween décor for your home.

See where I’m linking up!

Don’t Forget to Pin It!

Glow in the Dark Ghost Handprint Shirt for Kids: Pair this easy craft with any of your favorite Halloween movie for a fun and festive family movie night!

Categories // Autumn Holidays, Crafts, Crafts, DIY, Fabric Crafts, Halloween, Holidays, Kids, Paint Crafts

DIY Glowing Pirate Trick-or-Treat Bag

09.14.2017 by Marie // Leave a Comment

Do your kids normally carry those generic tick-or-treat bags or pumpkin buckets for Halloween? That is what our family usually does but as the kids get older they are requesting costumes that have more accessories. What not try something different this year with us? This DIY glowing pirate trick-or-treat bag lets you coordinate the entire buccaneer look. It also increases visibility of your little one to help keep your child safe. The best part is that this can be worn across your children to free up their hands for swords, hooks, and holding your hand. Add all of that up and you have one awesome and practical costume accessory.

Affiliate links may be used in this post. Ordering a product through these links may result in a commission at no extra cost to you. Read the full disclosure here.

This DIY glowing pirate trick-or-treat bag lets you coordinate the entire buccaneer look, increases visibility of your kid, and frees up little hands.


This #DIY glowing #pirate trick-or-treat #bag increases visibility and frees up little hands! Click To Tweet

Materials

  • Jumbo Checker Game
  • Gold Enamel Paint
  • Kids Plastic Paintbrush
  • Black Drawstring Bag
  • Glow-in-the-Dark Fabric Paint
  • Liquid Stitch


This DIY glowing pirate trick-or-treat bag lets you coordinate the entire buccaneer look, increases visibility of your kid, and frees up little hands.

Step 1

Open up your jumbo checkers game.


This DIY glowing pirate trick-or-treat bag lets you coordinate the entire buccaneer look, increases visibility of your kid, and frees up little hands.

Step 2

Set your red checkers and the board aside.

Note:

  • You will not be using them for this project.


This DIY glowing pirate trick-or-treat bag lets you coordinate the entire buccaneer look, increases visibility of your kid, and frees up little hands.

This DIY glowing pirate trick-or-treat bag lets you coordinate the entire buccaneer look, increases visibility of your kid, and frees up little hands.

Step 3

Now paint your black checkers with gold enamel paint.

Tips:

  • Do not completely cover the checkers. You want some of the black to show through the paint.
  • One brush dip should by enough to paint 2-3 checkers.


This DIY glowing pirate trick-or-treat bag lets you coordinate the entire buccaneer look, increases visibility of your kid, and frees up little hands.

Step 4

Set you painted checkers aside to dry.


This DIY glowing pirate trick-or-treat bag lets you coordinate the entire buccaneer look, increases visibility of your kid, and frees up little hands.

Step 5

Now pull out your drawstring bag.


This DIY glowing pirate trick-or-treat bag lets you coordinate the entire buccaneer look, increases visibility of your kid, and frees up little hands.

Step 6

Next, paint the outline of your skull in the top center of your bag with glow fabric paint.


This DIY glowing pirate trick-or-treat bag lets you coordinate the entire buccaneer look, increases visibility of your kid, and frees up little hands.

Step 7

Then add your skull’s eye sockets, nose cavity, and mouth.


This DIY glowing pirate trick-or-treat bag lets you coordinate the entire buccaneer look, increases visibility of your kid, and frees up little hands.

Step 8

Start painting the crossbones starting at the top left of your skull.


This DIY glowing pirate trick-or-treat bag lets you coordinate the entire buccaneer look, increases visibility of your kid, and frees up little hands.

Step 9

Continue painting the crossbones.

Tip:

  • Make sure that the opposite corner bones line up as though they continue behind your skull.

Step 10

Set your bag aside and let the fabric paint dry completely.


This DIY glowing pirate trick-or-treat bag lets you coordinate the entire buccaneer look, increases visibility of your kid, and frees up little hands.

Step 11

After all of your paint has dried, add Liquid Stitch to the bottom edge of your checkers.


This DIY glowing pirate trick-or-treat bag lets you coordinate the entire buccaneer look, increases visibility of your kid, and frees up little hands.

Step 12

Next, stick the checkers to your bag.


This DIY glowing pirate trick-or-treat bag lets you coordinate the entire buccaneer look, increases visibility of your kid, and frees up little hands.

Step 13 (Optional)

Add an additional line of Liquid Stitch around edges of the attached checkers to further secure them.


This DIY glowing pirate trick-or-treat bag lets you coordinate the entire buccaneer look, increases visibility of your kid, and frees up little hands.

Step 14

Let the glue dry completely.

Tip:

  • I let mine dry for 24 hours just to be sure everything was secure.


This DIY glowing pirate trick-or-treat bag lets you coordinate the entire buccaneer look, increases visibility of your kid, and frees up little hands.

This DIY glowing pirate trick-or-treat bag lets you coordinate the entire buccaneer look, increases visibility of your kid, and frees up little hands.

Now your kids can have a hands-free treat collector this Halloween. This DIY glowing pirate trick-or-treat bag is also great in case you end up having to carry it for the younger children while the older ones finish trick-or-treating. There is a 5 year gap between our oldest and youngest child. The 8 year old lasts much longer than the 3 year old as is expected. When that happens, I can throw this bag on my back and still have free hands and arms for the wee ones. Come back tomorrow to see the coordinating costumes for this bag and get some great face painting tutorials! See you then! **Update** The costumes and face paint will go live on Monday. Thanks!!

See where I’m linking up!

Don’t Forget to Pin It!

This DIY glowing pirate trick-or-treat bag lets you coordinate the entire buccaneer look, increases visibility of your kid, and frees up little hands.

Categories // Autumn Holidays, Crafts, DIY, Fabric Crafts, Halloween, Holidays, Paint Crafts

DIY Cincinnati Bengals Purse for Game Day

08.24.2017 by Marie // Leave a Comment

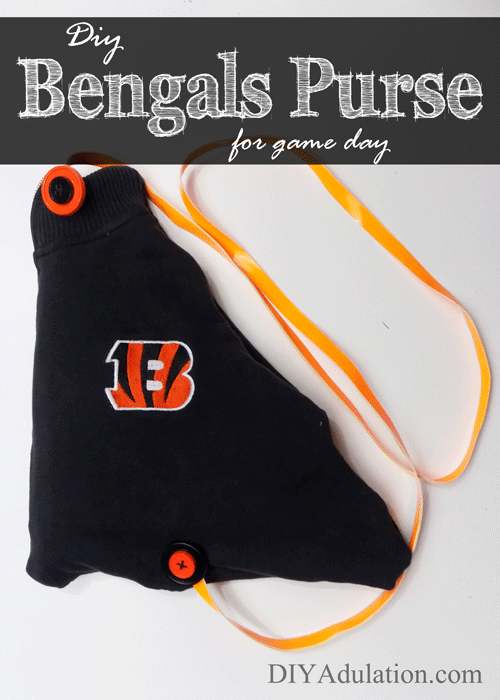
 Football season is here! On Saturday I am watching the game with my 2 youngest children and even though it is pre-season, I get into it. I am 100% that annoying person yelling at the TV like they can hear me. Then the most adorable thing started happening. The 3 and 4 year old started yelling the same things I was at the TV… only they don’t know much about football so it would be at completely random times. It is so cute to watch them yell, “Go, go, go!” at the players during a field goal attempt… the opposing team’s attempt. It was a great reminder of how much fun football can be even when you know nothing about the sport. This DIY Cincinnati Bengals purse celebrates that innocent fun with a mix of whimsical buttons and traditional style.

Affiliate links may be used in this post. Ordering a product through these links may result in a commission at no extra cost to you. Read the full disclosure here.

Thrift Store Decor Upcycle Challenge

The Rules:

  • Upcycle an item(s) from a thrift store, resale store, or garage sale into a new piece of decor.
  • There’s no monthly theme.
  • There’s no budget to stick to.

Meet the Hosts

Amanda | Domestically Creative Kim | Made in a Day
Victoria | Dazzle While Frazzled Pili | Sweet Things
Debra | Shoppe No. 5 Sue | A Purdy Little House Chelc | Inside the Fox Den
Kimm | Reinvented Ann | Duct Tape and Denim Sara | Twelve on Main
Kim | Farmhouse Made Toni | Small Home Soul Angela | Simply Beautiful by Angela
Michelle | Our Crafty Mom Marie | DIY Adulation Chelsea | Making Manzanita
Leanna | Of Faerie and Fauna Denise | My Thrifty House Lindsay | Crazy Organized
Florence | Vintage Southern Picks Shirley | Intelligent Domestications | Michelle | Michelle J Designs

Make sure you follow our board on Pinterest for more upcycled decor inspiration!


Football season is here! Get your style ready for game day with this DIY Cincinnati Bengals Purse made from a thrift store jacket!


Get your style ready for game day with this #DIY Cincinnati #Bengals Purse! Click To Tweet


Football season is here! Get your style ready for game day with this DIY Cincinnati Bengals Purse made from a thrift store jacket!

Materials

  • XL Bengals Zip-Up Jacket
  • Scissors
  • Straight Pins
  • Needle Black Thread
  • Large Orange Button
  • Small Orange Button
  • Large Black Button
  • Small Black Button
  • Orange Strap (Measured and Cut for where you would like the purse to hang)


Football season is here! Get your style ready for game day with this DIY Cincinnati Bengals Purse made from a thrift store jacket!

Football season is here! Get your style ready for game day with this DIY Cincinnati Bengals Purse made from a thrift store jacket!

Step 1

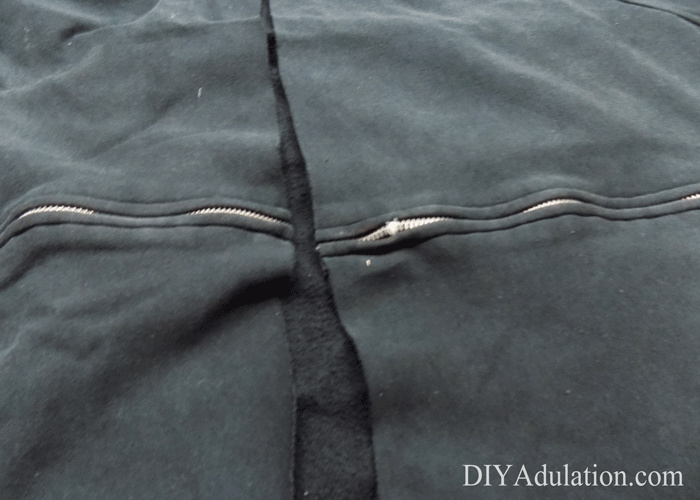
First, sew a whip-stitch around your zipper 6-7 inches from the top.

Tip:

  • Make sure that your jacket is zipped closed for this. You are creating a new stop for the zipper so it needs to be above the stitch.


Football season is here! Get your style ready for game day with this DIY Cincinnati Bengals Purse made from a thrift store jacket!

Step 2

Next, cut off the trim around the bottom in one long piece.

Note:

  • Keep this for another project that I will be sharing with you later.


Football season is here! Get your style ready for game day with this DIY Cincinnati Bengals Purse made from a thrift store jacket!

Step 3

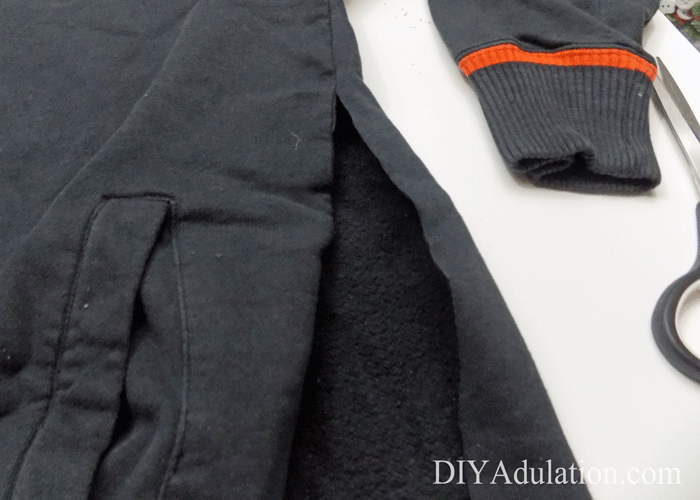
Then cut up the side seam of the jacket to just below where you sewed around the zipper.


Football season is here! Get your style ready for game day with this DIY Cincinnati Bengals Purse made from a thrift store jacket!

Step 4

Cut straight across the front of the jacket, again staying under the sewn part on your zipper.


Football season is here! Get your style ready for game day with this DIY Cincinnati Bengals Purse made from a thrift store jacket!

Step 5

Repeat step 3 on the opposite side seam of the jacket.


Football season is here! Get your style ready for game day with this DIY Cincinnati Bengals Purse made from a thrift store jacket!

Step 6

Next, cut to the sleeves on either side.


Football season is here! Get your style ready for game day with this DIY Cincinnati Bengals Purse made from a thrift store jacket!

Step 7

Then cut about the sleeves and the collar, leaving the collar attached as pictured.

Note:

  • Again, save the pieces you have removed for another project.


Football season is here! Get your style ready for game day with this DIY Cincinnati Bengals Purse made from a thrift store jacket!

Step 8

Fold your jacket piece in half at the zipper with right-sides facing together.


Football season is here! Get your style ready for game day with this DIY Cincinnati Bengals Purse made from a thrift store jacket!

Football season is here! Get your style ready for game day with this DIY Cincinnati Bengals Purse made from a thrift store jacket!

Step 9

Line up the edges and pin them together.


Football season is here! Get your style ready for game day with this DIY Cincinnati Bengals Purse made from a thrift store jacket!

Step 10

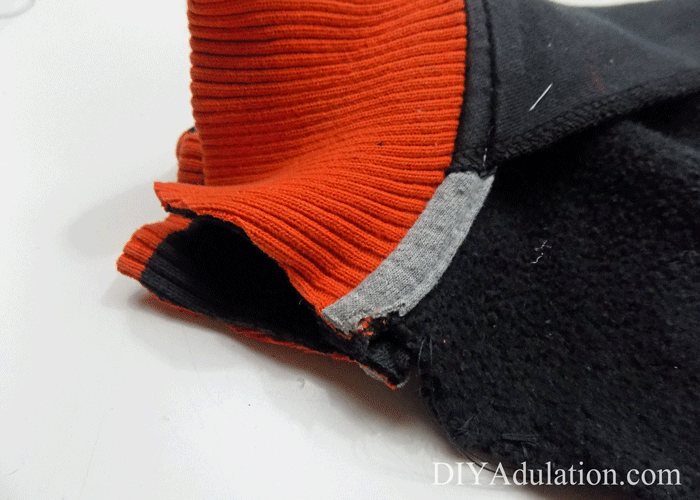
Next, sew around the pinned edges starting at the bottom and stopping at the collar.


Football season is here! Get your style ready for game day with this DIY Cincinnati Bengals Purse made from a thrift store jacket!

Football season is here! Get your style ready for game day with this DIY Cincinnati Bengals Purse made from a thrift store jacket!

Step 11

After the rest of the edges are sewn, trim the collar to match the edge and sew close.


Football season is here! Get your style ready for game day with this DIY Cincinnati Bengals Purse made from a thrift store jacket!

Step 12

Unzip your zipper and turn your purse right-side out.


Football season is here! Get your style ready for game day with this DIY Cincinnati Bengals Purse made from a thrift store jacket!

Step 13

Next, sew one end of your strap to the large orange button.

Step 14

Once the orange button is secure, sew the small black button on top of it.

Tip:

  • During these steps, don’t add too many stitches. It will make it harder to attach to your purse in the next step.


Football season is here! Get your style ready for game day with this DIY Cincinnati Bengals Purse made from a thrift store jacket!

Step 15

Now sew the buttons to the top of your purse.


Football season is here! Get your style ready for game day with this DIY Cincinnati Bengals Purse made from a thrift store jacket!

Step 16

Repeat steps 13 through 15 with the large black button and small orange button at the bottom of your purse.


Football season is here! Get your style ready for game day with this DIY Cincinnati Bengals Purse made from a thrift store jacket!

Football season is here! Get your style ready for game day with this DIY Cincinnati Bengals Purse made from a thrift store jacket!

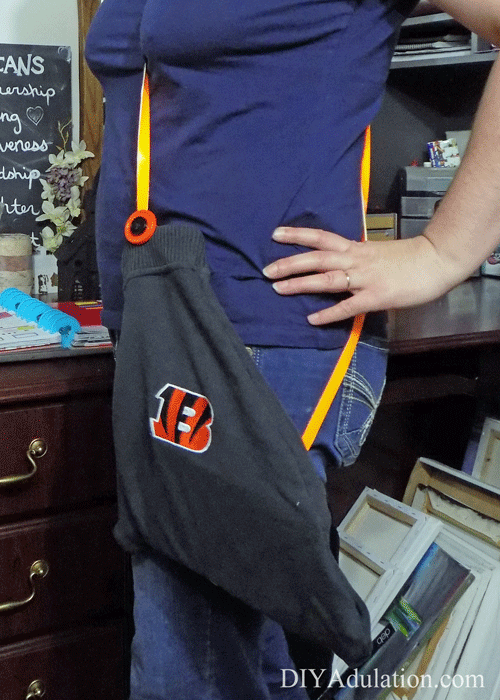
How much fun is this DIY Cincinnati Bengals purse?! I love it when you find something your love at the thrift store and are able to turn it into something amazing. In this case it is being turned into 4 amazing somethings. I will be sharing those tutorials with you throughout the month so don’t throw out any of the pieces we didn’t use to make the purse. Now it is time to check out what my friends discovered this month at the links below.

See where I’m linking up!

Don’t Forget to Pin It!

Football season is here! Get your style ready for game day with this DIY Cincinnati Bengals Purse made from a thrift store jacket!

And now for more thrifty goodness!

Check out what my fellow upcyclers created below!

An InLinkz Link-up


Categories // Autumn Holidays, Crafts, DIY, Fabric Crafts, Football Season, Holidays, Recycled Crafts

  • « Previous Page
  • 1
  • …
  • 3
  • 4
  • 5
  • 6
  • 7
  • …
  • 10
  • Next Page »

  • Facebook
  • Instagram
  • Pinterest
  • Twitter
  • YouTube
Shop The Best Machine Prices of the Year

Copyright © 2021 · Modern Studio Pro on Genesis Framework · WordPress · Log in