It is time to get the kids in on the Halloween décor fun. Don’t worry. This not-so-spooky monster owl Halloween tree is super easy to make. You can get everything you need to make it at Oriental Trading and have it shipped right to your door. The owl ornaments come in easy, pre-packaged kits that make assembly a breeze for little hands. My 8 year old was able to make his with nearly no assistance from me. He also helped me assist his younger siblings in creating theirs. This project is fun for the whole family and looks great on the dining room table!
This is a sponsored post on behalf of Oriental Trading Company. All thoughts, projects, and opinions of my own. Affiliate links may be used in this post. Ordering a product through these links may result in a commission at no extra cost to you. Read the full disclosure here.

[bctt tweet=”Get the kids in on the décor fun with this not-so-spooky monster owl Halloween tree! #ad” username=”diyadulation”]

Materials

Step 1
First, cut a length of plastic cord.
Step 2
Knot the end of the cord with a loop on it. See the picture above for reference.

Step 3
Begin stringing beads on your cord, including the excess cord as pictured.
Step 4
Continue stringing beads on your cord until your beaded garland is at least 2 feet long.
Step 5
Secure the end of your beaded garland with a knot and trim the excess.
Step 6
Next, fluff your tree by unfolding the branches.

Step 7
Wrap your beaded garland around your tree.
Step 8
Lastly, hang your owls on your tree.
Witch Owl Ornament

Step 1
First, place your eyes background on the head.

Step 2
Next, place your eyes on top of the background.

Step 3
Add your beak between the bottom center of the eyes.

Step 4
Then attach the belly to your owl.

Step 5
Add feet to the bottom of your owl slightly overlapping the belly.

Step 6
Next, add the wings to your owl.
Step 7
Place your hat on the owl.

Step 8
Then add the star to the point of the hat.

Step 9
Put the ends of the string together and stick them to the sticky side of the circle sticker.

Step 10
Lastly, stick the circle and string to the back of your owl.
Skeleton Ornament

Step 1
First, place your eyes background on the head.

Step 2
Next, place your eyes on top of the background.

Step 3
Add your beak between the bottom center of the eyes.

Step 4
Then attach the belly to your owl.

Step 5
Add feet to the bottom of your owl slightly overlapping the belly.

Step 6
Next, add the wings to your owl.
Step 7
Add your heart to the top right of your owl’s belly.

Step 8
Put the ends of the string together and stick them to the sticky side of the circle sticker.
Step 9
Lastly, stick the circle and string to the back of your owl.
Ghost Owl Ornament

Step 1
First, place your eyes background on the head.

Step 2
Next, place your eyes on top of the background.
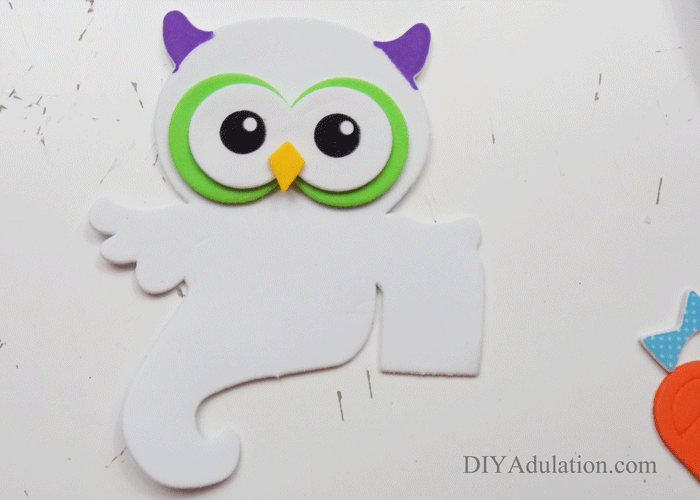
Step 3
Add your beak between the bottom center of the eyes.

Step 4
Next add your trick-or-treat bag to your owl.

Step 5
Then add the bow tie beneath the beak of your owl.
Step 6
Put the ends of the string together and stick them to the sticky side of the circle sticker.
Step 7
Lastly, stick the circle and string to the back of your owl.


Your kids will love having décor that they helped create displayed this season. You will love dressing up your table with the monster owl Halloween tree. Aren’t those owl ornaments absolutely adorable? The kids are hysterical as they get so excited seeing their owls come together. Make sure you have your camera ready to capture all of the fun. Refer to the broken-down tutorials above if you get stuck on the included directions to make the owls. Don’t forget that Oriental Trading has you covered for more than décor. See the awesome costumes we found complete with face painting tutorials at Pirates and Mermaid Sibling Costumes.
See where I’m linking up!
Don’t Forget to Pin It!