DIY Upcycled Bengals Throw Pillow

Have you ever noticed how right after playoffs your social media fills up with angry fans mad that their team isn’t in the Super Bowl? It is one of the feelings that I simply can’t relate to. Would you like to know why? I’m a Bengals fan. The last time my team saw a Super Bowl was in the 80’s.

That doesn’t mean I don’t enjoy making awesome stuff that supports my team. Super Bowl still brings out the creative football spirit even when your team isn’t in the game. This DIY upcycled Bengals throw pillow is easy to make and easy to customize to your favorite team.

Affiliate links may be used in this post. Ordering a product through these links may result in a commission at no extra cost to you. Read the full disclosure here.

The Rules:

Meet the Hosts

Amanda | Domestically Creative – Pili | My Sweet Things
Angela | Simply Beautiful by Angela – Jeanie | Create and Babble
Molly | Just a Little Creativity – Colleen | Life on Kaydeross Creek
Marie | The Inspiration Vault – Michelle | Michelle James Designs
Shirley | Intelligent Domestications – Dru | Polka Dot Poplars
Pam | P.S. I Love You Crafts – Gail | Purple Hues and Me
Jennifer | Cookies Coffee and Crafts – Toni | Small Home Soul
Sue | A Purdy Little House – Kathleen | Our Hopeful Home
Victoria | Dazzle While Frazzled – Marie | DIY Adulation
Michelle | Our Crafty Mom – Debra | Shoppe No. 5
 Denise | My Thrifty House – Florence | Vintage Southern Picks 
Ann | Duct Tape and Denim – Yamilette | The Latina Next Door – Maureen | Red Cottage Chronicles

Make sure you follow our board on Pinterest for more upcycled decor inspiration!

Super Bowl still brings out the creative football spirit even when your team isn’t in the game. This DIY upcycled Bengals throw pillow is easy to make and easy to customize to your favorite team.


[bctt tweet=”DIY upcycled Bengals throw pillow is easy to make or customize to your favorite team! #repurposeit” username=”diyadulation”]

Materials


Step 1

First, cut the back of the jacket into a rectangle that includes the team logo.


Super Bowl still brings out the creative football spirit even when your team isn’t in the game. This DIY upcycled Bengals throw pillow is easy to make and easy to customize to your favorite team.

Step 2

Next, fold your rectangle in half with the right sides of the fabric facing in.

Tip:

  • In this case, the right side is the side with the team logo.


Super Bowl still brings out the creative football spirit even when your team isn’t in the game. This DIY upcycled Bengals throw pillow is easy to make and easy to customize to your favorite team.

Super Bowl still brings out the creative football spirit even when your team isn’t in the game. This DIY upcycled Bengals throw pillow is easy to make and easy to customize to your favorite team.

Step 3

Now sew around the edges of your pillow until only 2-3 inches of the seam remain unsewn.

Step 4

Then turn your pillow right-sides out.


Super Bowl still brings out the creative football spirit even when your team isn’t in the game. This DIY upcycled Bengals throw pillow is easy to make and easy to customize to your favorite team.

Step 5

Next, stuff your pillow with Poly-Fil.


Super Bowl still brings out the creative football spirit even when your team isn’t in the game. This DIY upcycled Bengals throw pillow is easy to make and easy to customize to your favorite team.

Step 6

After your pillow is filled to your liking, sew the corner opening closed.


Super Bowl still brings out the creative football spirit even when your team isn’t in the game. This DIY upcycled Bengals throw pillow is easy to make and easy to customize to your favorite team.

Super Bowl still brings out the creative football spirit even when your team isn’t in the game. This DIY upcycled Bengals throw pillow is easy to make and easy to customize to your favorite team.

Super Bowl still brings out the creative football spirit even when your team isn’t in the game. This DIY upcycled Bengals throw pillow is easy to make and easy to customize to your favorite team.

Super Bowl still brings out the creative football spirit even when your team isn’t in the game. This DIY upcycled Bengals throw pillow is easy to make and easy to customize to your favorite team.

Super Bowl still brings out the creative football spirit even when your team isn’t in the game. This DIY upcycled Bengals throw pillow is easy to make and easy to customize to your favorite team.

I seriously cannot stop squeezing this pillow. It is so soft! The fact that it represents my team makes me absolutely love it. Make your own DIY upcycled Bengals throw pillow or find a jacket that represents your favorite team. Then find out how to use the front of your jacket to make this DIY Cincinnati Bengals Purse. Now it’s time to see what other thrifty ideas my friends came up with this month. Check them all out below!

See where I’m linking up!

Don’t Forget to Pin It!

Super Bowl still brings out the creative football spirit even when your team isn’t in the game. This DIY upcycled Bengals throw pillow is easy to make and easy to customize to your favorite team.


And now for more thrifty goodness!

Check out what my fellow upcyclers created below!


Adorable Upcycled Snowman Treat Jar

Welcome to Day 3 of our 12 Days of Christmas blog hop! Today is all about snowman fun and I’m excited to see all of the creative ideas my friends have come up with for today. Before we get to those, find out how to make this adorable upcycled snowman treat jar. This easy craft is perfect for storing treats or fill it with cookies to give as a gift. You can even make a bunch of these to have on hand as grab and go hostess gifts. Now, let’s get onto this tutorial.

Affiliate links may be used in this post. Ordering a product through these links may result in a commission at no extra cost to you. Read the full disclosure here.


Welcome to the third annual 12 Days of Christmas Blog Hop!

Stop by every day from December first through the twelfth for new ideas you can use to make your season brighter!

Meet Your Hosts

They have all been busy as Elves creating, decorating, cooking and crafting tons of new ideas for you to try this holiday season!

Shirley~Intelligent Domestications I Alli~An Alli Event I Michelle~Our Crafty Mom I Marie~DIY Adulation 

Erlene~My Pinterventures I Beverly~Across The Blvd. I Debra~Shoppe No. 5 I Victoria~Dazzle While Frazzled

Megan~C’mon Get Crafty I Michelle~Michelle James Designs I Amanda~Domestically Creative

Deborah~Salvage Sister & Mister I Jeanie~Create & Babble I Sherry~Olives & Okra

Jenny~Cookies Coffee & Crafts I Emily~Domestic Deadline I Bonbon~Farmhouse 40

Leanna~Of Faeries & Fauna I Pam Larmore~P.S. I Love You Crafts I Kelly~North Country Nest I

Marie~The Inspiration Vault I Gail~Purple Hues and Me I Lynne~My Family Thyme I

Karen~Dragonfly and Lily Pads I Trisha~Blowing Away Out West Lorrin~Embrace The Perfect Mess I

Terri~Christmas Tree Lane I Sam~Raggedy Bits I Cyn~Creative Cynchronicity  Valeria~Val Event Gal 

Yami~The Latina Next Door I Jeannee~Centsably Creative I Tania~Little Vintage Cottage

 Lauren~Wonderfully Made I Vanessa~DIY 180 I Kimberly~A Wonderful Thought I

Kim~Everyday Parties  I Dru~Polka Dot Poplars


Give your treats a festive home for the holidays with this adorable upcycled snowman treat jar :: the perfect inexpensive holiday hostess gift!


[bctt tweet=”Give treats a festive home with this adorable upcycled snowman treat jar! #snowmancraft” username=”diyadulation”]

Materials


Give your treats a festive home for the holidays with this adorable upcycled snowman treat jar :: the perfect inexpensive holiday hostess gift!

Give your treats a festive home for the holidays with this adorable upcycled snowman treat jar :: the perfect inexpensive holiday hostess gift!

Step 1

First, prepare your container by removing the label and washing it.

Step 2

Allow your container to dry completely before moving on.


Give your treats a festive home for the holidays with this adorable upcycled snowman treat jar :: the perfect inexpensive holiday hostess gift!

Step 3

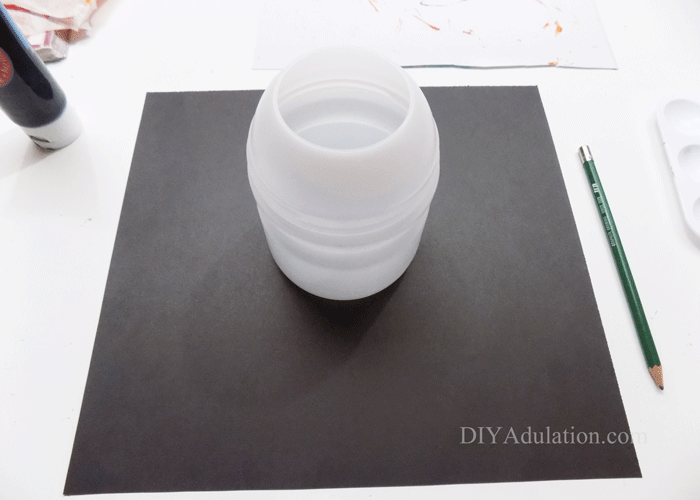
Use your container to measure a circle on your black card stock.


Give your treats a festive home for the holidays with this adorable upcycled snowman treat jar :: the perfect inexpensive holiday hostess gift!

Step 4

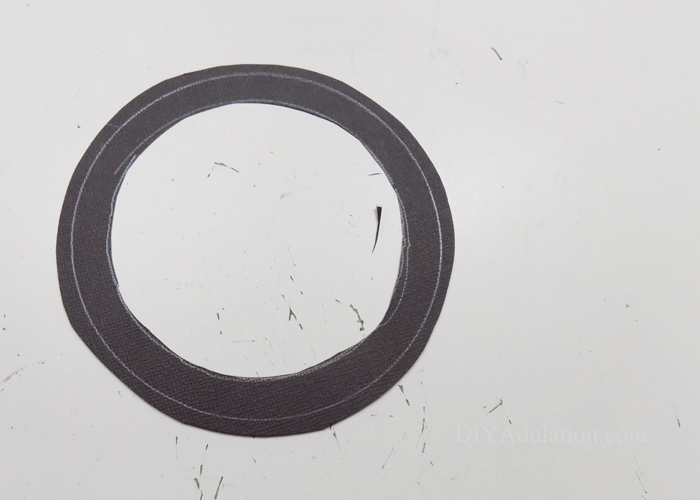
Next, find the center of your drawn circle and place the point of your compass on it. Spread it so that the pencil is ½ inch past your drawn circle and add a second circle.


Give your treats a festive home for the holidays with this adorable upcycled snowman treat jar :: the perfect inexpensive holiday hostess gift!

Step 5

Next, cut out the larger circle outline with scissors.


Give your treats a festive home for the holidays with this adorable upcycled snowman treat jar :: the perfect inexpensive holiday hostess gift!

Step 6

Carefully cut out the inner circle without breaking the outer circle.


Give your treats a festive home for the holidays with this adorable upcycled snowman treat jar :: the perfect inexpensive holiday hostess gift!

Step 7

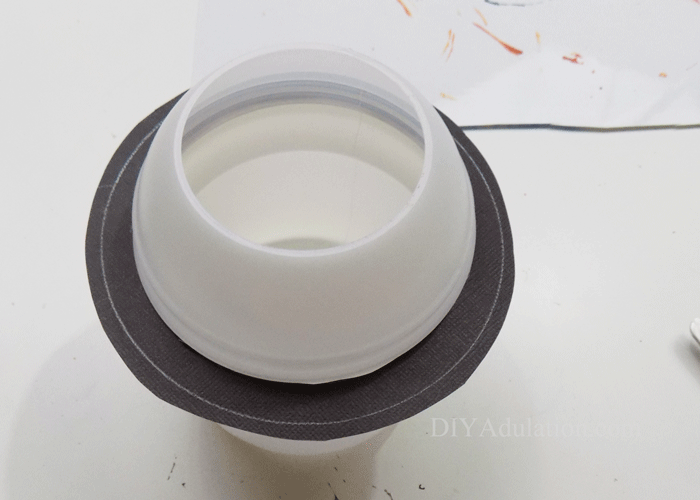
Test your circle to ensure that it fits on the top of your container. Trim the inside of the circle if needed.


Give your treats a festive home for the holidays with this adorable upcycled snowman treat jar :: the perfect inexpensive holiday hostess gift!

Step 8

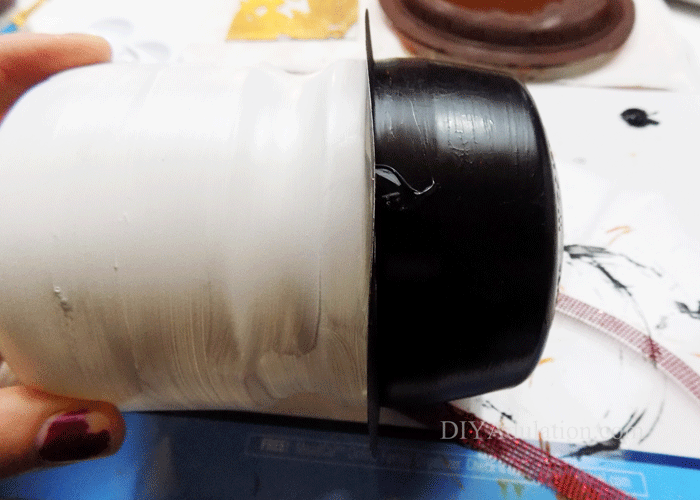
Now, paint the bottom of your container white below the threaded part (where the lid attaches).


Give your treats a festive home for the holidays with this adorable upcycled snowman treat jar :: the perfect inexpensive holiday hostess gift!

Step 9

Paint the lid of your container and your card stock circle black.

Step 10

Set your painted pieces aside to dry.

Step 11

After your container has dried, assemble it with your card stock circle on it.


Give your treats a festive home for the holidays with this adorable upcycled snowman treat jar :: the perfect inexpensive holiday hostess gift!

Step 12

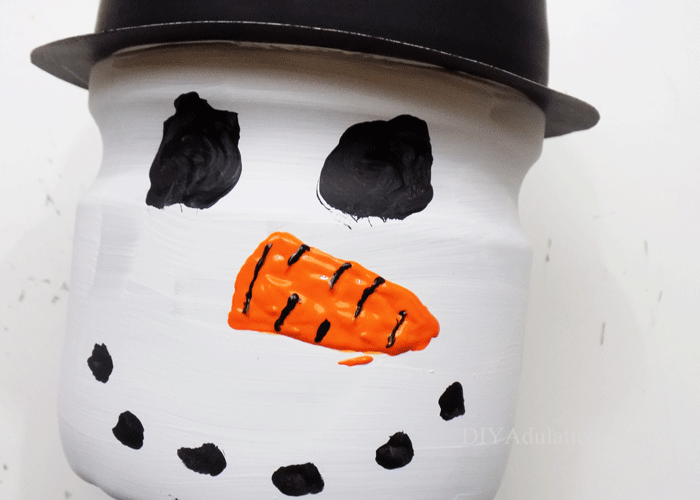
Next, paint the eyes and mouth on your container with black paint.


Give your treats a festive home for the holidays with this adorable upcycled snowman treat jar :: the perfect inexpensive holiday hostess gift!

Step 13

Add a nose to your snowman with orange fabric paint. You can also add some black notching as pictured if you would like.

Note:

  • I like to use fabric paint for this because of the ease of control and also because it gives the nose a 3-dimensional element.

Step 14

Allow the paint on the container to dry completely.

Step 15

After the paint is dry, seal your container with acrylic sealant.


Give your treats a festive home for the holidays with this adorable upcycled snowman treat jar :: the perfect inexpensive holiday hostess gift!

Step 16

Next, add a dab of hot glue to the back of your snowman’s hat.


Give your treats a festive home for the holidays with this adorable upcycled snowman treat jar :: the perfect inexpensive holiday hostess gift!

Step 17

Attach your ribbon around the hat, securing loose ends in glue. Trim any excess ribbon.


Give your treats a festive home for the holidays with this adorable upcycled snowman treat jar :: the perfect inexpensive holiday hostess gift!

Step 18

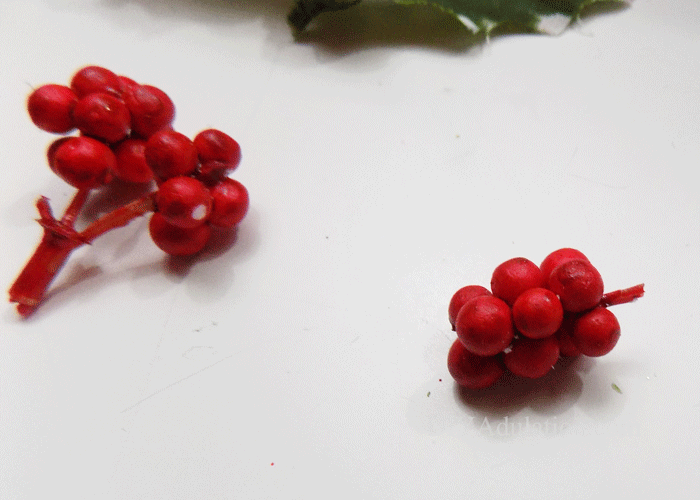
Cut the elements of your holly floral pick apart.


Give your treats a festive home for the holidays with this adorable upcycled snowman treat jar :: the perfect inexpensive holiday hostess gift!

Step 19

Next, cut one leaf off and cut it in half.


Give your treats a festive home for the holidays with this adorable upcycled snowman treat jar :: the perfect inexpensive holiday hostess gift!

Give your treats a festive home for the holidays with this adorable upcycled snowman treat jar :: the perfect inexpensive holiday hostess gift!

Step 20

Fold the ends of your cut leaf to re-form the shape on a smaller scale and secure with hot glue.


Give your treats a festive home for the holidays with this adorable upcycled snowman treat jar :: the perfect inexpensive holiday hostess gift!

Step 21

Attach your leaves to the snowman hat with hot glue.


Give your treats a festive home for the holidays with this adorable upcycled snowman treat jar :: the perfect inexpensive holiday hostess gift!

Step 22

Then cut a small sprig of berries off of your floral pick pieces.


Give your treats a festive home for the holidays with this adorable upcycled snowman treat jar :: the perfect inexpensive holiday hostess gift!

Step 23

Next, glue the berries sprig onto the leaves on your snowman’s hat.


Give your treats a festive home for the holidays with this adorable upcycled snowman treat jar :: the perfect inexpensive holiday hostess gift!

Step 24

Lastly, fill your snowman treat jar with candy and enjoy!


Give your treats a festive home for the holidays with this adorable upcycled snowman treat jar :: the perfect inexpensive holiday hostess gift!

Give your treats a festive home for the holidays with this adorable upcycled snowman treat jar :: the perfect inexpensive holiday hostess gift!

Give your treats a festive home for the holidays with this adorable upcycled snowman treat jar :: the perfect inexpensive holiday hostess gift!

Give your treats a festive home for the holidays with this adorable upcycled snowman treat jar :: the perfect inexpensive holiday hostess gift!

This adorable upcycled snowman treat jar gives your Christmas treats a festive home for the season. It is also the perfect way to use up those empty containers from your Christmas punch and reduce your holiday waste. Now it is time to check out everyone’s tutorials! Hop around and check out the fun snowman crafts from my friends. Then come back tomorrow for delicious party food recipes.

See where I’m linking up!


Be sure to visit our fellow 12 Days of Christmas Bloggers below for even more creative ideas this holiday season!

12 Days of Christmas Blog Hop 2018. Intelligentdomestications.com


Don’t Forget to Pin It!

Give your treats a festive home for the holidays with this adorable upcycled snowman treat jar :: the perfect inexpensive holiday hostess gift!

DIY Ammo Frame for Guys :: Thrift Store Decor Upcycle Challenge

Are you looking for an awesome DIY gift for your husband? This DIY ammo frame is perfect for guys who like hunting or are military men like mine. It is also the newest creation for this month’s Thrift Store Décor Upcycle Challenge. If you have any friends or family who like to hunt or fire guns for fun, ask them to start saving their casings now. One day at the range will give you enough to make this awesome project. I’m incredibly thankful to my close friend for diligently saving all of his casings for me so that I could bring you this DIY. Now, let’s get onto the tutorial.

Affiliate links may be used in this post. Ordering a product through these links may result in a commission at no extra cost to you. Read the full disclosure here.

Thrift Store Decor Upcycle Challenge

The Rules:

Meet the Hosts

Amanda | The Kolb Corner    Kim | Made in a Day
Maureen | Red Cottage Chronicles    Pili | Sweet Things
Debra | Shoppe No. 5    Marie | DIY Adulation    Sue | A Purdy Little House
Chelsea | Making Manzanita    Ann | Duct Tape and Denim    Karen | Dragonfly and Lily Pads
Kimm | Reinvented    Kathleen | Our Hopeful Home   Megan | C’mon Get Crafty
Victoria | Dazzle While Frazzled    Shirley | Intelligent Domestications    Angela | Simply Beautiful by Angela
Michelle | Our Crafty Mom    Jeannee | Shepherds and Chardonnay
Jennifer and Vicki | 2 Bees in a Pod    Ali | Home Crafts By Ali    Denise | My Thrifty House

Make sure you follow our board on Pinterest for more upcycled decor inspiration!


Are you looking for an unique DIY gift for your husband? This DIY ammo frame is perfect for guys who like hunting or military men, like mine.


[bctt tweet=”Are you looking for an unique #DIY #gift for your husband? This DIY ammo frame is it!” username=”diyadulation”]

Materials


Are you looking for an unique DIY gift for your husband? This DIY ammo frame is perfect for guys who like hunting or military men, like mine.

Step 1

Start by cleaning your thrift store frame and your casings if needed.


Are you looking for an unique DIY gift for your husband? This DIY ammo frame is perfect for guys who like hunting or military men, like mine.

Step 2

Next, take your frame apart and set the glass and backing aside.


Are you looking for an unique DIY gift for your husband? This DIY ammo frame is perfect for guys who like hunting or military men, like mine.

Are you looking for an unique DIY gift for your husband? This DIY ammo frame is perfect for guys who like hunting or military men, like mine.

Step 3

Start gluing your casings along the bottom of your frame, starting in the center.


Are you looking for an unique DIY gift for your husband? This DIY ammo frame is perfect for guys who like hunting or military men, like mine.

Step 4

Continue adding casings until the bottom of the frame is covered.


Are you looking for an unique DIY gift for your husband? This DIY ammo frame is perfect for guys who like hunting or military men, like mine.

Step 5

Next, begin gluing casing in a single line on the left side of your frame.

Tip:

  • Do this with like sides of the casings together as pictured.


Are you looking for an unique DIY gift for your husband? This DIY ammo frame is perfect for guys who like hunting or military men, like mine.

Are you looking for an unique DIY gift for your husband? This DIY ammo frame is perfect for guys who like hunting or military men, like mine.

Step 6

Repeat step 5 on the right side of your frame.


Are you looking for an unique DIY gift for your husband? This DIY ammo frame is perfect for guys who like hunting or military men, like mine.

Step 7

Next, glue 2 casings together on the top left corner of your frame as pictured.

Step 8

Do the same on the t op right corner of your frame.


Are you looking for an unique DIY gift for your husband? This DIY ammo frame is perfect for guys who like hunting or military men, like mine.

Step 9

Glue 3 casings upright, as pictured, in the center of the top of your frame.

Step 10

Once your glue has cooled, spray your entire frame with bronze spray paint. Allow the paint to dry.

Step 11

Next, spray your frame with a second coat of paint.


Are you looking for an unique DIY gift for your husband? This DIY ammo frame is perfect for guys who like hunting or military men, like mine.

Step 12

Lastly, put your frame back together and add a photo if desired.

Are you looking for an unique DIY gift for your husband? This DIY ammo frame is perfect for guys who like hunting or military men, like mine.


Are you looking for an unique DIY gift for your husband? This DIY ammo frame is perfect for guys who like hunting or military men, like mine.

Are you looking for an unique DIY gift for your husband? This DIY ammo frame is perfect for guys who like hunting or military men, like mine.

Are you looking for an unique DIY gift for your husband? This DIY ammo frame is perfect for guys who like hunting or military men, like mine.

This was so easy to make! I am crazy excited to surprise my husband with it this Father’s Day. You could also replace the picture with a handwritten note or drawing from your kiddos before gifting it. What are your thoughts? I’m seriously considering it. Let me know in the comments and then check out the other awesome Thrift Store projects from my friends below!

See where I’m linking up!


And now for more thrifty goodness!

Check out what my fellow upcyclers created below!