DIY Adulation

Fawning Over a Do-It-Yourself Life

  • Crafts
    • Papercrafts
    • Fabric Crafts
    • Paint Crafts
    • Recycled Crafts
    • DIY Crafts
  • Home
    • Home Decor
    • Organization
    • Recipes
    • Finances
    • Cleaning
  • Holidays
    • Spring Holidays
    • Summer Holidays
    • Autumn Holidays
    • Winter Holidays
  • Relationships
    • Self
    • Marriage
    • Parenting
    • Friends and Family
    • Kids
      • Kids Crafts
      • Kids Learning
      • Kids Activities
      • Back to School
      • Kids Parties
      • Kids Korner
  • Policies & Disclosures
  • Newsletter
  • About Me
  • VIP Resource Library

Organize Your Throw Blankets with a DIY Sprinkles Basket

07.25.2019 by Marie // Leave a Comment

Is your living room swimming in throw blankets? Now you can wrangle them all in a sweet way with a DIY sprinkles basket! It’s totally budget-friendly and a fun way to add some color to your organization.

Affiliate links may be used in this post. Ordering a product through these links may result in a commission. Read the full disclosure here.

Collage of Blankets in a Basket with text overlay - Organize Your Blankets with a DIY Sprinkles Basket Is your living room swimming in throw blankets? Now you can wrangle them all in a sweet way with a DIY sprinkles basket that's totally budget friendly! Click To Tweet


The Rules:

  • Upcycle an item(s) from a thrift store, resale store, or garage sale into a new piece of decor.
  • There’s no monthly theme.
  • There’s no budget to stick to.

Meet the Hosts

Angela | Simply Beautiful By Angela – Gail | Purple Hues and Me – Carmen | Living Letter Home – Chas | Chas’ Crazy Creations – Jenny | Cookies Coffee and Crafts – Pili | My Sweet Things – Kathleen | Our Hopeful Home – Marie | DIY Adulation – Michelle | Our Crafty Mom – Beverly | Across the Blvd – Michelle | Michelle James Designs – Molly | Just a Little Creativity 

Make sure you follow our board on Pinterest for more upcycled decor inspiration!


Sprinkles Blanket BasketI don’t know if this happens with your kiddos but I swear mine would rather walk around wrapped in a throw blanket than they would put on appropriate clothes… or any clothes. Even better, they don’t even stick to one blanket. Instead by the end of the day my living room looks like a second-hand blanket store. I wanted an easy way to corral all of those blankets every day. If you follow me on Instagram, you also know that I’m totally trying to sneak more color into our decor. Put the 2 together and you get this awesome DIY sprinkles basket to get all of the blankets organized quickly, easily, and in style! Sprinkles Basket with Blanket Hanging Out

DIY Sprinkles Basket Materials

  • Large Thrift Store Basket
  • White Spray Paint (The Kind for Wood Works Best)
  • Multiple Bright Colors of Acrylic Paint
  • Small Flat Paint Brush
  • Clear Acrylic Sealant

  Thrift Store Basket

Step 1

First, thoroughly clean your basket. This helps the paint stick to it better, plus you really want to store your blankets in a clean basket. If it’s especially dusty or dingy, use a soft bristle toothbrush to get the crevices clean.

Step 2

Then place your basket on a protected surface and spray paint the entire basket white. Note:

  • If you have to do it one side at a time, allow the painted side to dry before turning and painting the second side.

Step 3

Allow the white spray paint to dry completely before moving on.     White Basket with Green Sprinkles Painted on It

Step 4

After the paint has dried, pick a bright acrylic paint and paint small rectangles all over the basket.   White Basket with Green and Blue Sprinkles Painted on It

Step 5

Next, pick a second bright color and, again, paint small rectangles all over the basket. Sprinkles Blanket Basket

Step 6

Continue painting different colored triangles until you have the desired amount on your basket. I recommend using at least 3-4 different colors.

Step 7

Then let your acrylic paint dry completely.

Step 8

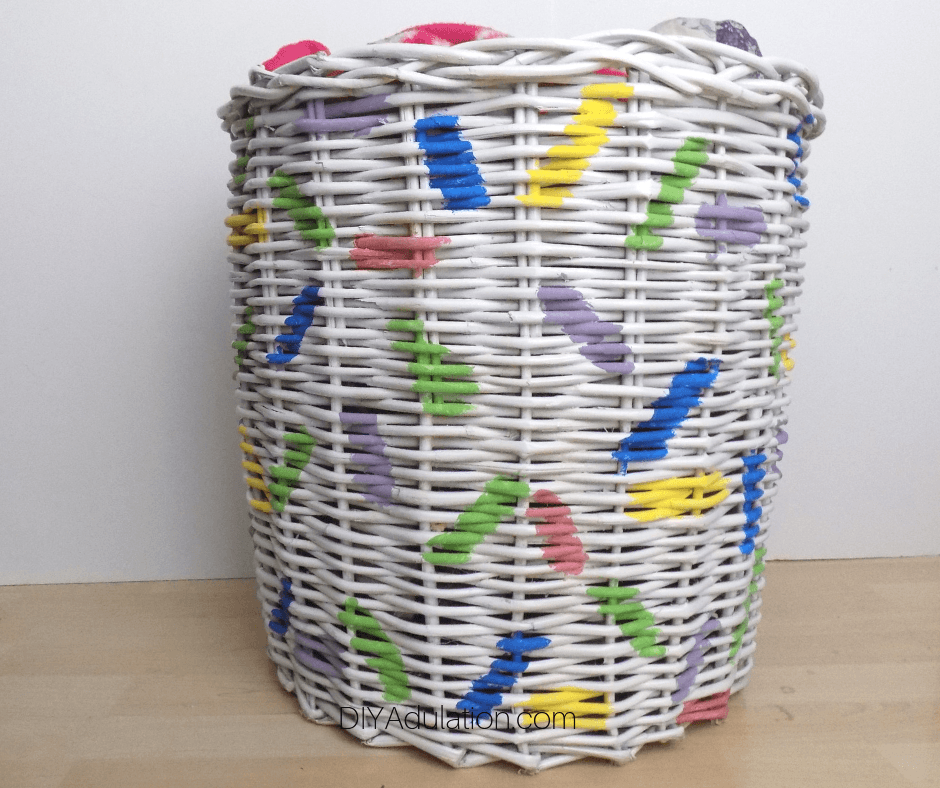
Lastly, seal your entire basket with a coat of clear acrylic sealant and allow it to dry before using to store your blankets. Blankets in a Basket with text overlay - Organize Your Blankets with a DIY Sprinkles BasketI absolutely love this DIY sprinkles basket for blanket organization! There’s a really good chance that I’m going to start incorporating candy-themed decor into every part of my house (unless my husband catches me…). Now it’s time to check out the rest of the awesome thrift store upcycles this month! Find my friends’ projects below!

See where I’m linking up!

Don’t Forget to Pin It!

Blankets in a Basket with text overlay - Organize Your Blankets with a DIY Sprinkles Basket

And now for more thrifty goodness!

Check out what my fellow upcyclers created below!

You are invited to the Inlinkz link party!

Click here to enter

Categories // Crafts, Home, Home Decor, Recycled Crafts, Thrift Store Challenge

DIY Coffee Mug Organizing Rack

07.27.2017 by Marie // Leave a Comment

Coffee is an important part of my life. Just the smell of a fresh pot brewing instantly lifts my mood (any time of day, I might add). Because of this absolute love of coffee, one of the most difficult areas to de-clutter are my coffee mugs. I began collecting them on my travels many years ago in high school. They mean a lot to me and some are irreplaceable. That’s why it was a big deal when I took on decluttering this spring that I pared down my collection. I kept the ones that I simply couldn’t part with and decided that items that emotionally charged deserved to be displayed. Thus, this DIY coffee mug organizing rack idea was born.

Affiliate links may be used in this post. Ordering a product through these links may result in a commission at no extra cost to you. Read the full disclosure here.

Thrift Store Decor Upcycle Challenge

The Rules:

  • Upcycle an item(s) from a thrift store, resale store, or garage sale into a new piece of decor.
  • There’s no monthly theme.
  • There’s no budget to stick to.

Meet the Hosts

Amanda | The Kolb Corner    Kim | Made in a Day
Victoria | Dazzle While Frazzled    Pili | Sweet Things
Debra | Shoppe No. 5    Jeannee | Shepherds and Chardonnay    Sue | A Purdy Little House
Kimm | Reinvented    Ann | Duct Tape and Denim    Kathleen | Our Hopeful Home 
Dru | Polka Dot Poplars    Toni | Small Home Soul     Angela | Simply Beautiful by Angela
 Michelle | Our Crafty Mom    Marie | DIY Adulation    Chelsea | Making Manzanita
Michelle | Michelle James Designs     Denise | My Thrifty House    Sara | Twelve on Main
Molly | Just a Little Creativity    Chelc | Inside the Fox Den
Colleen | Life on Kaydeross Creek    Florence | Vintage Southern Picks

Make sure you follow our board on Pinterest for more upcycled decor inspiration!


Having all of your mugs on display with this DIY coffee mug organizing rack will totally brighten up your mornings and you will have more cabinet space!


Free up cabinet space with this #DIY coffee mug organizing rack! #repurposeit Click To Tweet

Materials

  • Thrifted Loft Bed Mattress Support (The one I bought came with 4 but you only need one for this project)
  • Krylon Oil Rubbed Bronze Spray Paint
  • 20 Pack of S-Hooks
  • Command Picture Strips


Having all of your mugs on display with this DIY coffee mug organizing rack will totally brighten up your mornings and you will have more cabinet space!

Having all of your mugs on display with this DIY coffee mug organizing rack will totally brighten up your mornings and you will have more cabinet space!

Step 1

First, spray paint your mattress support on a protected and well-ventilated area.


Having all of your mugs on display with this DIY coffee mug organizing rack will totally brighten up your mornings and you will have more cabinet space!


Step 2

Next, lay out all of your s-hooks and spray paint them.

Step 3

Allow both your mattress support and s-hooks to dry.


Having all of your mugs on display with this DIY coffee mug organizing rack will totally brighten up your mornings and you will have more cabinet space!

Step 4

Flip your s-hooks over and spray paint the other side.


Having all of your mugs on display with this DIY coffee mug organizing rack will totally brighten up your mornings and you will have more cabinet space!

Step 5

Add a second coat of paint to your mattress support.

Tip:

  • Make sure that all of the sides, corners, and wires are covered during this step.

Step 6

Allow all of your paint to dry.

Step 7

Flip over your mattress support and add 12-16 Command Picture Strips around the edges that will face the wall.

Step 8

Hang your organizer on the wall by pressing the edges firmly against it.


Having all of your mugs on display with this DIY coffee mug organizing rack will totally brighten up your mornings and you will have more cabinet space!

Step 9

Lastly, add your s-hooks and mugs to your organizer.


Having all of your mugs on display with this DIY coffee mug organizing rack will totally brighten up your mornings and you will have more cabinet space!

Having all of your mugs on display with this DIY coffee mug organizing rack will totally brighten up your mornings and you will have more cabinet space!

Having all of your mugs on display with this DIY coffee mug organizing rack will totally brighten up your mornings. Guests will be able to strike up a conversation about your unique collection and you will have freed up extra cabinet space. One last tip I want to leave you with: Definitely hand this on the wall and don’t skimp on the Command Strips. I got impatient and wanted to test out my DIY coffee mug organizing rack. I loaded it up and leaned it against the wall behind our coffee pot. The next day, I walked past it, into the kitchen, and immediately heard loud crashing and glass breaking.


Having all of your mugs on display with this DIY coffee mug organizing rack will totally brighten up your mornings and you will have more cabinet space!

I knew before I had even seen it that the mug rack had fallen. I saw the shattered mugs that meant so much to me and wept. Thankfully, not all of my mugs were on it yet. Once I hung the organizer, I tested it by pulling down on it with all of my strength. It didn’t budge so I felt very confident. It has now been hanging for 3 weeks with mugs on it and no more incidents.

See where I’m linking up!

Don’t Forget to Pin It!

Having all of your mugs on display with this DIY coffee mug organizing rack will totally brighten up your mornings and you will have more cabinet space!


And now for more thrifty goodness!

Check out what my fellow upcyclers created below!

An InLinkz Link-up


Categories // Crafts, DIY, Home, Home Decor, Organization, Thrift Store Challenge

  • Facebook
  • Instagram
  • Pinterest
  • Twitter
  • YouTube
Shop The Best Machine Prices of the Year

Copyright © 2021 · Modern Studio Pro on Genesis Framework · WordPress · Log in