Easy and Beautiful DIY Druzy Jewelry Set

Sometimes creating your own beautiful and unique jewelry is exactly what you need for some fashionable self-care. First, of course, you get the recharge from crafting and creating. Secondly, you get the mood boost from looking beautiful in your new jewels. This DIY druzy jewelry set is the perfect set to create when you’re a busy mom short on time.

Affiliate links may be used in this post. Ordering a product through these links may result in a commission. Read the full disclosure here.

Pink Druzy Necklace and Earrings on Teal Background with text overlay - Easy and Beautiful DIY Druzy Jewelry Set


[bctt tweet=”Get ready to rock your next outing in style and confidence, even if it’s just to the grocery store, with this easy and beautiful DIY druzy jewelry set!” username=”diyadulation”]

Even though I rarely wear jewelry, I still love a beautiful piece. When you wear pieces so rarely, it becomes something special that you do for yourself. Even adding a simple statement necklace to jeans and tee-shirt can boost your self esteem quickly and easily.

That’s why I think all moms should learn to make their own jewelry. Simple designs are best when you’re just starting out. Luckily, that’s exactly what this DIY druzy jewelry set is. There’s no complicated measuring or creations. Simple thread and glue and you’re done.


Pink Druzy Jewelry Set

Before you get started with jewelry making, you need to invest in a small tool set. I love and use this one from Bead Landing. It’s inexpensive but has everything you need to get started. Keep your tools together in a small bag or plastic box so that they don’t get mixed up with your other tools. I recommend using your jewelry tools only for creating, not on any household project or improvements.


Beads and Glue Next to Earring Posts

DIY Druzy Jewelry Set Materials


Pink Druzy Beads

Step 1

First, open and un-string your natural stone beads.


Pink Druzy Beads Glued to Earring Posts

Step 2

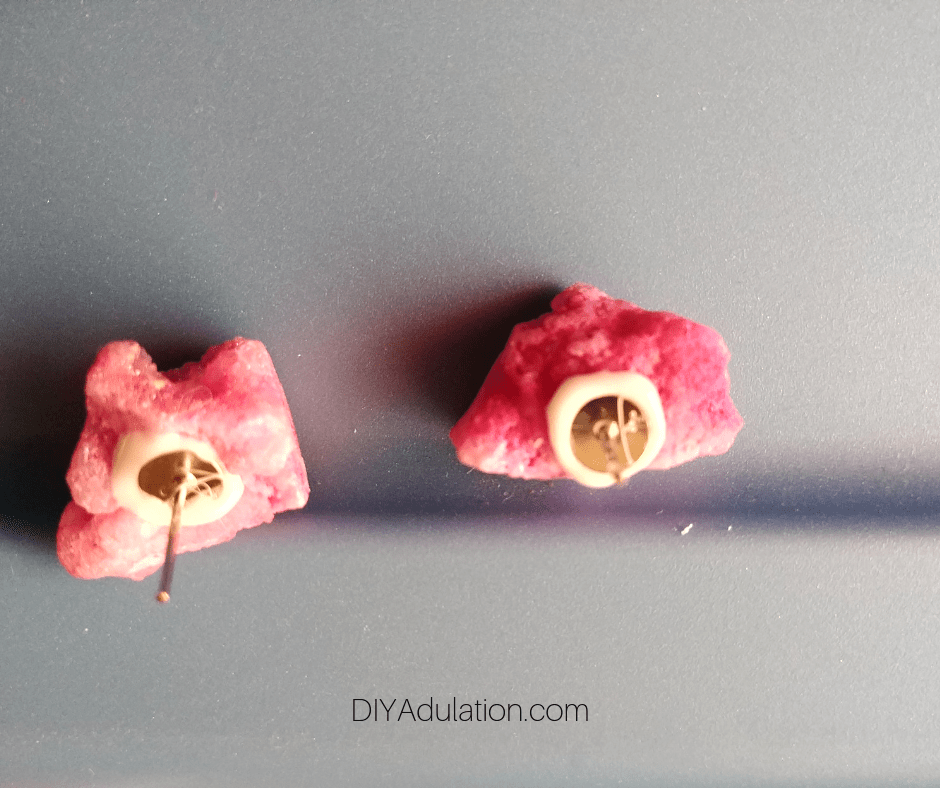
Then choose two of the smallest natural stone beads and glue them to the earring posts with E6000. The stones are heavy. That is why you want the smallest ones in the set otherwise the earrings may be too heavy.

Step 3

Set the earrings aside to dry for at least 24 hours. Make sure they are stable during drying so that the beads don’t slide off.

Tip:


Druzy Bead next to Piece of Metal

Wire Threaded Through Bead

Step 4

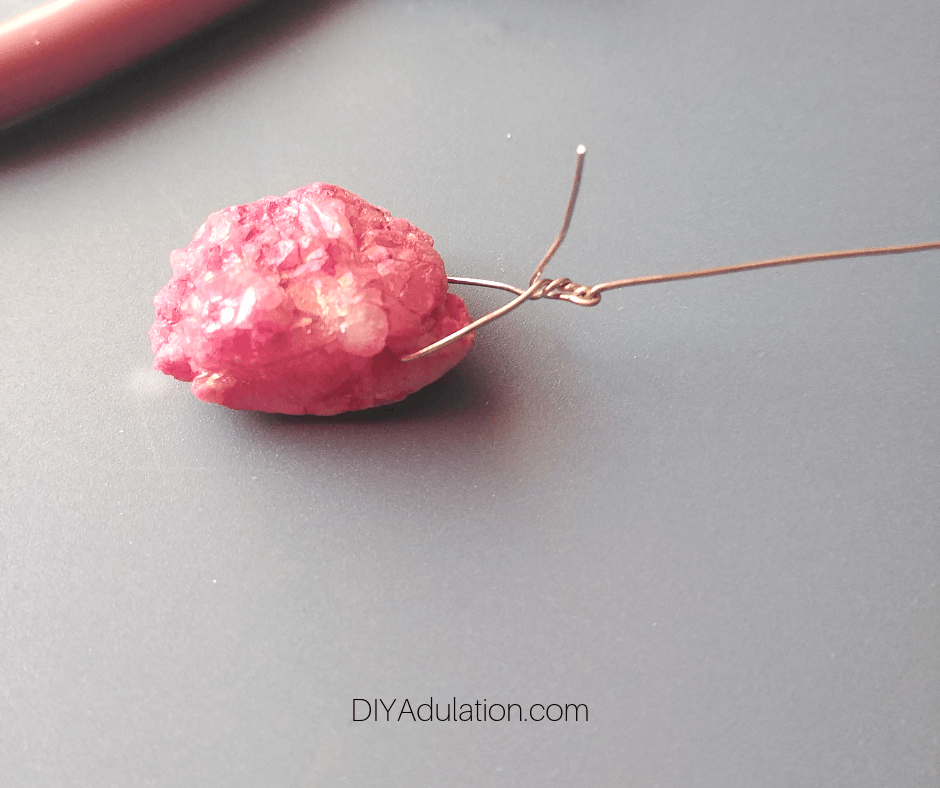
Next, cut a small length of wire and thread it through the hole in a third natural stone bead. The size of this one isn’t important. Choose the largest for a statement pendant or another small one for a daintier jewelry set.


Twisted Wire Threaded Through Bead

Twisted Wire Hanger on Bead

Twisted Wire Hanger on Bead with Excess Wire Removed

Step 5

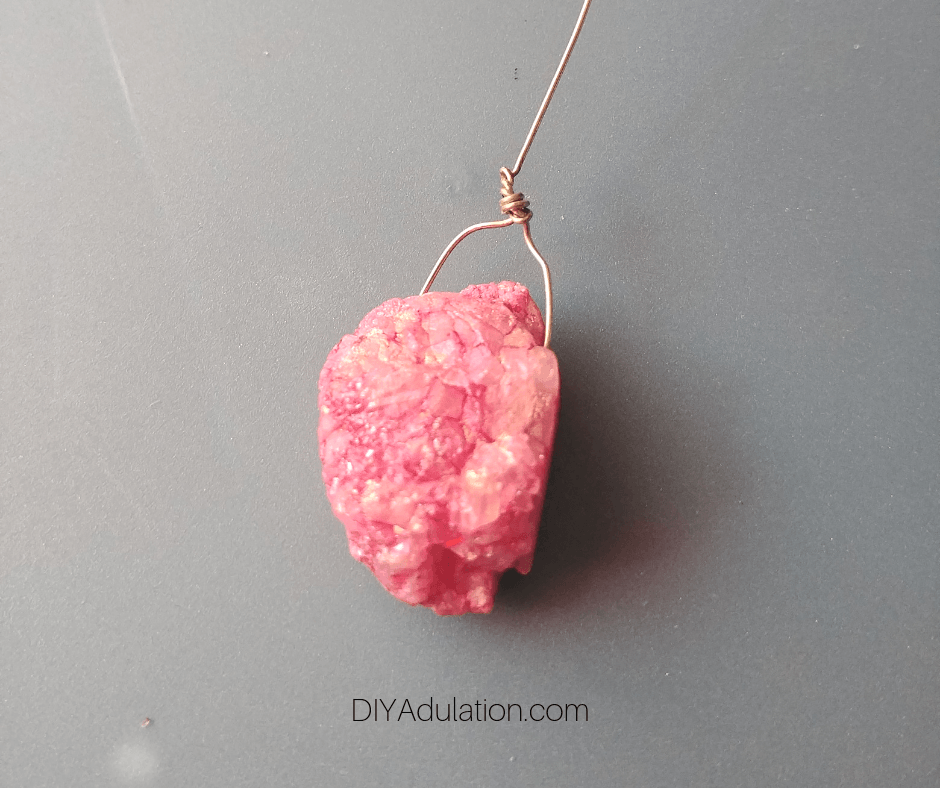
Then wrap the wire around itself as pictured to create an attachment for your jump ring. If there is any excess, trim it off with the wire cutters in your jewelry tool set.

Step 6

Open your jump ring with pliers from your jewelry tool set.


Bead with Jump Ring Attached to Wire Hanger

Step 7

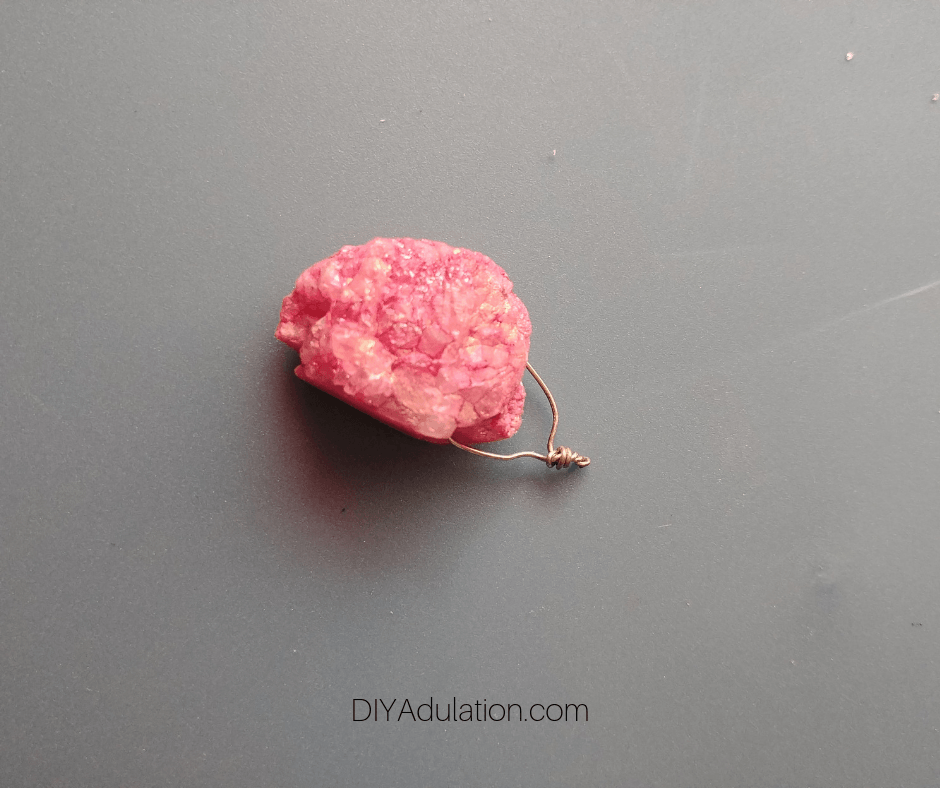
Next, attach the jump ring to the wrapped wire on your bead with flat nose pliers.
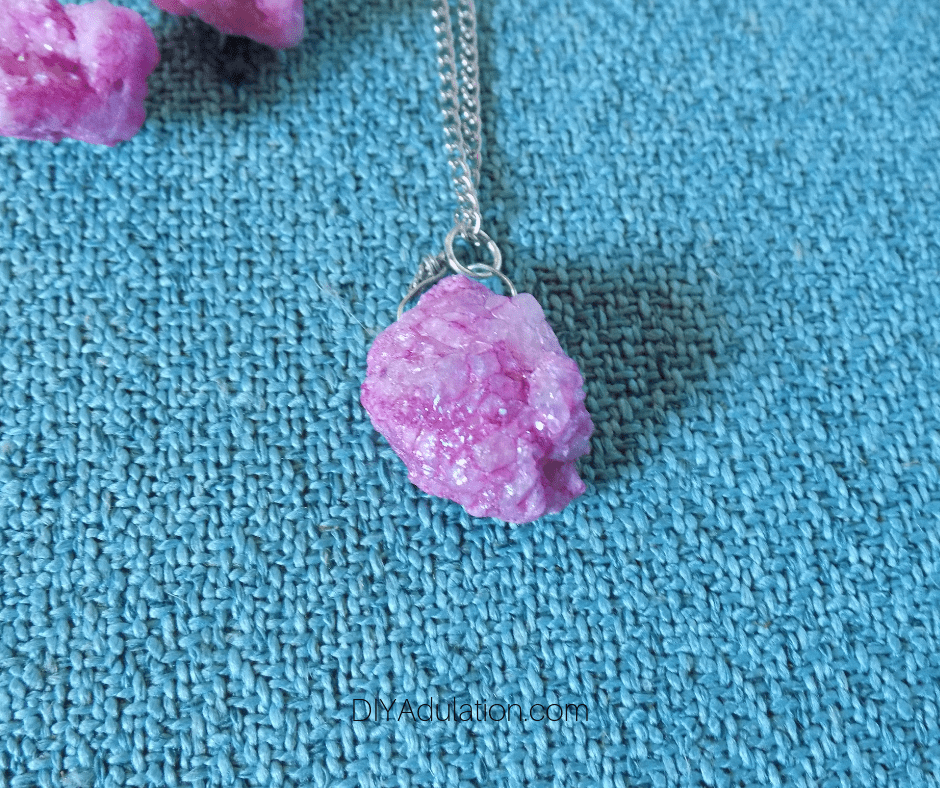
 

Pink Druzy Pendant on Chain

Step 8

Lastly, slide your created pendant onto your silver chain and enjoy!


Pink Druzy Necklace and Earrings on Teal Background

Close Up of Pink Druzy Earrings

Pink Druzy Necklace and Earrings on Teal Background with text overlay - Easy and Beautiful DIY Druzy Jewelry Set

This DIY druzy jewelry set is absolutely beautiful! What’s even better is that it’s the perfect jewelry set for beginners to make. A few tools is all you need to get started and, more importantly, it’s a self care 2-fold. That’s pretty incredible when you think about it. So get ready to rock your next outing in style (even if it’s just to the grocery store).

See where I’m linking up!

Don’t Forget to Pin It!

Pink Druzy Necklace and Earrings on Teal Background with text overlay - Easy and Beautiful DIY Druzy Jewelry Set


More Ideas You’ll Love:

Crazy Easy DIY Body Glitter Gel

Getting dressed up in makeup and putting on crazy outfits is one of the great joys of childhood. Of course, all moms know that when it comes to kiddos that makeup is blown throw faster than you can buy it. That’s why I’m showing you how to make your own DIY body glitter gel for a lot less than it costs in the store. No more internal groaning when they come out entirely covered in makeup.

Affiliate links may be used in this post. Ordering a product through these links may result in a commission. Read the full disclosure here.

Stack of body glitter with text overlay - Crazy Easy DIY Body Glitter Gel


[bctt tweet=”In addition to being crazy easy to make and saving you a ton of money, this DIY body glitter gel is a fantastic party favor for sleepovers!” username=”diyadulation”]


Okay, confession time. I love glitter and it totally doesn’t know any limits. I still rock body glitter, glitter eye shadow (more occasionally), and I actually love receiving glittery greeting cards. Heck, I even love eating/drinking glittery stuff. Don’t believe me? Check out this glittery punch recipe. Yes, I’m that bad.

Why am I telling you this? Because it shows that my kids come by their glitter obsession honestly. It’s not limited to my daughter, either. My oldest boy still rocks some glitter on occasion and my daughter and youngest son practically swim in it when they play with makeup or craft.


Stack of Multi Color Body Glitter Gel

Yes, it’s a pain to clean up and I doubt any part of our home will ever truly be cleaned of glitter but it is worth it. Twenty years from now we won’t remember the messes we cleaned up. They will blend together. We also won’t remember how tired we were every night. We remember is how happy they were when they came out and asked us how pretty they were. Even when their faces are covered in multi-colored eye shadows and glitter.


Materials for DIY Body Glitter

DIY Body Glitter Gel Materials


Clear Aloe Gel in Small Plastic Cups

Step 1

First, put a small amount of clear aloe vera gel into each small plastic mixing cup. Do not put more gel in the cup than will fit in your storage container unless you want multiple containers of the same color.


Glitter on Top of Clear Aloe Gel in Small Plastic Cups

Step 2

After your cups have gel in them, add cosmetic grade glitter on top of each.


Glitter Mixed in Aloe Gel in Small Plastic Cups

Teal Body Glitter Gel in Small Cup

Pink Body Glitter Gel in Small Cup

Orange Body Glitter Gel in Small Cup

Step 3

Next thoroughly mix your aloe vera gel and glitter together. Be sure to scrape the sides of your cup as you mix. This ensures the glitter is throughout the body glitter.


Small Empty Lidded Containers

Small Containers Filled with Body Glitter Gel

Step 4

After you mix all of the colors, transfer the body glitter gel into your lidded containers for storage.


Multi colored tower of body glitter

Additional Options:

If you prefer scented body glitter, mix in a few drops of essential oil when you mix together your glitter and aloe vera gel. You can also add additional color to the body glitter gel although I prefer it without. It all depends on your (or your kids’) preferences.


Close up of Orange and Green Body Glitter Gel

Stack of body glitter with text overlay - Crazy Easy DIY Body Glitter Gel

In addition to being crazy easy to make and saving you a ton of money, this DIY body glitter gel is a fantastic party favor for sleepovers. It can even be a party activity. Let the kiddos mix up their favorite colors and then decorate the containers with stickers. It’s seriously that easy.

See where I’m linking up!

Don’t Forget to Pin It!

Stack of body glitter with text overlay - Crazy Easy DIY Body Glitter Gel


More Ideas You’ll Love:

Awesome DIY Planters and Vases for Your Home

As the weather warms up and the flowers begin to bloom, it’s time to start thinking about a refresh for your plants. These awesome DIY planters and vases for your home are the perfect way to update your space.

Affiliate links may be used in this post. Ordering a product through these links may result in a commission. Read the full disclosure here.

Collage of Planters and Vases with text overlay - DIY Planters and Vases for Your Home


[bctt tweet=”Thinking about a refresh for your plants? These awesome DIY planters and vases for your home are the perfect way to update your space.” username=”diyadulation”]

Every spring I get that itch. I want to fill my home with flowers and beautify my front garden. I know I’m not the only one. After the dullness of winter, you crave the colors of spring flowers. The blossoming trees, the flitting of birds, and the sprouting flowers make the season a refreshing and inspiring time.

What better way to harness that inspiration than with some crafty new planters and vases?


tiered raised garden bed

DIY Tiered Raised Garden Bed (Anika’s DIY Life)

When you want a garden but you’re short on space, this raised garden bed is perfect. It’s so easy to make, even beginner woodworkers can totally do it.


raised patio planter

Creating a Raised Patio Garden (Mom Home Guide)

Another space saving option is this raised patio garden idea. She shows you how to use what you have to create it so it’s budget-friendly too!


metallic planter on stack of books

DIY Metallic Tribal Print Planter (Inside the Fox Den)

Don’t forget about bringing some plants inside. This metallic planter is a beautiful way to grow your favorites.


yogurt jar vase

Repurposed Yogurt Jar Flower Vase (Glitter on a Dime)

Not all flowers stay in planters, of course. This wonderful repurposed vase is a gorgeous way to display your favorite fresh and faux flower arrangements.


swan figurine planter

How to Re-Purpose Household Items as Planters (The Boondocks Blog)

Find out how to turn everyday items into fun and kitschy planters with this super simple tutorial.


table planter on umbrella table

DIY Umbrella Table Flower Planter (Dazzle While Frazzled)

Of course, you don’t want to forget about the back deck when planning your spring refresh. This umbrella table planter is the perfect addition to your patio set!


Close up of Whitewashed Terracotta Pots

How to Whitewash Pots and Planters (Snazzy Little Things)

Refresh your existing planters with this easy tutorial. If you love the whitewash look, you’ll love learning how to do it yourself.


basket planter

From Discarded Basket to Farmhouse Planter (Organized and Simplified)

Get that farmhouse look from an old basket with this awesome DIY planter. It’s a fantastic way to breath new life into something old.


flower arrangements in birch bark vases

DIY Birch Bark Vases (DIY Adulation)

Lastly is another terrific upcycled vase idea. Turn baby food jars into bud vases with this super simple tutorial!


Collage of Planters and Vases with text overlay - DIY Planters and Vases for Your Home

Soak up the warming sunshine and refresh your space this spring with these awesome DIY planters and vases for your home. You’ll have the perfect home for growing and displaying your beautiful plants.

Don’t Forget to Pin It!

Collage of Planters and Vases with text overlay - DIY Planters and Vases for Your Home