DIY Glittery Shamrock Fairy Dress Up Accessories

Have you ever had an idea that totally starts out small and vague but then blossoms into something really awesome? That is exactly what happened with these DIY glittery shamrock fairy dress up accessories. Once you get in that creative mindset it can truly take on a life of its own. Now, you can let your little one prance around to her heart’s content this holiday as an adorable shamrock fairy.

Affiliate links may be used in this post. Ordering a product through these links may result in a commission at no extra cost to you. Read the full disclosure here.

Shamrock Fairy Accessories Collage with Text Overlay: DIY Shamrock Fairy Dress Up Accessories


[bctt tweet=”Let your little one do what she does best: play pretend. These #DIY glittery shamrock fairy #dressup accessories are so much fun and cost less than $5.00 to make!” username=”diyadulation”]


Shamrock Fairy Accessories

Originally, I only had a shamrock headband in the editorial calendar. I thought something fun and playful for little girls to wear would be a sweet idea. Then the idea started to grow. Every mom knows that kids love playing dress up. Mine come up with some of the most creative ensembles that have me in tears from laughter. Why not add some Saint Patrick’s Day fun to their dress up trunk. That’s exactly what these DIY glittery shamrock fairy dress up accessories do.


Gold Headband, Foam Shamrocks, Ink Pen, and Gold Wire

DIY Shamrock Fairy Dress Up Accessories Materials


2 Cut Lengths of Gold Wire Next to Pink Scissors and Foam Shamrock

Step 1

Start but cutting 2 lengths of gold wire roughly 9 inches long each.


Gold Wire Wrapped Around an Ink Pen

Step 2

Next, wrap one piece of wire around your ink pen to form a spring.


Close Up of Gold Springs

Step 3

Slide the spring off of the pen and repeat with your second piece of wire.


Gold Spring Attached to Headband

Step 4

Then wrap the ends of each spring around your headband.

Tip:

  • If you have to use a solid headband, add some hot glue to the wrapped wire to help hold it in place more securely.


Flattened End of Coil attached to Headband

Step 5

Now, bend the top coil on each spring so that is lies flat as pictured above.


Gold Spring glued to Foam Shamrock Stem

Step 6

Add a dab of hot glue to the stem of a foam shamrock and press the flattened coil into it.


Shamrock Attached to Gold Spring


Step 7

Immediately cover with a second foam shamrock and press firmly together.


Shamrock attached to Spring and attached to Headband

Step 8

Now secure the rest of the shamrock edges together with hot glue.


Glittery Shamrock Headband

Step 9

Repeat steps 6 through 8 with the second spring on your headband.


Green Glittery Fairy Wings

Step 10

Set your headband to the side and pull out your fairy wings.


Gold Wire Wrapped around Center of Wings

Step 11

Start by wrapping the center of your fairy wings in gold wire.


Close up of Gold Wire Glued to Wings

Gold Wire Attached to Wings

Step 12

Next, outline each of the wings with a single strand of gold wire, securing every few inches with hot glue.

Gold Wire Outlining Wings

Tips:

  • Do this on a non-stick surface otherwise you’ll end up gluing your wings to the table.
  • Wrap each part of the wing separately. For example: one length of gold wire for the top right wing and a second length of wire for the bottom right wing.


Gold Coins Glued on Green Wings

Step 13

Lastly, attach some gold coins to the wings as decoration. I attached one to each glittery swirl as well as a second coin to the bottom wings. This makes it easier to keep them symmetrical.


Shamrock Fairy Accessories

Shamrock Fairy Accessories Collage with Text Overlay: DIY Shamrock Fairy Dress Up Accessories

That’s it! Now your little one can do what she does best: play pretend. These DIY glittery shamrock fairy dress up accessories are so much fun, I totally want to make a second set for me to wear. We might add a rainbow wand, too. What do you think? Don’t worry about this craft breaking the bank either. Everything except the gold wire came from the Dollar Tree and even that you can get there if you don’t have any on hand. Don’t you love that store when it comes to the holidays? This awesome project only cost $4 to make ($5 if you need wire, too). Worth it!

See where I’m linking up!

Don’t Forget to Pin It!

Shamrock Fairy Accessories Collage with Text Overlay: DIY Shamrock Fairy Dress Up Accessories


More Ideas You’ll Love:


Sprinkle-Covered Rainbow Shamrock Cakes

Let’s start this week off with a splash of color and sugar. As promised at the Merry Monday party yesterday, we are back today with another fun rainbow treat. These easy rainbow shamrock cakes are a fun addition to your holiday party or simply a nice surprise for the family. Get in the kitchen, crank some Flogging Molly, and bake up this deliciousness.

Affiliate links may be used in this post. Ordering a product through these links may result in a commission at no extra cost to you. Read the full disclosure here.

Sprinkled Shamrock Cakes Collage with Text Overlay: Sprinkle Covered Rainbow Shamrock Cakes


[bctt tweet=”Get in the kitchen, crank some Flogging Molly, and bake up these delicious rainbow shamrock cakes! #stpats #recipe” username=”diyadulation”]

I have loved celebrating St. Patrick’s Day since I first moved out on my own. I always went all out with green everything, fun decorations, and games. Since those days, the celebrations have tamed quite a bit but we still enjoy celebrating. We always do some sort of festive food spread and, of course, blast the music. The kiddos get all hyped up on sugar and dance around. This year, I’m surprising them with this new sweet treat!


Close up of Sprinkled Rainbow Shamrock Cake

Ingredients

Step 1

First, preheat your oven to 350° F.


Flour Prepped Baking Dish

Step 2

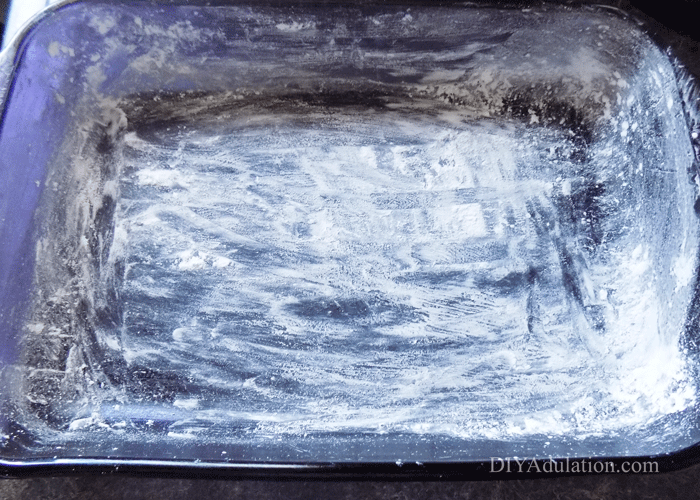
Prepare a 9 x 13 glass baking dish by lining with shortening and then covering in flour. This makes it easier to get the cake out later. Set it to the side.


Mixed Cake Batter and Whisk in Mixing Bowl

Step 3

Prepare your cake mix according to the instructions on the box.


4 Bowls of Cake Batter

Step 4

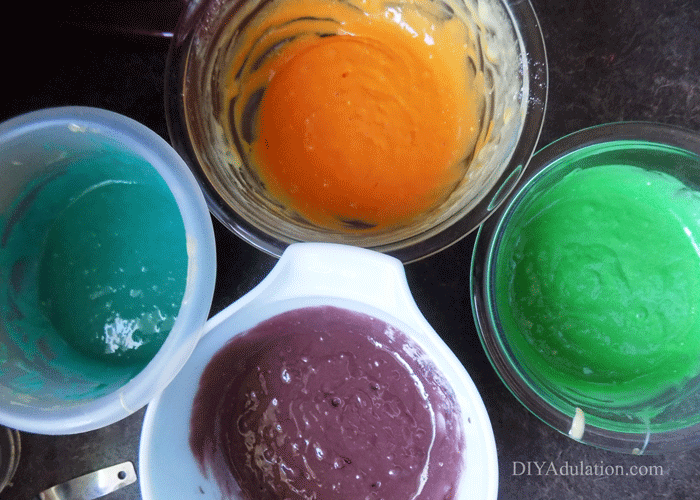
Next, separate your mix into 4 or 5 different small bowls.


Dyed Cake Mix in 4 Separate Bowls

Step 5

Add in food coloring to each bowl and mix it in. I went with blue, green, orange, and purple but any colors from the rainbow (or all of them) will work.


Step 6

Now, drop dollops of each color of cake batter into the baking dish at random.

Step 7

Next, take a toothpick and swirl it through the cake batter in your baking dish.

Step 8

Bake for 30 minutes at 350° F.

Step 9

After your cake is finished baking, place the baking dish on a trivet to cool for 10-15 minutes.

Step 10

When the baking dish is cool enough to touch without oven mitts, flip it over onto a cooling rack to remove the cake.

Step 11

Place your cake and the cooling rack in the freezer for at least 2 hours. This will make the next steps much easier.


Cooled Cake on parchment Paper

Cut in Half Slab of Cake

Step 12

After your cake is fully cooled (even partially frozen), pull it out and cut it in half along the center like a hamburger bun. Put one half off to the side for now.

Step 13

Lay your remaining half slab of cake on a piece of parchment paper and begin cutting out your shamrocks with a cookie cutter.

Notes:

  • I used 2 different sizes to reduce the amount of cake waste.
  • Put the excess cake that cannot be cut with your cookie cutters in a plastic freezer bag. You can turn it into cake pops later so none of the cake goes to waste.

Step 14

Continue cutting out shamrocks until both halves of your cake have been cut.


Cut Out Shamrock Cakes on Cooling Rack

Step 15

Now, place your shamrocks on the cooling rack and place it over the parchment paper.

Step 16

Melt your candy melts in the microwave in a microwave safe bowl in 1 minute increments until smooth.

Tip:

  • After the candy is melted, add a tbsp. of shortening to make it smoother and easier to pour.

Step 17

Next, pour your melted candy over the tops of the shamrocks. Be sure that the sides are covered also.

Step 18

Sprinkle your green sugar sprinkles over the candy coating immediately.


Sprinkled Rainbow Shamrock Cakes

Step 19

Allow your candy coating to cool completely, the remove the rainbow shamrock cakes and enjoy!

Bonus Tips


Sprinkled Shamrock Cakes Collage with Text Overlay: Sprinkle Covered Rainbow Shamrock Cakes

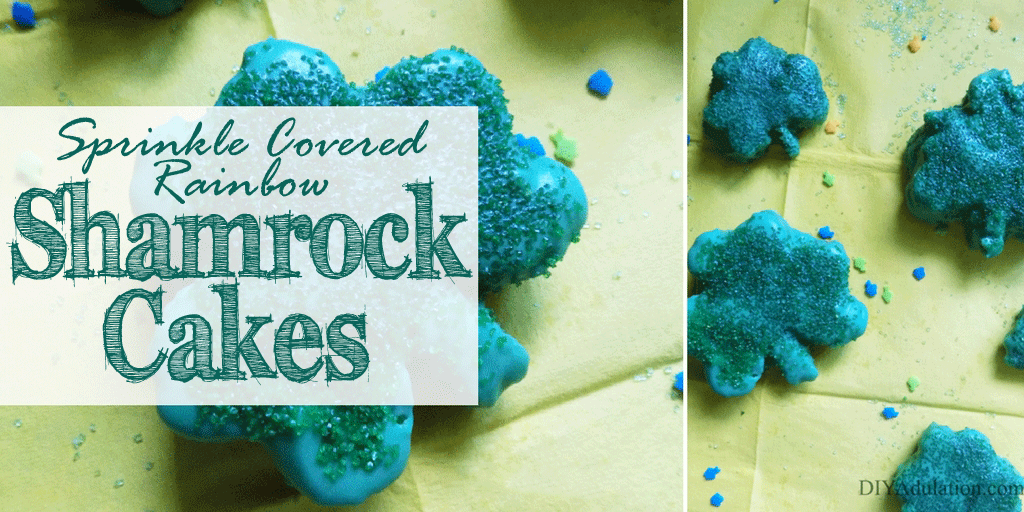
The work on these rainbow shamrock cakes is totally worth it. The candy coating seals in the moisture for a soft, spongy cake and the sprinkles give it a surprise crunch that you will love. In case you missed it, you can find more awesome Rainbow Crafts and Treats at this week’s Merry Monday link party. Don’t forget to complete the fun with these Dollar Store St Pats Party Hats, too.

See where I’m linking up!

Don’t Forget to Pin It!

Sprinkled Shamrock Cakes Collage with Text Overlay: Sprinkle Covered Rainbow Shamrock Cakes


More Ideas You’ll Love:

Playful Rainbow Crafts and Treats for Saint Patrick’s Day

Are you loving all things rainbow this St. Patrick’s Day? I definitely am so much so that I’m sharing these awesome Rainbow Shamrock Cakes tomorrow. Until then, however, here are more playful rainbow crafts and treats for Saint Patrick’s Day you can make right now. Rainbows are always so cheerful. It’s hard not to be happy when creating such colorful fun. After you’re done checking them out, stick around for this week’s Merry Monday Link Party below!

Collage of Rainbow Crafts and Treats with text overlay: Playful Rainbow Crafts and Treats


[bctt tweet=”Are you loving all things rainbow this St. Patrick’s Day? Here are more playful #rainbow crafts and treats for #SaintPatricksDay you can make right now.” username=”diyadulation”]

Rainbow swirled chocolate bark with rainbow sprinkles

Rainbow Chocolate Bark Recipe (Simply Designing)

This sweet swirling confection is so fun and festive. It is almost too pretty to eat and deceptively easy to make.


Colorful rainbow grapes in a bowl

Rainbow Jello Frosted Grapes Recipe (Must Have Mom)

Are you looking for a lighter treat this St. Patrick’s Day? These colorful rainbow grapes are perfect!


Butter rainbow bagels on a plate

Learn How to Make Your Own Rainbow Bagels (Ducks ‘n a Row)

Ah, rainbow bagels. These are so much fun! Why make boring plain bagels when you can make them fun and colorful?


Close up of rocky road treats on a plate

Rainbow’s End Rocky Road Candy (The Monday Box)

This chocolaty goodness is right up my alley. Sweet, crunchy, and colorful is the perfect combination.


pompom rainbow on a teal wall with spools of yarn and decorative sign

DIY Pom Pom Rainbow Art (White House Crafts)

Anyone else obsessed with pompoms? If so then this awesome rainbow wall art is for you.


Ribbon Rainbow and shamrock wall hanging on a pallet wall

DIY St. Patrick’s Day Shamrock Front Door Décor (Dazzle While Frazzled)

Have you ever seen such a unique way to use ribbons in your craft? The texture she creates is playful and fun just like the decor itself.


Rainbow trees close up

Felt Rainbow Topiaries (Simply Designing)

These colorful topiaries are great for your mantle or as a centerpiece on your table. You won’t believe how easy they are to make!


Gray tote bag with rainbow hearts in a circle design on the front

DIY Felt Heart Rainbow Tote (Busy Being Jennifer)

Don’t limit your rainbow love to treats and decor. Sport it on-the-go with this adorable tote bag.


Close up of metallic rainbow washi tape tags

Metallic Washi Tape Rainbow Tags (White House Crafts)

Need a little shine with your rainbow? These metallic tags have you covered. Use them on holiday treats or make a bunch and hang them all the wall as decor.


Gold Coin Pendant Necklace with Rainbow tassel and text overlay: St. Patrick's Day Rainbow Tassel Necklace

Rainbow Tassel Necklace (My Pinterventures)

This DIY is great for kids. This colorful necklace is super fun and keeps the pinches away on St. Patrick’s Day.


Bowl of fruit loops and egg cartons with sorted fruit loops and a cereal rainbow

R is for Rainbow – Preschool Craft (Ducks ‘n a Row)

Don’t limit the rainbow fun to the big kids. This preschool craft is great for teaching little ones sorting, fine motor skills, and matching all while having fun.


Collage of Rainbow Crafts and Treats with text overlay: Playful Rainbow Crafts and Treats

Insert some colorful fun into your Saint Patrick’s Day with these playful rainbow crafts and treat. There is truly something for the whole family. Don’t forget to come back tomorrow to get the recipe for these awesome Rainbow Shamrock Cakes. For now it’s time to get this Merry Monday Link Party started. See what creative ideas everyone is sharing and then link up what you have been creating!

See where I’m linking up!

Don’t Forget to Pin It!

Collage of Rainbow Crafts and Treats with text overlay: Playful Rainbow Crafts and Treats