High Style Holiday Entertaining on a Budget (+ Asiago-Parmesan Fig Crostini Appetizer)

The holidays are a prime entertaining time. You love getting together with friends and family to celebrate this magical season. Unfortunately television advertisements, the magazines you read, and store displays convince you that throwing the ultimate soiree means spending a fortune on fresh décor, fine china, and table linens. All of this is before you even get to the food. Stop chasing an idea of perfection that will land you broke long before Christmas arrives. Here are tips for high style holiday entertaining on a budget including an easy and budget-friendly Asiago-Parmesan Fig Crostini Appetizer!

Asiago-Parmesan fig crostini appetizers are a perfect mix of savory and sweet. This year wow your guests with high style holiday entertaining on a budget! #ad #StellaCheeses #QualitySince1923

Décor

Instead of rushing out to buy new swags and lights, use the décor you already own to decorate. If you don’t have much décor, concentrate the pieces you do have in one area (like the dining room). This will give the appearance of a full and festive party.

Another easy and inexpensive way to beef up your décor is to use Christmas wrapping paper. Wrap the pictures on your walls to look like presents. You can also wrap your food tables and even your doors to easily coordinate all of you entertaining décor elements.

Choose a Neutral Tablecloth

Create an upscale dining table with a gorgeous fabric tablecloth. The trick is to choose one that is a solid color such as green or white that can be used for multiple holidays throughout the year. Personalize the theme of your table with place settings and centerpieces. By choosing a tablecloth that can be used year-round it makes this a splurge worth investing in.

[bctt tweet=”This year wow your guests with high style holiday entertaining on a budget! #ad #StellaCheeses #QualitySince1923″ username=”StellaCheese”]

Buy Disposable

When hosting a large holiday gathering the cleanup us a nightmare. Make it easier this year by purchasing disposable serving ware and utensils. These no longer have to mean a cheap-looking gathering with paper plates and napkins. You can buy plastic utensils and serving trays that look like silver as well as gorgeous plates in every color and style you can imagine. Take it a step further by getting plastic wine and champagne glasses that only look like crystal. Finally, no more worrying about kids breaking glasses or being forced to compromise your style.

Rock Your Food

The most memorable part of holiday entertaining is the food. If your guests don’t like it, or worse, have not gotten enough to eat they won’t be focused on the awesome memories being made. Don’t let your high style décor go to waste by underwhelming guests with food. Make sure that you have more than enough to eat and drink to keep guests happy all night.

[bctt tweet=”Asiago-Parmesan fig crostini appetizers are a perfect mix of savory and sweet. #ad #StellaCheeses #QualitySince1923″ username=”StellaCheese”]

Appetizers are a must whether you’re serving a full meal or not. Luckily, this doesn’t have to be hard. Before you reach for that bag of chips to unceremoniously dump in a bowl, make this decadent Asiago-Parmesan Fig Crostini appetizer. With the help of Stella Cheeses creating a high style appetizer is easy and budget-friendly.

Asiago-Parmesan fig crostini appetizers are a perfect mix of savory and sweet. This year wow your guests with high style holiday entertaining on a budget! #ad #StellaCheeses #QualitySince1923

Ingredients


Step 1

Cut 28 small circles out of your French loaf using a metal cookie or fondant cutter.

Tip:

If you don’t have one of these cutters, a regular medicine cup will work also. This is what I used and they turned out fantastic!

Step 2

Place 1/3 cup of butter in a microwave safe bowl and heat for 1 minute or until melted.

Step 3

Pre-heat your oven to 350º.

Step 4

Brush melted butter on butter on both sides of your bread circles and place on a non-stick baking sheet.

Step 5

Bake bread at 350 degrees for 10 minutes.

Step 6

Thinly slice 28 squares of Stella Asiago cheese roughly the size of your circles.

Step 7

Place toasted bread circles on spoon rests and stack a square of cheese on each circle.

Step 8

Place a dried fig on top of each stack and drizzle with honey.

Step 9

Grate a small amount of Stella Parmesan over each honey-drizzled fig.

Asiago-Parmesan fig crostini appetizers are a perfect mix of savory and sweet. This year wow your guests with high style holiday entertaining on a budget! #ad #StellaCheeses #QualitySince1923

Asiago-Parmesan fig crostini appetizers are a perfect mix of savory and sweet. This year wow your guests with high style holiday entertaining on a budget! #ad #StellaCheeses #QualitySince1923

Asiago-Parmesan fig crostini appetizers are a perfect mix of savory and sweet. This year wow your guests with high style holiday entertaining on a budget! #ad #StellaCheeses #QualitySince1923

Asiago-Parmesan fig crostini appetizers are a perfect mix of savory and sweet. This year wow your guests with high style holiday entertaining on a budget! #ad #StellaCheeses #QualitySince1923

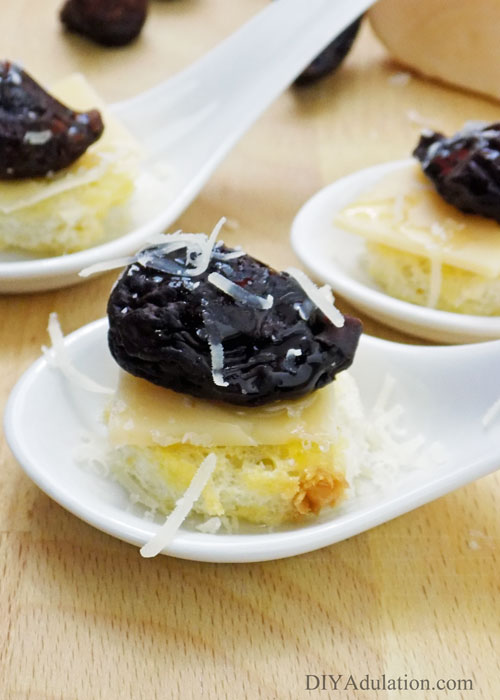
These delicious Asiago-Parmesan fig crostini appetizers are a perfect marriage of savory and sweet. The presentation is effortless and instantly bumps up the style of your appetizer table. This year you can wow your guests with high style holiday entertaining on a budget! What are your favorite budget-friendly entertaining tips? Let me know in the comments! Next, check out the amazing contest Stella is having for your chance to win a $5000 trip to Napa Valley, CA wine country!

Asiago-Parmesan Fig Crostini Appetizer

Asiago-Parmesan Fig Crostini Appetizer
Prep Time 5 minutes
Cook Time 10 minutes
Additional Time 5 minutes
Total Time 20 minutes

Ingredients

  • Sliced French Loaf
  • Stella Aged Asiago and Parmesan Cheeses
  • 1/3 Cup of Butter or Margarine
  • Dried Whole Figs
  • 1 tbs. Honey

Instructions

  1. Cut 28 small circles out of your French loaf using a metal cookie or fondant cutter.
  2. Place 1/3 cup of butter in a microwave safe bowl and heat for 1 minute or until melted.
  3. Pre-heat your oven to 350º.
  4. Brush melted butter on butter on both sides of your bread circles and place on a non-stick baking sheet.
  5. Bake bread at 350 degrees for 10 minutes.
  6. Thinly slice 28 squares of Stella Asiago cheese roughly the size of your circles.
  7. Place toasted bread circles on spoon rests and stack a square of cheese on each circle.
  8. Place a dried fig on top of each stack and drizzle with honey.
  9. Grate a small amount of Stella Parmesan over each honey-drizzled fig.

Asiago-Parmesan fig crostini appetizers are a perfect mix of savory and sweet. This year wow your guests with high style holiday entertaining on a budget! #ad #StellaCheeses #QualitySince1923

See where I’m linking up!

Don’t Forget to Pin It!

Merry Monday Link Party 131

Thanksgiving is officially over which means it is now completely acceptable for us to get into full Christmas mode. Yay! The fun is going to start on the site this week with a Mom and Daughter Christmas movie night, tips for holiday hosting, and an awesome new take on Advent Calendars. Be sure to come and check out all of the holiday ideas during the week. Right now, let’s start the week off by linking up at the Merry Monday Link Party 131. I can’t wait to see all of the amazing ideas you have been creating!

Welcome to the Merry Monday Link Party #131!

Welcome to Merry Monday Link Party!


Meet the hosts of the 2016 Merry Monday Link Party

Meet the Hosts of the Merry Monday Link Party

It’s Google Follow Week at Merry Monday! Although it isn’t required, we’d love for you to follow your Host on Google.

googlelogo_color_272x92dp


All features & host favorites are pinned to the Merry Monday Link Party Board!

Follow My Pinterventures’s board Merry Monday Linky Party on Pinterest.


Help grow this party by displaying this button on your sidebar or party page!

Merry Monday Link Party Button

If you were featured, grab a STAR button and place it on your blog!

Grab a Merry Monday Star button if you were featured!


[bctt tweet=”Time to party! Join the #MerryMonday Link Party 131 #bloggers #linkparty” username=”diyadulation”]

Party Rules – Please read!

Party Rules for the Merry Monday Link Party!

Merry Monday Link Party #131

Please only share posts that show us a tutorial, “how to” craft, or a useful/helpful tip! All others will be deleted.


DIY Family Game Night Board

Board games are so much fun. With the variety of styles and age ranges available there is literally something for everyone. If you have ever played with small children, though, you have likely experienced the frustration of little do-it-myself arms knocking all of the pieces over. This easy DIY family game night board solves the problem by making the game board easy to rotate so that little hands can always reach their pieces. The best part is that it’s non-skid so the board stays in place while you play!

Affiliate links may be used in this post. Ordering a product through these links may result in a commission at no extra cost to you. Read the full disclosure here.

This DIY family game night board makes the board easy to rotate so little hands can always reach their pieces and keeps the board in place while you play!

[bctt tweet=”With the DIY family game night board your biggest worry will be what snacks to serve! #diy #familynight” username=”diyadulation”]

Materials


This DIY family game night board makes the board easy to rotate so little hands can always reach their pieces and keeps the board in place while you play!

Step 1

Remove the packaging from your lazy susan and wipe is down with a damp cloth.


This DIY family game night board makes the board easy to rotate so little hands can always reach their pieces and keeps the board in place while you play!

Step 2

Write the word “Family” on the top third of the lazy susan.

Note:

  • Try to center it on the board.
  • I used the Lime paint for this word.


This DIY family game night board makes the board easy to rotate so little hands can always reach their pieces and keeps the board in place while you play!

Step 3

Next, outline the word “Game” in block letters directly underneath the word “Family”. Do not fill in the letters yet.

Note:

  • I used the Turquoise paint for this word.


This DIY family game night board makes the board easy to rotate so little hands can always reach their pieces and keeps the board in place while you play!

Step 4

Write the word “Night” last in the same style as you wrote “Family” in step 2. This should be directly underneath the word “Game”.

Step 5

Allow your paint to dry completely.


This DIY family game night board makes the board easy to rotate so little hands can always reach their pieces and keeps the board in place while you play!

Step 6

After your paint has dried, fill in the block letters of the word “Game” with a secondary paint color.

Note:

  • I used Yellow paint for this.


This DIY family game night board makes the board easy to rotate so little hands can always reach their pieces and keeps the board in place while you play!

This DIY family game night board makes the board easy to rotate so little hands can always reach their pieces and keeps the board in place while you play!

This DIY family game night board makes the board easy to rotate so little hands can always reach their pieces and keeps the board in place while you play!

Step 7

Add starts around the edges. Be sure to vary the sizes to add visual interest.

Note:

  • I used 2 different paint colors to create the stars: Yellow and Purple.


This DIY family game night board makes the board easy to rotate so little hands can always reach their pieces and keeps the board in place while you play!

This DIY family game night board makes the board easy to rotate so little hands can always reach their pieces and keeps the board in place while you play!

This DIY family game night board makes the board easy to rotate so little hands can always reach their pieces and keeps the board in place while you play!

Step 8

Continue embellishing the lazy susan until you have the look you want.

Note:

  • I wanted a fun and colorful look for ours (because family game nights are a celebration) so I added bubbles, party swirls (my own term), and polka dots. This gave it that celebratory vibe I wanted.


This DIY family game night board makes the board easy to rotate so little hands can always reach their pieces and keeps the board in place while you play!

Step 9

Allow all of your paint to dry completely before use. I recommend at least 24 hours.


This DIY family game night board makes the board easy to rotate so little hands can always reach their pieces and keeps the board in place while you play!

This DIY family game night board makes the board easy to rotate so little hands can always reach their pieces and keeps the board in place while you play!

This DIY family game night board makes the board easy to rotate so little hands can always reach their pieces and keeps the board in place while you play!

This DIY family game night board makes the board easy to rotate so little hands can always reach their pieces and keeps the board in place while you play!

This DIY family game night board makes the board easy to rotate so little hands can always reach their pieces and keeps the board in place while you play!

This DIY family game night board makes the board easy to rotate so little hands can always reach their pieces and keeps the board in place while you play!

This DIY family game night board makes the board easy to rotate so little hands can always reach their pieces and keeps the board in place while you play!

This DIY family game night board makes the board easy to rotate so little hands can always reach their pieces and keeps the board in place while you play!

I only waited 12 hours and then stacked my package of fabric paint on top of it. The packaging kind of stuck and now we’ll have black letters forever on the paint. That’s okay though because I feel like it gives it an extra fun element. Luckily a baby wipe took off all of the paper from the stuck packaging leaving just the letters. That reminds me; wipe down your DIY family game night board with a damp cloth to clean as needed. Looking for some fun new games to add to your family night? Here are a few of our faves:


This DIY family game night board makes the board easy to rotate so little hands can always reach their pieces and keeps the board in place while you play!
Photo Credit: Amazon.com

Doctor Who Monopoly

Don’t think you can only play this with older kids. When we play this for family night, the 3 (almost 4) year old is usually on my team. She “manages” the properties for me, rolls the dice, and moves the piece abound the board with help from me. She also loves to hand over money when we have to pay people or the bank.


This DIY family game night board makes the board easy to rotate so little hands can always reach their pieces and keeps the board in place while you play!
Photo Credit: Amazon.com

Pay Day

This game doesn’t get enough love. It is a great way to teach kids beginning money-management skills. My 7-year-old has begun coping what I do and putting the money to pay the bills with those bills as he draws them. This way we know exactly how much we have to spend on deals throughout the month.


This DIY family game night board makes the board easy to rotate so little hands can always reach their pieces and keeps the board in place while you play!
Photo Credit: Amazon.com

Disney Trivial Pursuit

The beauty of the version we own is that there are 2 different card types. One is geared towards young kids and one is geared towards adults. This lets the game be fun for everyone. The kids get to guess at pictures while the adults take on actual trivia prowess.


This DIY family game night board makes the board easy to rotate so little hands can always reach their pieces and keeps the board in place while you play!
Photo Credit: Amazon.com

Imaginiff (This one is harder to find)

This is a fun and silly game to play any night of the week. All of the options are family-friendly (at least the ones we’ve gotten to) although younger children may need some of the options explained, like penicillin. The best part about this game is that there is no “right” answer. You simply need to pick the most popular one.


This DIY family game night board makes the board easy to rotate so little hands can always reach their pieces and keeps the board in place while you play!

There you have it. Now you can totally rock your next family game night easily. With the DIY family game night board your biggest worry will be what snacks to serve instead of “Where was that piece at again?” You can get even more fun family night ideas with this Moana-themed family night and 10 easy ways to connect with your kids!

See where I’m linking up!