Reusable DIY First Day of School Sign

You want to do something to commemorate that special day every year for your kids because it helps get (or keep) them excited about the first day of school. You also love looking back at these photos through the years and watching your tiny human grow into his or her own person. Of course, you’re also a busy mom with a ton of stuff to do. This reusable DIY first day of school sign lets you collect those precious photos while not adding yet a another project to your to-do list every year.

Affiliate links may be used in this post. Ordering a product through these links may result in a commission. Read the full disclosure here.

Collage of Kids Holding first Day of School Signs with text overlay - Reusable DIY First Day of School Sign


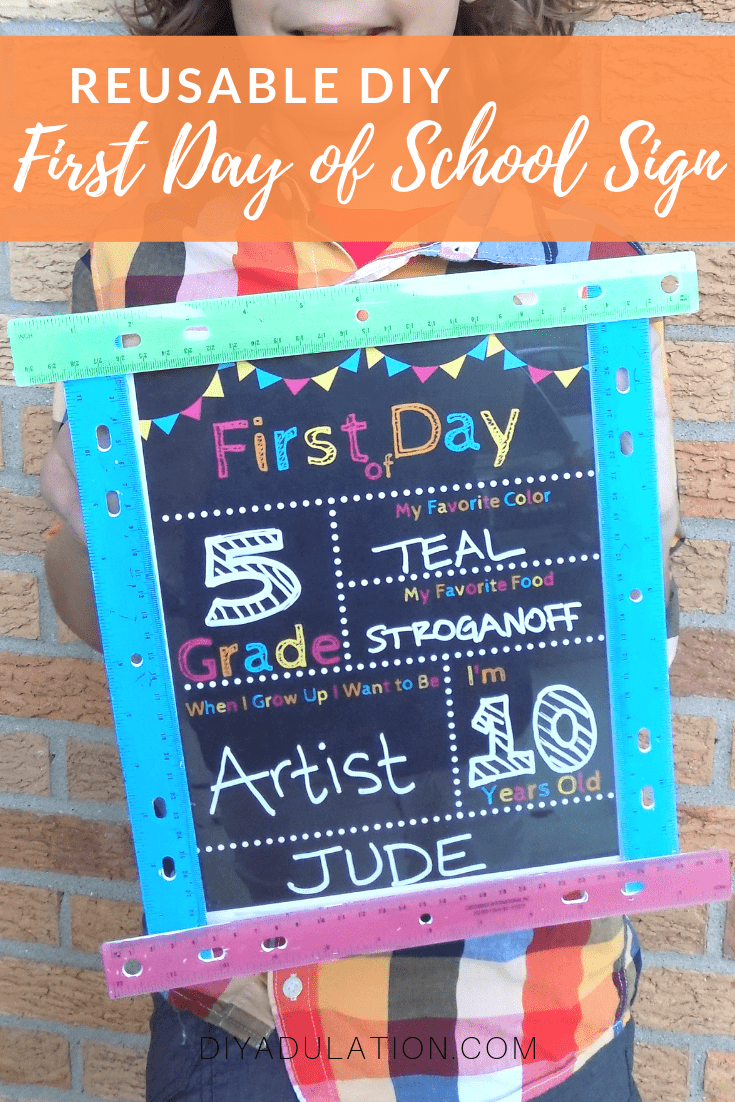
[bctt tweet=”This reusable DIY first day of school sign is seriously perfect for capturing that special day! After the first day, simply store it away until next year.” username=”diyadulation”]

With 3 kids in school now, I knew I didn’t have the time to make 3 separate first day of school signs each year. The end of the summer and back to school season is hectic enough without piling on extra work.

That’s why I wanted to create something that was pretty, fun, and reusable year after year. This reusable DIY first day of school sign is perfect. We were able to get all of the photos in about 10 minutes which was amazing, and still had plenty of time to be ready for the first day.


Smiling Child Holding First Day of School Sign

Note:

I used the First Day of School printable from this month’s Monthly Subscription Bundle. (Not a part of it? Get your subscription here.) Alternatively, you can use any first day of school printable you like for this project. Remember to change the color of the chalk marker if the background of the printable you use is lighter than mine so that those awesome facts show up in your photos!


Materials for First Day of School

Reusable DIY First Day of School Sign Materials

Step 1

First, print out your First Day of School printable and set aside.


Stack of Colorful Translucent Rulers

Painted Back of Translucent Rulers

Step 2

Then open your rulers and paint the back of them with white acrylic paint. I bought 2 3-packs from the Dollar Tree so I had extra. I chose to use 2 blue rulers, 1 green, and 1 pink.

Step 3

Set you rulers aside and allow the paint to dry.


Glass Removed from Snap Frame

Step 4

While your rulers dry, pop the glass out of your Snap frame.


First Day of School Printable in Snap Frame

Glass over First Day of School Printable in Snap Frame

Step 5

Place your First Day of School printable inside and return the glass to the frame.


Blue Rulers Glued to Long Edges of Snap Frame

Step 6

Next, glue 2 of your dry, painted rulers to the long edges of your frame with hot glue. I ran a line of glue along the inch edge of the ruler then pressed it firmly to the frame. You don’t want too much overlap over the glass of the frame or it covers your pretty printable.


Green and Pink Rulers Glued to Short Edges of Snap Frame

Step 7

Finish the frame by gluing your remaining dry, painted rulers to the short edges of your frame.

Step 8 (Optional)

For a cleaner look, wipe the excess paint that is on the front of the rulers after they are attached to your frame. The paint comes off with a damp cloth or paper towel.


Chalk Writing on First Day of School Sign

Step 9

Use your chalk marker to fill out the details on your sign for one child.


Smiling Boy Holding First Day of School Sign

Step 10

Take your cutie’s photo then use a damp paper towel followed by a dry paper towel to remove the chalk marker.


Smiling Girl Holding First Day of School Sign

Step 11

Repeat for each of your kiddos then store for next year!


Close up of Sign with text overlay - Reusable DIY First Day of School Sign

This reusable DIY first day of school sign is seriously perfect for capturing your tiny humans’ growth each school year. After the first day, simply store it away with the extra school supplies you’re hoarding for inevitable refills until next year. Not only is this a totally easy-to-make project, but it already checks one thing off of next year’s back to school to-do list!

See where I’m linking up!

Don’t Forget to Pin It!

Close up of Sign with text overlay - Reusable DIY First Day of School Sign

Please Excuse the Mess Explanation

Have you noticed the total craziness that’s happening on this website? Depending on when you visit, the post may have shown without photos, given you an error screen, or, even worse, not shown you anything at all. Now that I have time to come up for air (sort of), I can finally give you the 411 on what’s happening.

Host Server Malfuncions

Everything started with an error screen showing on both the front end (the part you see) and the back end (the part I edit) of DIY Adulation. That’s when it’s time to contact your host and when I did, it took a few days to find out what was wrong. Essentially there was a server corruption (I was not informed as to the cause) and it resulted in databases becoming broken and this also affected my backups.

It’s Fixed… Or Not

Through multiple back and forth conversations, I thought it was fixed only to find I couldn’t make any changes. Yikes! At this point something has to give so I change hosts and finally start getting some serious answers.

Broken Databases Aren’t Easy to Fix

After another week we have found that databases in DIY Adulation are seriously broken. I could try to pay someone hundreds, or even thousands, of dollars to try to go in and manual repair it but there’s no guarantee even then. Instead of risking losing everything with more poking around and no promise that it can even be fixed, I’ve made the hard decision to go another route.

I’ve Moved DIY Adulation

Nothing will change for you, but the doman DIY Adulation is on a new base completely. The problem is that it means I have to manually re-post every piece of content that has even been on DIY Adulation. It’s a slow and painstakingly tedious job but here’s the honest truth:

I love DIY Adulation and all of the wonderful people that are here with me, like you. It’s a beautiful resource full of awesome, supportive readers and I’m not ready to let it go.

What This Means for You

This means that while I get everything re-posted and moved from the old base of DIY Adulation, some links (okay, a lot of links) are going to lead to 404 errors. When you get that, it simply means I haven’t moved that content yet. I’m averaging about 30 posts a day and expect to have everything back up and going fully by the end of September at the latest. 

I’m asking you to please excuse the mess during this time of transition and know that it is all being fixed, slowly but surely. In addition, I will be posting new content while updating the old so keep checking back for the awesomeness you’ve grown to know and love! Thank you so much for your patience!

Inspiration from the Stampaway Convention 2019

Don’t let stress stifle your creativity. If you are feeling stuck in a creative rut, all you need is a little inspiration and that’s exactly what we have. Check out this inspiration from the Stampaway Convention 2019 to get your creative juices flowing again.

Affiliate links may be used in this post. Ordering a product through these links may result in a commission. Read the full disclosure here.

Collage of Handmade Cards with text overlay - Inspiration from the Stampaway Convention 2019


[bctt tweet=”Get excited to create! Check out some of the latest stamping trends and get some inspiration from the Stampaway Convention 2019!” username=”diyadulation”]

I absolutely love going to the Stampaway Convention. It’s always inspiring and it’s also a great way see what’s new in the stamping world. More importantly, you can watch demonstrations to learn how to use the tools. How many times have you bought a new tool and had to go through trial and error to figure it out? The demonstrations take the guesswork out and the lovely vendors don’t even mind being videoed a lot of the time. (Always ask first.)

This year was especially fun because there were a ton of different styles represented. There was everything from gothic mixed-media stamps and techniques to rainbow glitter fun. Even the projects and ideas that didn’t speak to my specific taste were totally inspiring. I absolutely loved it!

I took note of some of the trends I saw and now I’m sharing them with you. Don’t worry, though. I’m also going to create projects from all of these trends to show you how to do them in the coming months (as soon as we get through the back to school craziness).


Layered Stamped Pumpkin Card

Layering Stamped Papers

This isn’t a new concept but I specifically loved how they cut apart pieces of the same stamped image to create a unique design for the card. It gives it more dimension and is so simple to do.


Pop-Up Halloween Castle Card

Pop-Up Cards

My favorite thing about these pop-up cards is the versatility. The one pictured above is actually made with a sandcastle die cut which is such a smart way to get more seasons and occasions out of one tool. Especially when you pay so much for a die cut templates it’s great to see multiple unique ways to use them!


Birthday Shaker Cards

Ice Cream Thanks Shaker Card

Creative Shakers

We’ve all seen shaker cards but some of these are worth noting like the ice cream one above. It’s fun and whimsical plus the same shaker piece could be used for clouds in a congratulations or even a get well card.

The balloons are not only super cute but instead of the bulk being inside the card, the shaker is a separate piece completely on the outside. The message inside pulls the whole look together for a fun and cohesive card design.


Surf Silhouette Card

Color My World Silhouette Card

Walking Kids Silhouette Card

Silhouettes in Fun New Ways

I’ve never really gotten into silhouettes until this year. I saw a ton of fantastic cards that used these in new ways. One of my favorites is the surf card above. I love the colors for starters but also I feel like the card makes great use of a silhouette stamp.

Another card had a slider that revealed a colorful picture behind it. The layers and surprise pop of color make it a definite project I want to try.


Hey Crafty Friend Card Front

Inside of Hey Crafty Friend Card

Sliding Mom Mom Mom Card

All About Movement

One theme that seemed to be everywhere was movement. Not just in the pop-up cards and shaker cards but in unique new ways too. My favorite were the slider cards. Some had an entire panel that moved (like the Mom, Mom, Mom one above) and some had one element that could be moved on the card.


Moving Beach Ball Card

Moving Sail-ebrate Card
Flying Dragon Birthday Card

This one was so impressive to me that I bought the die-cut template and small disks to make them. I can’t wait to share my creations with you!

Bonus Inspiration for You:

Pirate Birthday Card

Frame Thanks Card

Future Self Card


Collage of Handmade Cards with text overlay - Inspiration from the Stampaway Convention 2019

Soak up this inspiration from the Stampaway Convention 2019. Don’t forget to get your stamps ready and check back to see these techniques in action soon. Spoiler alert, there’s going to be more than one using the new die-cut template. It’s going to be awesome.

See where I’m linking up!

Don’t Forget to Pin It!

Collage of Handmade Cards with text overlay - Inspiration from the Stampaway Convention 2019


More Ideas You’ll Love: