5 Ways to Earn Extra Income

I have been blessed to be able to be a stay-at-home mom since 2009. I wouldn’t trade it for the world but budgets were tight in the beginning. That forced me to put creativity into overdrive to give us the quality of life that we are blessed to have. There are crazy ways to save/make money out there and I’m sharing 5 with you today. These ideas will not make you rich or substitute an income, but they might let you get that $6 Starbucks Caramel Macchiato every now and then without feeling guilty. These 5 ways to earn extra income can also help out around birthdays and holidays especially if you build them up year-round.

Affiliate links may be used in this post. Ordering a product through these links may result in a commission. Read the full disclosure here.

Make extra money for coffee and boot splurges (or ease the holiday financial stress) with these 5 ways to earn extra income.

MPoints (mPLUS Rewards)

This one is actually one of my favorites because I earn points for things that I do on my phone already. For instance, I check my weather app every day and that earns me 10-15 points just for doing so. Basically, you sign in on any eligible apps you are already using (or you can download new ones that earn points) and you earn points for checking the app, playing games, etcetera depending on the app. When you collect those points, you can cash them in for gift cards and items. You can also donate your points to charitable causes and enter sweepstakes, but I tend to stick with the gift cards.

EBates

I love this because I earn money on purchases that I am going to make already. The best way to make sure that you are always getting your earnings is to make sure that you install the button on your browser. It will alert you when you go to a site that offers cashback. Once you check out, you will earn a percentage of what you spend back. Then every 3 months or so, they will mail you a check for the amount you have earned. This is a super easy way to earn a little extra cash.


[bctt tweet=”5 ways to earn extra money for coffee and boot splurges (or ease the holiday financial stress).” username=”diyadulation”]


Swagbucks

This one is similar to MPoints in that you earn “Swagbucks” for doing things that are redeemable for gift cards. The pros of this one are that you need fewer points to earn gift cards and you can get free points by following them on social media and answering their daily poll. The cons are that a lot of the points are earned through surveys which can take up a substantial amount of time. However, you can also earn points on purchases (although not as often as EBates), so again I recommend adding the button to your browser and it will automatically detect when this is an option.

Online Surveys

This one can make you some larger payouts; however it is also a lot more time-consuming. Surveys can last anywhere from 10 minutes to an hour or more, and the compensation varies depending on the company. I have done this with a few different sites but just do not have the time available to make it worth my while. I will say that Pinecone Research was one of the best ones I worked with but they also are not always taking on new applicants. Also, for some of them you will have to have certain programs (such as Java) on your computer if you do not already.

Yearly Yard Sale

This idea is actually three-fold: You make some extra cash on items you no longer use or want. You also help keep your house clean of clutter. Lastly, I always recommend donating what you don’t sell to a local church or charity organization. You help those in need and get rid of that clutter. If you’re worried that you don’t have enough stuff to sell, ask friends and family to contribute. Chances are they have stuff that they will happily give you if you cart it off for them. If they want to be in on the earnings, ask them to help you work the yard sale. Extra hands for you and they earn a little cash as well.

Make extra money for coffee and boot splurges (or ease the holiday financial stress) with these 5 ways to earn extra income.

I cannot stress enough how much I love and recommend Ebates and Mpoints. It kind of blows my mind that there are still people not utilizing it. It’s free money, guys! According to Mintel’s online report in 2015 “over two-thirds (69 percent) of US online adults shop online at least monthly…” which means every month they could be earning money. Want to know a little secret? I’ve earned money on free items with Ebates! I love taking advantage of free prints and photo gifts from places like Walgreens and Shutterfly. I have actually earned money back on those purchases that didn’t cost me a dime. If that doesn’t convince you how awesome this is nothing will. Don’t forget to organize your finances before you start earning your extra money. Double-check that your Caramel Macchiato truly is guilt-free.

See where I’m linking up!

Cooler Than Bowties Card

This awesome Dr. Who inspired Cooler Than Bowties card is a fun and nerdy DIY to give to the Whovians in your life!


Let your friends and family know how cool they are with the Dr. Who inspired Cooler than Bowties card. No special occasion needed.


[bctt tweet=”Give this #DrWho inspired Cooler than Bowties card. No special occasion needed. #bowties”]

In case you haven’t noticed, I’m a sucker for Dr. Who crafts. Actually, I’m a sucker for nerdy crafts in general. If it’s fun, cool, and nerdy then I’m in! With Valentine’s Day reminders all over the place you can’t help but think about greeting cards.

Come on, they’re in your face everywhere you look. That has put my nerdy brain into overdrive with a million new card ideas (including a Buffy the Vampire Slayer card that I’m beyond excited about and this Hello Sweetie card). For now, find out how to make this awesome Cooler Than Bowties card!

Cooler Than Bowties Card Materials


Let your friends and family know how cool they are with the Dr. Who inspired Cooler than Bowties card. No special occasion needed.

I have altered these sketches with a photo editor to darken the pencil lines so you can see what my sketches looked like. My actual sketches were in pencil so that I could erase and/or fix any mistakes.

Step 1

Sketch an outline of a fez on your cardstock that is the lighter shade of red. Sketch an outline of a bowtie on the darker red cardstock.


Let your friends and family know how cool they are with the Dr. Who inspired Cooler than Bowties card. No special occasion needed.

Step 2

Cut out your sketches. Cut out a small square of the lighter red and glue is to the center of the bowtie. Trim any edges necessary.


Let your friends and family know how cool they are with the Dr. Who inspired Cooler than Bowties card. No special occasion needed.

Step 3

Trace all of these lines with your black marker. Add 2 lines on either side of the center of the bowtie. See the picture for reference.


Step 4

Place a red brad in the center of the “top” of the fez. Glue your fez and bowtie to the front of the card as pictured below.


Let your friends and family know how cool they are with the Dr. Who inspired Cooler than Bowties card. No special occasion needed.

Step 5

Write “The Only Thing Cooler Than Bowties…” as you see in the picture.

Tip:


Let your friends and family know how cool they are with the Dr. Who inspired Cooler than Bowties card. No special occasion needed.

Step 6

Cut out a rectangle (smaller than the size of your card) from your cardstock. Write (or print out) “… Is You!” in the center.


Let your friends and family know how cool they are with the Dr. Who inspired Cooler than Bowties card. No special occasion needed.

Step 7

Next, outline the edges of your rectangle as you did with the fez and bowtie.


Let your friends and family know how cool they are with the Dr. Who inspired Cooler than Bowties card. No special occasion needed.

Step 8

Glue your rectangle to the inside of your card. I chose to place mine at the angle but you don’t have to. Centering it looks great as well.


Let your friends and family know how cool they are with the Dr. Who inspired Cooler than Bowties card. No special occasion needed.

Let your friends and family know how cool they are with the Dr. Who inspired Cooler than Bowties card. No special occasion needed.

This specific card is being used as a Valentine but it totally works for birthdays, graduations, and more. Frankly, do you really need a reason to let your friends and family know how cool they are? I don’t think so. However, this seriously comes together so quickly you can totally whip it up in time for Valentine’s Day! (When you’re done, make sure you check out these additional fun and easy card tutorials.)

See where I’m linking up!

Don’t Forget to Pin It!

Recycled Pokeball Valentine Box

The dreaded Valentine box… when I was in grade school these were done a lot differently. If you made one at all, you bought a shoe box to class and covered it with construction paper and stickers. Now you make them at home and apparently covering them with stickers isn’t cool enough. I offered to make my son’s box this year and allowed him to pick the theme he wanted, thinking he’d pick a sports team or something like that. Somehow, I always forget that he is my nerdy little mini-me. He, of course, chose Pokemon. After a quick freak-out panic, I saw a Poptart box and was inspired to make this recycled Pokeball Valentine box.

Affiliate links may be used in this post. Ordering a product through these links may result in a commission. Read the full disclosure here.

This recycled Pokeball Valentine box is made from items you already have laying around. Whip it up in time for your child's party.


[bctt tweet=”You won’t believe how this Pokeball Valentine box is made! Easy and recycled! #valentinesday”]

Materials


This recycled Pokeball Valentine box is made from items you already have laying around. Whip it up in time for your child's party.

Step 1

Cover the outside of your box in 2 coats of white acrylic paint. Allow the first coat to dry completely before applying the second coat.


This recycled Pokeball Valentine box is made from items you already have laying around. Whip it up in time for your child's party.

Step 2

Measure the width your cardstock needs to be by turning your box on its side and measuring to about the middle. (See picture above.) Next cut 2 strips in that size from the 8.5 side of your white cardstock.


Step 3

Repeat step 2 with your red cardstock. This gives you four strips of paper (2 red, 2 white).


This recycled Pokeball Valentine box is made from items you already have laying around. Whip it up in time for your child's party.

Step 4

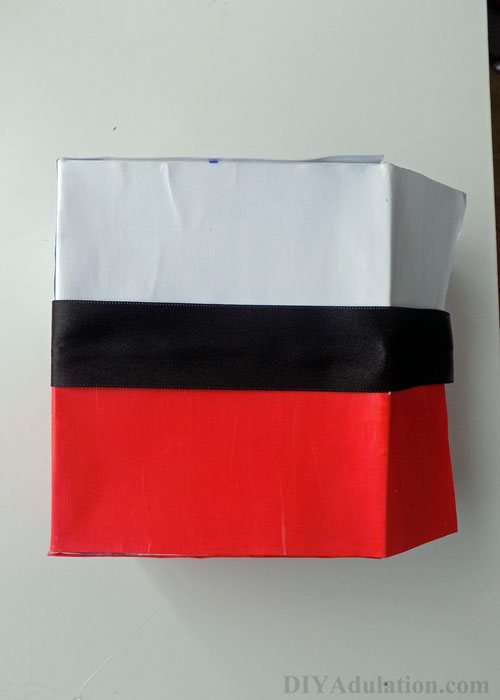
Attach your strips of paper with Mod Podge, aligning your paper edges with the flap and edge of your box.

Note: There will be a gap on the unopened side of your box.

Step 5

Measure the top and bottom of your box using the remaining cardstock and trim cardstock to fit. Attach colors correspondingly with your Mod Podge.

Step 6

With the leftover cardstock, cover the gap left on the unopened side of the box.

Step 7

Cover your entire box with your Mod Podge. This gives it the shine like a Pokeball. Allow the whole project to dry (about an hour). Have lunch; take a nap, whatever while you wait.


This recycled Pokeball Valentine box is made from items you already have laying around. Whip it up in time for your child's party.

Step 8

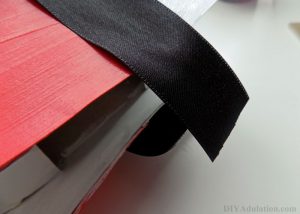
Once the Mod Podge has dried, attach your ribbon around the center of the box, starting at the flap.

This recycled Pokeball Valentine box is made from items you already have laying around. Whip it up in time for your child's party.

Tips:

  • Leave extra length on both ends of your ribbon so that there is overhang.
  • Prevent waste by attaching the ribbon while still on the spool and only cutting after the end is glued.


Step 9

Attach your snack container lid to the middle using hot glue to create the button.


This recycled Pokeball Valentine box is made from items you already have laying around. Whip it up in time for your child's party.

Step 10

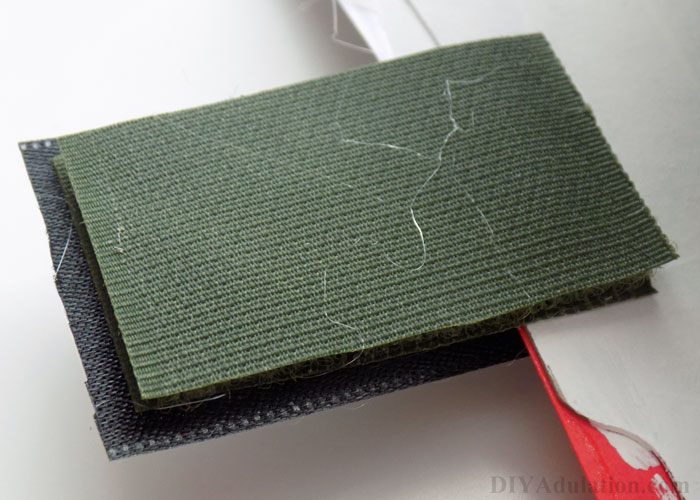
Attach one half of your Velcro to the extra length of ribbon overhanging the flap with hot glue.

Tip:

  • Turn the box so that the white is on top. Place the Velcro on the flap that is on top (or in front) with the box in this position.


This recycled Pokeball Valentine box is made from items you already have laying around. Whip it up in time for your child's party.

Step 11

Place adjoining piece of Velcro onto the attached piece.


This recycled Pokeball Valentine box is made from items you already have laying around. Whip it up in time for your child's party.

Step 12

Fold down flap without Velcro. Place hot glue on the top of the second piece of Velcro and press to folded flap. This will make sure the Velcro aligns correctly when box is closed.

Tip:

  • Allow glue to dry before trying to open.


This recycled Pokeball Valentine box is made from items you already have laying around. Whip it up in time for your child's party.

Step 13

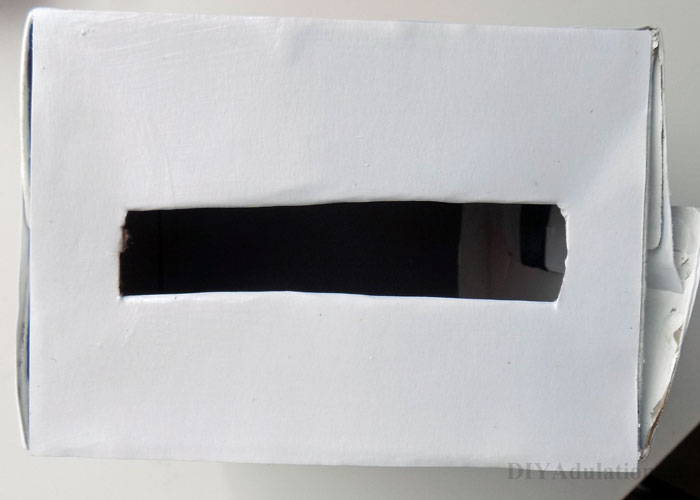
Cut out a hole in the top of the box with your box cutter for the Valentines to go through.


This recycled Pokeball Valentine box is made from items you already have laying around. Whip it up in time for your child's party.

This recycled Pokeball Valentine box is made from items you already have laying around. Whip it up in time for your child's party.

Viola! Now your kid has an awesome Pokeball Valentines box to collect all of his or her cards in. If you want to print out the awesome Valentines in the photos, you can download them free here. What crazy theme has your kid asked for when making a Valentine’s Box? Let me know in the comments!

See where I’m linking up!

Don’t Forget to Pin It!

More Ideas You’ll Love: