Recycled Pokeball Valentine Box

The dreaded Valentine box… when I was in grade school these were done a lot differently. If you made one at all, you bought a shoe box to class and covered it with construction paper and stickers. Now you make them at home and apparently covering them with stickers isn’t cool enough. I offered to make my son’s box this year and allowed him to pick the theme he wanted, thinking he’d pick a sports team or something like that. Somehow, I always forget that he is my nerdy little mini-me. He, of course, chose Pokemon. After a quick freak-out panic, I saw a Poptart box and was inspired to make this recycled Pokeball Valentine box.

Affiliate links may be used in this post. Ordering a product through these links may result in a commission. Read the full disclosure here.

This recycled Pokeball Valentine box is made from items you already have laying around. Whip it up in time for your child's party.


[bctt tweet=”You won’t believe how this Pokeball Valentine box is made! Easy and recycled! #valentinesday”]

Materials


This recycled Pokeball Valentine box is made from items you already have laying around. Whip it up in time for your child's party.

Step 1

Cover the outside of your box in 2 coats of white acrylic paint. Allow the first coat to dry completely before applying the second coat.


This recycled Pokeball Valentine box is made from items you already have laying around. Whip it up in time for your child's party.

Step 2

Measure the width your cardstock needs to be by turning your box on its side and measuring to about the middle. (See picture above.) Next cut 2 strips in that size from the 8.5 side of your white cardstock.


Step 3

Repeat step 2 with your red cardstock. This gives you four strips of paper (2 red, 2 white).
 

This recycled Pokeball Valentine box is made from items you already have laying around. Whip it up in time for your child's party.

Step 4

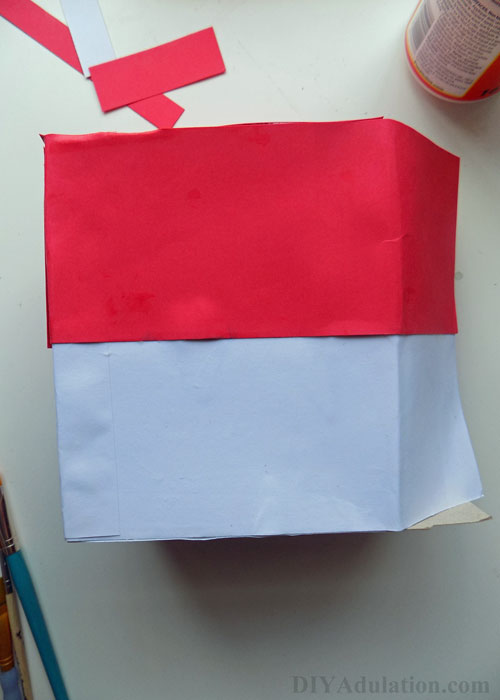
Attach your strips of paper with Mod Podge, aligning your paper edges with the flap and edge of your box.

Note: There will be a gap on the unopened side of your box.

Step 5

Measure the top and bottom of your box using the remaining cardstock and trim cardstock to fit. Attach colors correspondingly with your Mod Podge.

Step 6

With the leftover cardstock, cover the gap left on the unopened side of the box.

Step 7

Cover your entire box with your Mod Podge. This gives it the shine like a Pokeball. Allow the whole project to dry (about an hour). Have lunch; take a nap, whatever while you wait.
 

This recycled Pokeball Valentine box is made from items you already have laying around. Whip it up in time for your child's party.

Step 8

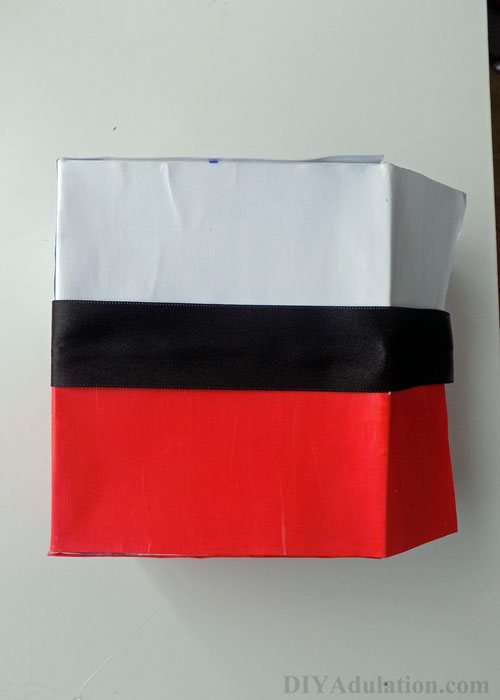
Once the Mod Podge has dried, attach your ribbon around the center of the box, starting at the flap.

This recycled Pokeball Valentine box is made from items you already have laying around. Whip it up in time for your child's party.

Tips:

  • Leave extra length on both ends of your ribbon so that there is overhang.
  • Prevent waste by attaching the ribbon while still on the spool and only cutting after the end is glued.


Step 9

Attach your snack container lid to the middle using hot glue to create the button.


This recycled Pokeball Valentine box is made from items you already have laying around. Whip it up in time for your child's party.

Step 10

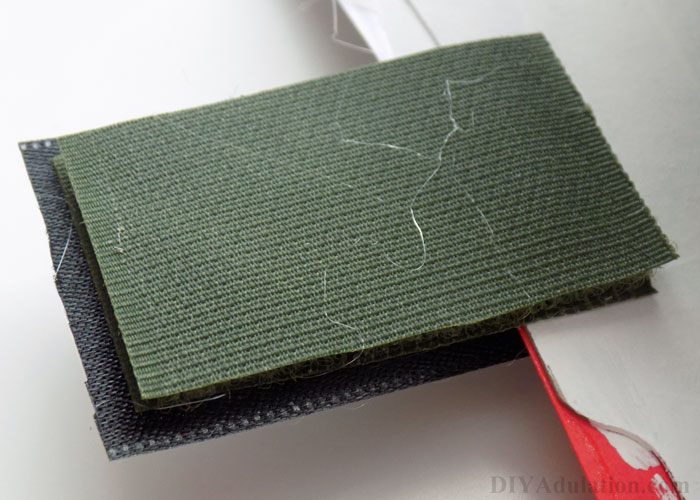
Attach one half of your Velcro to the extra length of ribbon overhanging the flap with hot glue.

Tip:

  • Turn the box so that the white is on top. Place the Velcro on the flap that is on top (or in front) with the box in this position.
 

This recycled Pokeball Valentine box is made from items you already have laying around. Whip it up in time for your child's party.

Step 11

Place adjoining piece of Velcro onto the attached piece.


This recycled Pokeball Valentine box is made from items you already have laying around. Whip it up in time for your child's party.

Step 12

Fold down flap without Velcro. Place hot glue on the top of the second piece of Velcro and press to folded flap. This will make sure the Velcro aligns correctly when box is closed.

Tip:

  • Allow glue to dry before trying to open.
 

This recycled Pokeball Valentine box is made from items you already have laying around. Whip it up in time for your child's party.

Step 13

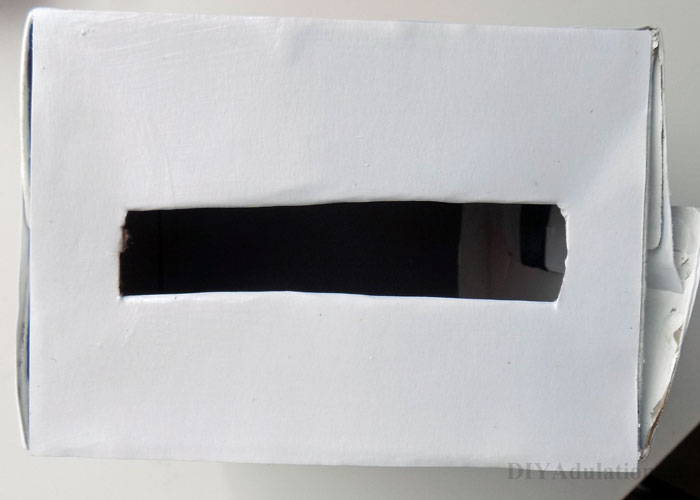
Cut out a hole in the top of the box with your box cutter for the Valentines to go through.


This recycled Pokeball Valentine box is made from items you already have laying around. Whip it up in time for your child's party.

This recycled Pokeball Valentine box is made from items you already have laying around. Whip it up in time for your child's party.

Viola! Now your kid has an awesome Pokeball Valentines box to collect all of his or her cards in. If you want to print out the awesome Valentines in the photos, you can download them free here. What crazy theme has your kid asked for when making a Valentine’s Box? Let me know in the comments!

See where I’m linking up!

Don’t Forget to Pin It!

More Ideas You’ll Love:

Zombie Valentine for Your Single Friends

Romance and relationships get a lot of love around Valentine’s Day.  Don’t get me wrong, I am a huge fane of romance and relationships (I also totally dig the color pink).  Unfortunately, your single girlfriends tend to get excluded from the holiday.  A lot of times this can make them feel a little jaded on Valentine’s Day, understandably so.  No one likes to feel excluded (if you do, be happy that you’re the exception).  This year, let your girlfriends know you’re thinking of them with this humorous zombie valentine!

Affiliate links may be used in this post. Ordering a product through these links may result in a commission. Read the full disclosure here.

Let your girls know that you haven’t forgotten them this holiday with this zombie Valentine!


[bctt tweet=”Let your girls know you’re thinking of them this holiday with this zombie Valentine! #zombievalentine”]


Zombie Valentine Materials


Let your girls know that you haven’t forgotten them this holiday with this zombie Valentine!

Let your girls know that you haven’t forgotten them this holiday with this zombie Valentine!

Step 1

Trim one piece of scrap paper to a size that allows for roughly ½ inch border around your stamp.  Next, round the corners with your punch.


Let your girls know that you haven’t forgotten them this holiday with this zombie Valentine!

Step 2

Mount your stamp to your acrylic block.  Have holographic embossing powder open and ready to pour.


Let your girls know that you haven’t forgotten them this holiday with this zombie Valentine!

Step 3

Ink your stamp with black ink and stamp it in the center of your scrap of paper from step one.  Immediately cover stamped image with embossing powder.

Tip:

  • Do this on a piece of paper to keep your work surface clean and make it easier to return excess powder to container.


Let your girls know that you haven’t forgotten them this holiday with this zombie Valentine!

Step 4

Shake off excess powder and return it to the container.


Let your girls know that you haven’t forgotten them this holiday with this zombie Valentine!

Step 5

Emboss the powder with your heat gun. (I use the heat gun in this post.  It works fantastic and doesn’t cost a fortune!)


Let your girls know that you haven’t forgotten them this holiday with this zombie Valentine!

Step 6

Mount the stamped paper to a larger scrap using your glue runner.


Step 7

Trim the edges to create an even boarder around your stamped paper.  (It can be any size you would like as long as it isn’t larger than your card.)


Let your girls know that you haven’t forgotten them this holiday with this zombie Valentine!

Step 8

Measure a piece of glitter tape to the size of your card.  Next, remove the backing and place across your card as pictured above.


Let your girls know that you haven’t forgotten them this holiday with this zombie Valentine!

Step 9

Trim any excess glitter tape so that it is even with the edge of your card.


Let your girls know that you haven’t forgotten them this holiday with this zombie Valentine!

Let your girls know that you haven’t forgotten them this holiday with this zombie Valentine!

Step 10

Place a gemstone on each dot of the colon of your stamped image.


Step 11

Trim your vellum saying and adhere it to your third scrap of paper.

Step 12

Trim the edge tight to your vellum saying.


Let your girls know that you haven’t forgotten them this holiday with this zombie Valentine!

Step 13

Cut your fourth piece of scrap paper to roughly the same size as your vellum/paper and glue the paper together as pictured above.


Let your girls know that you haven’t forgotten them this holiday with this zombie Valentine!

Step 14

Attach the saying papers to the inside of your card.


Let your girls know that you haven’t forgotten them this holiday with this zombie Valentine!

Let your girls know that you haven’t forgotten them this holiday with this zombie Valentine!

Let your girls know that you haven’t forgotten them this holiday with this zombie Valentine!

This card is so much fun (both to make and to receive)!  All of your girlfriends are sure to get a chuckle at a time of year it can be needed.  Laughter is absolutely the best medicine and they are sure to appreciate your thoughtfulness.  Let your girls know that you haven’t forgotten them this Valentine’s Day.  Make this fun zombie valentine (quickly and easily) and brighten her day!


See where I’m linking up!

DIY Dollar Store Valentine Wreath + A Blog Hop

Thank you for joining me for the Valentine’s Day Blog Hop! I’ve joined with 13 other talented bloggers to share Valentine’s Day crafts on a budget. Each blogger was given a budget of no more than $10 and challenged to create a Valentine’s Day craft using items from the dollar store or dollar section of their local stores. If you have budget Valentine’s Day crafts to share, please add it to the link-up at the bottom of this post so it can be seen on all of our blogs!


This beautiful dollar store Valentine wreath is easy to put together and only cost $4 to make! + 13 more dollar store Valentine's Day projects!


Decorating for the holidays is a blast but you can easily break the bank trying to do so.  This beautiful dollar store Valentine wreath is easy to put together and only cost $4 to make!  Even if you have to buy the battery-operated candles, you can get a two pack for a dollar bringing your total cost to five dollars.  Either way, you have a beautiful new piece of Valentine décor for cheap!


This beautiful dollar store Valentine wreath is easy to put together and only cost $4 to make! + 13 more dollar store Valentine's Day projects!


[bctt tweet=”Dollar store Valentine wreath is easy to put together and only cost $4 to make! + 14 more dollar store Valentine’s Day projects! #diy #valentines”]


This beautiful dollar store Valentine wreath is easy to put together and only cost $4 to make! + 13 more dollar store Valentine's Day projects!

Materials


This beautiful dollar store Valentine wreath is easy to put together and only cost $4 to make! + 13 more dollar store Valentine's Day projects!

Step 1

Remove wooden hearts from the ribbon.  A staple remover will make this easier however I didn’t have one and was still able to do it by hand.  Do yourself a favor, though, and use a staple remover because otherwise it takes some serious time and muscle.

Do not cut the ribbon.  You will use it later in the project.


This beautiful dollar store Valentine wreath is easy to put together and only cost $4 to make! + 13 more dollar store Valentine's Day projects!

Step 2

Unwind the entire spool of wire and form a circle the size you want your wreath to be.  If there is extra wire, wind it around the existing circle to strengthen it.

Use all of the wire.


This beautiful dollar store Valentine wreath is easy to put together and only cost $4 to make! + 13 more dollar store Valentine's Day projects!

Step 3

Attach your ribbon as pictured using your hot glue gun to secure it to the wire wreath.  Be sure to twist it to create visual interest as well as volume to your wreath.


This beautiful dollar store Valentine wreath is easy to put together and only cost $4 to make! + 13 more dollar store Valentine's Day projects!

Step 4

There will be some extra ribbon after you finish covering the wreath.  Use is to create a bow on the side of your wreath.


This beautiful dollar store Valentine wreath is easy to put together and only cost $4 to make! + 13 more dollar store Valentine's Day projects!

Step 5

Take your wooden hearts and glue them to your wreath.

Tip:

  • Start with your “c” heart and place it in the top center of your wreath.  Next glue the remaining letters in place accordingly.


This beautiful dollar store Valentine wreath is easy to put together and only cost $4 to make! + 13 more dollar store Valentine's Day projects!

Step 6

Use the ribbon from your “Welcome Sign” and thread it through the top of your wreath to serve as a hanger.


This beautiful dollar store Valentine wreath is easy to put together and only cost $4 to make! + 13 more dollar store Valentine's Day projects!

Step 7

Tie one end of your baker’s twine to one side of your lantern.  Next thread the twine through the same part of your wreath as the ribbon.


This beautiful dollar store Valentine wreath is easy to put together and only cost $4 to make! + 13 more dollar store Valentine's Day projects!

Step 8

Take the loose end of your twine and tie it to the opposite side of your lantern.  Use hot glue to “seal” the knots on the lantern.


This beautiful dollar store Valentine wreath is easy to put together and only cost $4 to make! + 13 more dollar store Valentine's Day projects!

Step 9

Hang your wreath up and determine where the twine needs to be for your lantern to hang evenly in the middle of your wreath.  Pinch the twine in place with your fingers before taking it down.  Next, place a dot of hot glue to hold the twine in that place on the wreath.


This beautiful dollar store Valentine wreath is easy to put together and only cost $4 to make! + 13 more dollar store Valentine's Day projects!

Step 10

Place a battery-operated tea light in the lantern, hang on your door, and enjoy!


This beautiful dollar store Valentine wreath is easy to put together and only cost $4 to make! + 13 more dollar store Valentine's Day projects!

It is seriously that easy to create beautiful Valentine’s Day décor for minimal expenditure.  After you’re done making this Valentine wreath, be sure to check out the other awesome dollar store Valentine’s projects below!  Also, don’t forget to link up your budget holiday creations in the link-up.  Can’t wait to see what you make!

Looking for more budget friendly Valentine’s Day crafts? Visit these blogs for their creative Valentine’s Day crafts ~

Valentine's Day Blog Hop


  1. My Pinterventures
  2. DIY Adulation
  3. Houseful of Handmade
  4. C’mon Get Crafty
  5. Olives-n-Okra
  6. Inside The Fox Den
  7. Made In A Day
  8. The Robin’s Nest Designs
  9. Arrows & Awe
  10. Happily Ever After, Etc.
  11. Our House Now A Home
  12. The Home On The Corner
  13. Decor by the Seashore
  14. Intelligent Domestications

Share your $10 or less Valentine’s Day crafts on the link-up below and be seen on all 14 blogs!