18 Wicked Drinks and Savory Treats

No Halloween gathering is complete without food and drink.  When you’re looking to throw the ultimate spooky fete you can’t serve just any old bag of chips. You want your food to be just as awesome as you party. These 18 wicked drinks and savory treats are the perfect addition. Find the perfect alcoholic or non-alcoholic party punch to fit your tastes. Then serve up some spook-tacular bites with these creepy treats that are sure to wow!

When you’re looking to throw the ultimate spooky fete you can’t serve just any old bag of chips. These 18 wicked drinks and savory treats are perfect!


[bctt tweet=”These 18 wicked drinks and savory treats are perfect for your Halloween bash! #DIY #halloween #party” username=”diyadulation”]


Wicked Drinks

When you’re looking to throw the ultimate spooky fete you can’t serve just any old bag of chips. These 18 wicked drinks and savory treats are perfect!
Photo Credit: A Worthey Read

How cool are these blood clot shots from A Worthey Read? Delicious toasted marshmallows give this drink its creepy appeal!


When you’re looking to throw the ultimate spooky fete you can’t serve just any old bag of chips. These 18 wicked drinks and savory treats are perfect!
Photo Credit: Our Family World

This non-alcoholic party punch from Our Family World is perfect to serve kiddos. They’ll love sipping from a drink that looks at them.


When you’re looking to throw the ultimate spooky fete you can’t serve just any old bag of chips. These 18 wicked drinks and savory treats are perfect!
Photo Credit: Finding Zest

Another great drink for kids is these bloodshot Halloween drinks from Finding Zest! These interactive drinks will make your mini-monsters feel like superstars.


When you’re looking to throw the ultimate spooky fete you can’t serve just any old bag of chips. These 18 wicked drinks and savory treats are perfect!
Photo Credit: My Teen Guide

Apple cider is delicious on its own but your teens will love if you take it to the next level with these Apple Cider Mocktails from My Teen Guide!


When you’re looking to throw the ultimate spooky fete you can’t serve just any old bag of chips. These 18 wicked drinks and savory treats are perfect!
Photo Credit: April Golightly

Pump up the pumpkin vibe with this adults-only Pumpkin Spice Fizz from April Golightly. You can’t go wrong when prosecco is involved. Yum!


When you’re looking to throw the ultimate spooky fete you can’t serve just any old bag of chips. These 18 wicked drinks and savory treats are perfect!
Photo Credit: A Proverbs31 Wife

 This family-friendly Cranberry Orange Spiced Cider from A Proverbs31 Wife is delicious and easy. The best part of this recipe is that you make it in the Crock-Pot!


When you’re looking to throw the ultimate spooky fete you can’t serve just any old bag of chips. These 18 wicked drinks and savory treats are perfect!
Photo Credit: Grey is the New Black

The Crimson Martini from Grey is the New Black is perfect for a fancy soiree. Make your guests feel even cooler than Bond with these easy to make cocktails.


When you’re looking to throw the ultimate spooky fete you can’t serve just any old bag of chips. These 18 wicked drinks and savory treats are perfect!
Photo Credit: Finding Zest

This purple-y Black Spider Party Punch from Finding Zest is another great family punch. The addition of frozen blueberries helps keep your punch cool throughout the party.


When you’re looking to throw the ultimate spooky fete you can’t serve just any old bag of chips. These 18 wicked drinks and savory treats are perfect!
Photo Credit: Val Event Gal

Don’t feel like mixing up your party drinks? Serve pre-bottled drinks and top them with these ghost tags from Val Event Gal. She uses them to top mini-bottles of wine but you could easily make them family-friendly by using mini-bottles of pop instead.


When you’re looking to throw the ultimate spooky fete you can’t serve just any old bag of chips. These 18 wicked drinks and savory treats are perfect!
Photo Credit: Frog Prince Paperie

Drink your dessert with these Vampire Milkshake Shots from Frog Prince Paperie. Don’t let the look full you. These are 100% alcohol free so you can serve them to everyone.

Savory Treats

When you’re looking to throw the ultimate spooky fete you can’t serve just any old bag of chips. These 18 wicked drinks and savory treats are perfect!
Photo Credit: Woods of Bell Trees

These spooky Halloween appetizers from Woods of Bell Trees are super easy to make yet easily up your party fare.


When you’re looking to throw the ultimate spooky fete you can’t serve just any old bag of chips. These 18 wicked drinks and savory treats are perfect!
Photo Credit: The Lucky Pear

Jalapeno poppers are a staple party appetizer but these mummy ones from The Lucky Pear up the ante. Who wouldn’t want to nibble on these tasty little spooks?


When you’re looking to throw the ultimate spooky fete you can’t serve just any old bag of chips. These 18 wicked drinks and savory treats are perfect!
Photo Credit: Morgan Manages Mommyhood

If you are looking for a lighter meal to serve then this Chicken Boo-dle soup from Morgan Manages Mommyhood fits the bill. It is healthy and delicious with a dash of Halloween flair.


When you’re looking to throw the ultimate spooky fete you can’t serve just any old bag of chips. These 18 wicked drinks and savory treats are perfect!
Photo Credit: The Joys of Boys

I don’t know about your family but mine loves pizza. They’d eat it every day if I would let them. Treat your family and party guests with this fun mummy pizza from The Joys of Boys.


When you’re looking to throw the ultimate spooky fete you can’t serve just any old bag of chips. These 18 wicked drinks and savory treats are perfect!
Photo Credit: Tabler Party of Two

Don’t forget to treat your guest to some pumpkin fun. These roasted pumpkin seeds from Tabler Party of Two are a great treat to serve alongside chips and pretzels.


When you’re looking to throw the ultimate spooky fete you can’t serve just any old bag of chips. These 18 wicked drinks and savory treats are perfect!
Photo Credit: SheSaved

If you are throwing a family-friendly affair then be sure to serve up some of these Babybel cheese monsters from SheSaved. They are perfect for little hands to grab and go.


When you’re looking to throw the ultimate spooky fete you can’t serve just any old bag of chips. These 18 wicked drinks and savory treats are perfect!
Photo Credit: SheSaved

Another great savory appetizer from SheSaved are these spooky deviled egg spiders. They are just as creepy as they are delicious.


When you’re looking to throw the ultimate spooky fete you can’t serve just any old bag of chips. These 18 wicked drinks and savory treats are perfect!
Photo Credit: Crafts a la Mode

Last but certainly not least is this easy pumpkin cheese-ball from Crafts a la Mode. Cheese-balls are always an easy and crowd-pleasing appetizer.

Now that you have the perfect party fare to serve your guests, which ones will you choose? Don’t forget to round out your party with these wickedly easy DIY Halloween invitations and sweet DIY pumpkin banner! The DIY Halloween fun continues on Friday. See you then!

See where I’m linking up!

Sweet DIY Pumpkin Banner

Okay friends, the household is finally running smoothly again. Everyone is healthy and happy which means we can get the DIY Halloween shindig back on the road. The next tutorial on the list is this super sweet DIY pumpkin banner. The best part about this banner is that it is large. It is perfect to display over a large room opening or to drape around the edges of a doorway.

This is a sponsored post written on behalf on Oriental Trading. In addition, affiliate links are used on this site. Ordering a product through these links may result in a commission. Read the full disclosure here.

Let's get this DIY Halloween shindig back on the road! Find out how to make this super sweet DIY pumpkin banner for easy and beautiful party decor!


[bctt tweet=”Find out how to make this super sweet DIY pumpkin banner for easy party decor! #ad #diy” username=”diyadulation”]


Materials


Let's get this DIY Halloween shindig back on the road! Find out how to make this super sweet DIY pumpkin banner for easy and beautiful party decor!

Step 1

Open up your package of pumpkin boxes.


Let's get this DIY Halloween shindig back on the road! Find out how to make this super sweet DIY pumpkin banner for easy and beautiful party decor!

Step 2

Separate all of the lids from the boxes. Set the boxes aside for a project coming later this week.

Step 3

Pull a sheet of the banners paper from the Halloween paper pack.


Let's get this DIY Halloween shindig back on the road! Find out how to make this super sweet DIY pumpkin banner for easy and beautiful party decor!

Step 4

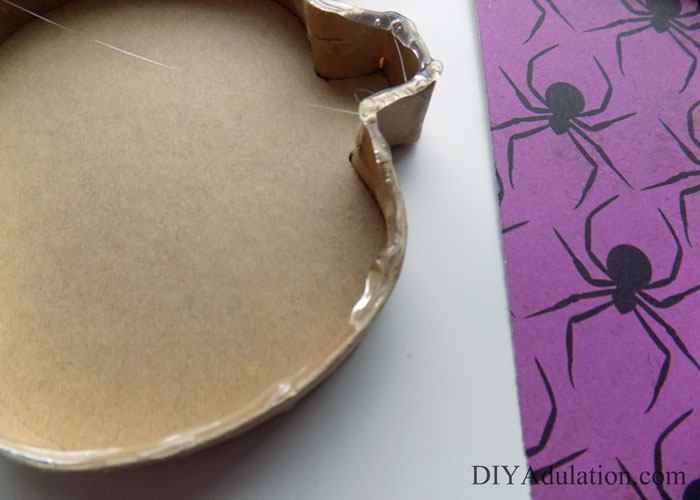
Select a lid and trace the outline of it onto your banners paper.


Let's get this DIY Halloween shindig back on the road! Find out how to make this super sweet DIY pumpkin banner for easy and beautiful party decor!

Step 5

Cut out your traced pumpkin image.


Let's get this DIY Halloween shindig back on the road! Find out how to make this super sweet DIY pumpkin banner for easy and beautiful party decor!

Step 6

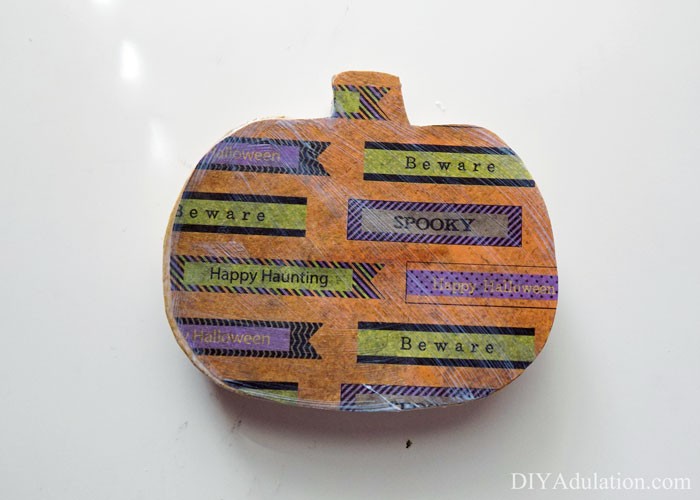
Brush Mod Podge onto the top of the pumpkin lid.


Let's get this DIY Halloween shindig back on the road! Find out how to make this super sweet DIY pumpkin banner for easy and beautiful party decor!

Step 7

Place your cut out piece of paper over it and add a second coat of Mod Podge to the top.


Let's get this DIY Halloween shindig back on the road! Find out how to make this super sweet DIY pumpkin banner for easy and beautiful party decor!

Step 8

Set your pumpkin lid to the side to dry.


Let's get this DIY Halloween shindig back on the road! Find out how to make this super sweet DIY pumpkin banner for easy and beautiful party decor!

Step 9

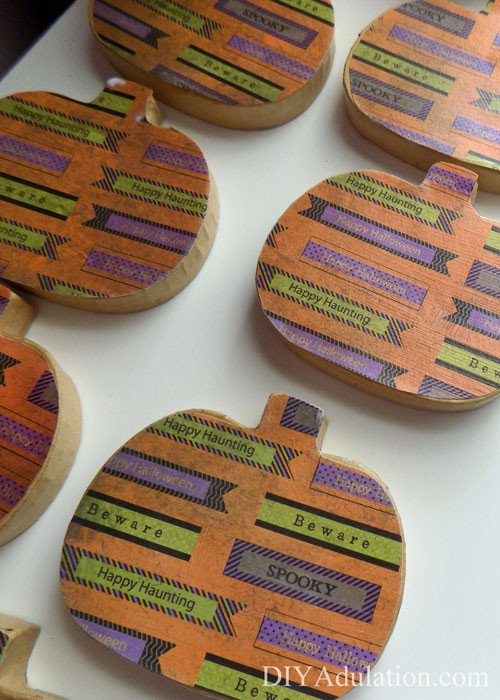
Repeat steps 4 through 8 until with all of your remaining pumpkin lids.


Let's get this DIY Halloween shindig back on the road! Find out how to make this super sweet DIY pumpkin banner for easy and beautiful party decor!

Step 10

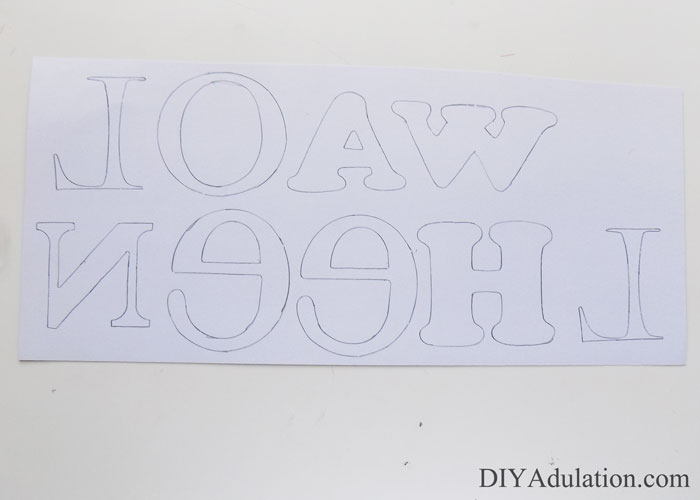
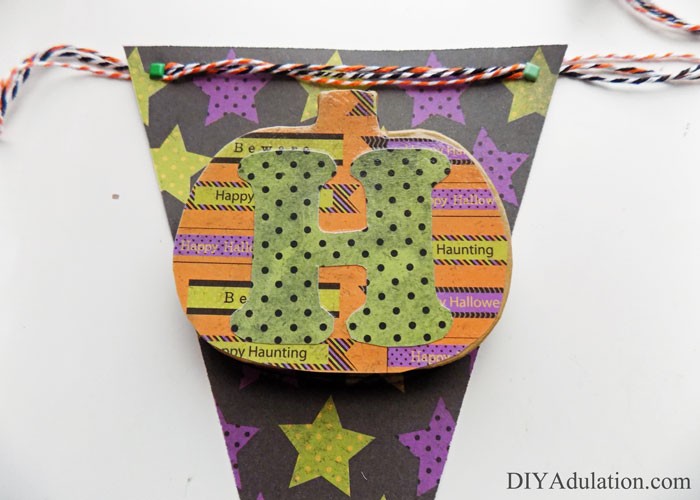
Trace your paper letters backwards onto the back of a sheet of green paper with black polka dots from your Halloween paper pack.


Let's get this DIY Halloween shindig back on the road! Find out how to make this super sweet DIY pumpkin banner for easy and beautiful party decor!

Step 11

Cut out the traced letters.


Let's get this DIY Halloween shindig back on the road! Find out how to make this super sweet DIY pumpkin banner for easy and beautiful party decor!

Step 12

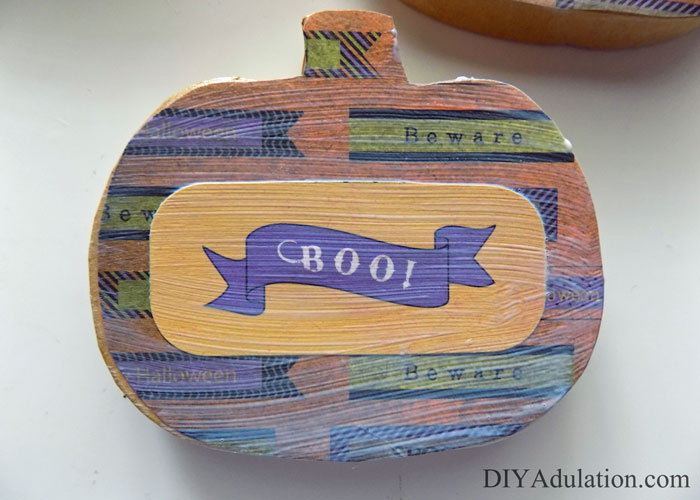
Add the cut out letter one at a time to the pumpkin lids.


Let's get this DIY Halloween shindig back on the road! Find out how to make this super sweet DIY pumpkin banner for easy and beautiful party decor!

Step 13

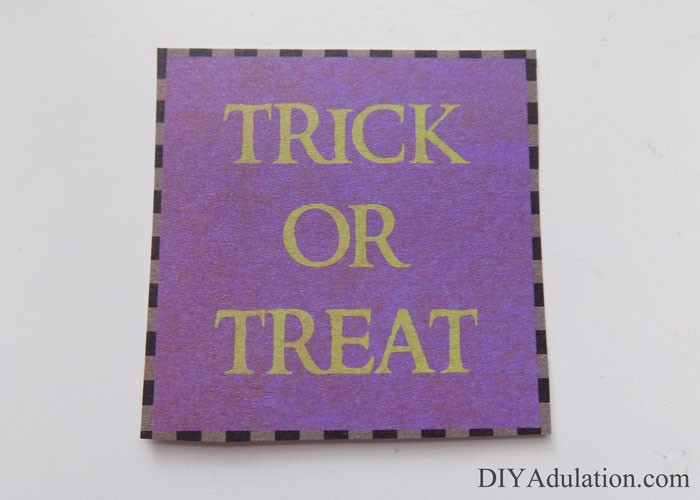
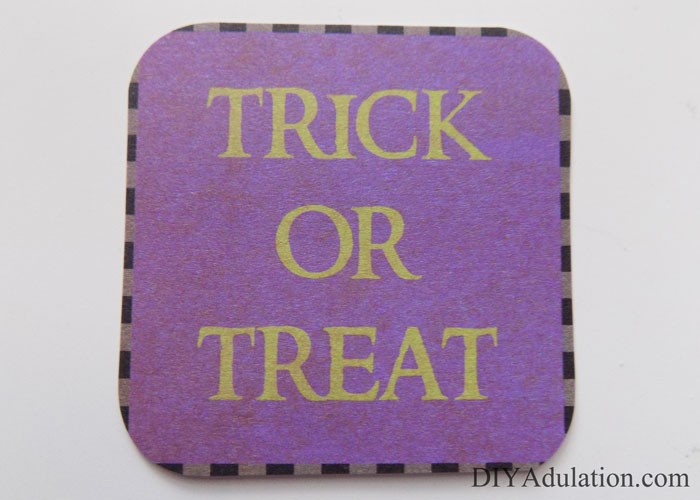
Grab 3 of the leftover cut out tags from when you made the invitations.


Let's get this DIY Halloween shindig back on the road! Find out how to make this super sweet DIY pumpkin banner for easy and beautiful party decor!

Step 14

Trim down to the words or designs on your tags. (You want them to be small enough to fit onto your pumpkin lids.)


Let's get this DIY Halloween shindig back on the road! Find out how to make this super sweet DIY pumpkin banner for easy and beautiful party decor!

Step 15

Next, round the corners of your trimmed tags.


Let's get this DIY Halloween shindig back on the road! Find out how to make this super sweet DIY pumpkin banner for easy and beautiful party decor!

Step 16

Attach to your remaining 3 pumpkins using Mod Podge as you did with the letters.


Let's get this DIY Halloween shindig back on the road! Find out how to make this super sweet DIY pumpkin banner for easy and beautiful party decor!

Step 17

Start creating your pennants by first selecting one sheet each of the purple background with black spiders, the black background with multi-patterned stars, the green background with spiderwebs, and the black background with spiderwebs from the Halloween paper pack.


Let's get this DIY Halloween shindig back on the road! Find out how to make this super sweet DIY pumpkin banner for easy and beautiful party decor!

Let's get this DIY Halloween shindig back on the road! Find out how to make this super sweet DIY pumpkin banner for easy and beautiful party decor!

Step 18

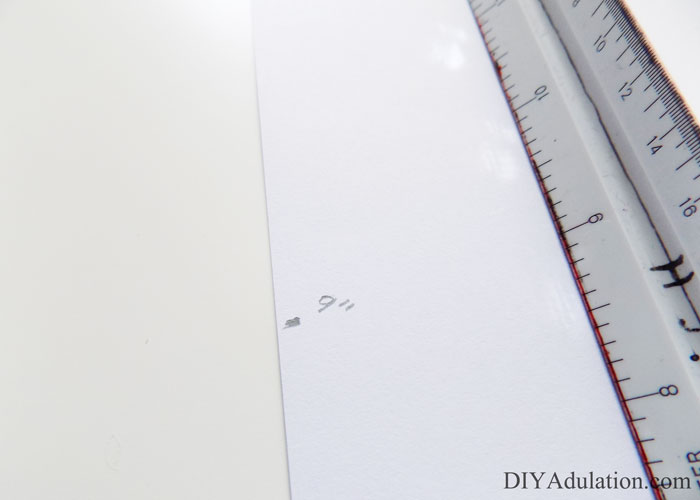
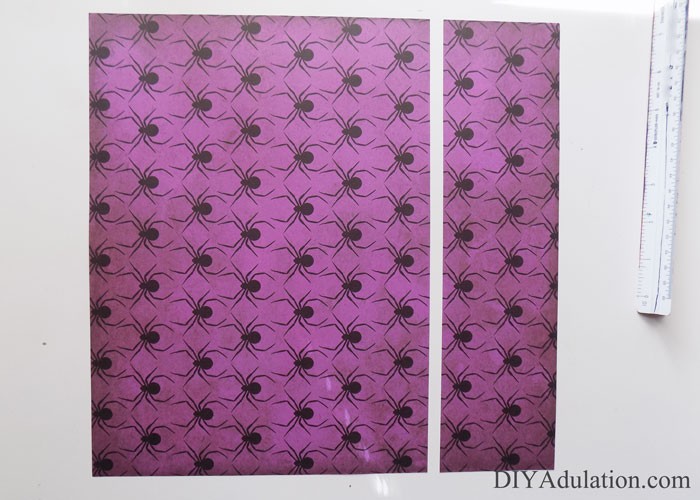
Use your ruler to measure 9 inches up on the edge of one sheet of paper. Trim your paper using your paper cutter using that mark.
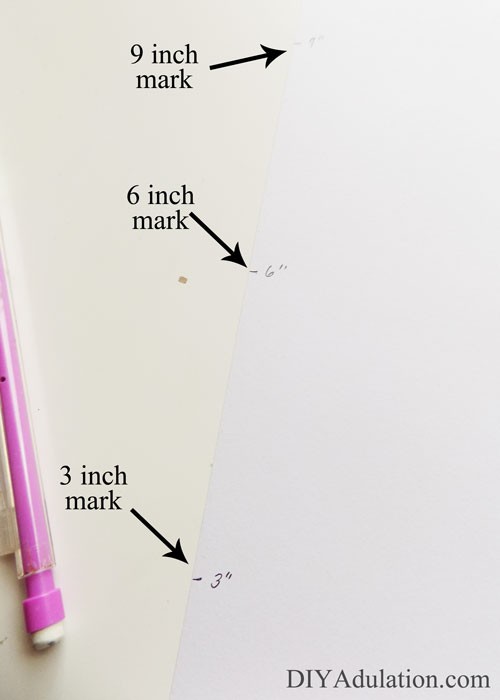
 

Let's get this DIY Halloween shindig back on the road! Find out how to make this super sweet DIY pumpkin banner for easy and beautiful party decor!

Step 19

Take your 9 inch piece of paper and mark every 3 inches along each long side (the 12 inch sides).


Let's get this DIY Halloween shindig back on the road! Find out how to make this super sweet DIY pumpkin banner for easy and beautiful party decor!

Step 20

Use your ruler to draw straight lines from the top left corner to the first 3 inch mark on the bottom. Continue connecting following the pattern listed below:

  • Bottom 3 inch to Top 6 inch
  • Top 6 inch to Bottom 9 inch
  • Bottom 9 inch to Top Right Corner
  • See the picture above for reference.


Let's get this DIY Halloween shindig back on the road! Find out how to make this super sweet DIY pumpkin banner for easy and beautiful party decor!

Step 21

Next, cut out the triangles. Only use the 3 large ones.
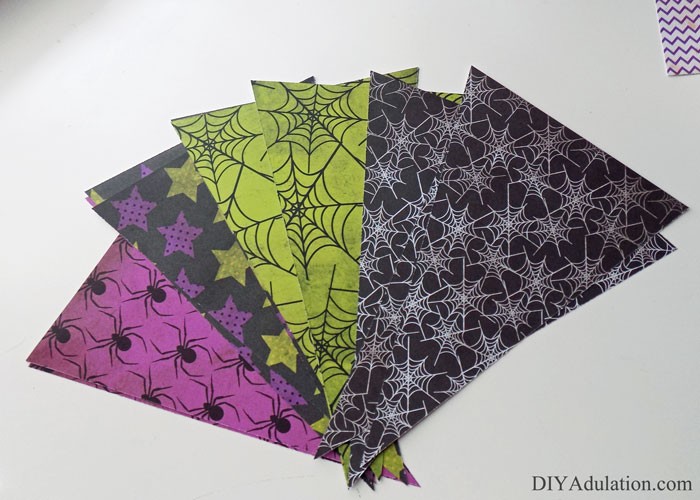
 

Let's get this DIY Halloween shindig back on the road! Find out how to make this super sweet DIY pumpkin banner for easy and beautiful party decor!

Step 22

Repeat steps 18 through 21 for your remaining 3 sheets of paper.


Let's get this DIY Halloween shindig back on the road! Find out how to make this super sweet DIY pumpkin banner for easy and beautiful party decor!

Step 23

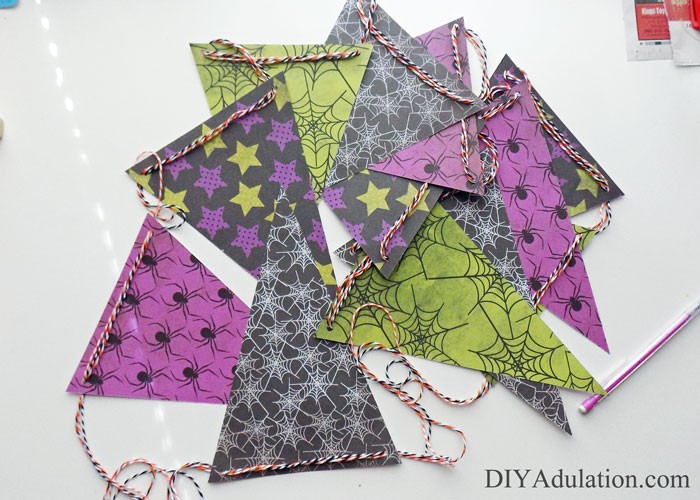
Once your pennants are cut out, punch holes in the top left and right corners.

Step 24

Arrange your pennants in the repeating pattern of:

Step 25

Flip the stack of pennants face down onto your work surface.


Let's get this DIY Halloween shindig back on the road! Find out how to make this super sweet DIY pumpkin banner for easy and beautiful party decor!

Step 26

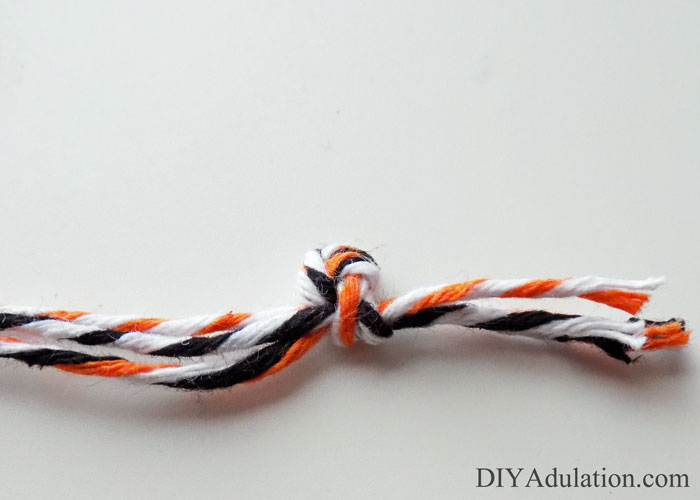
Twist the ends of your 3 baker’s twines together.


Let's get this DIY Halloween shindig back on the road! Find out how to make this super sweet DIY pumpkin banner for easy and beautiful party decor!

Step 27

Grab the pennant from the top of the facedown stack and thread the twines through the punched holes starting with the hole on the right and ending with the hole on the left.


Let's get this DIY Halloween shindig back on the road! Find out how to make this super sweet DIY pumpkin banner for easy and beautiful party decor!

Step 28

Continue threading until all of the pennants are added.


Let's get this DIY Halloween shindig back on the road! Find out how to make this super sweet DIY pumpkin banner for easy and beautiful party decor!

Step 29

Tie a knot in the loose end of the twine. Be sure to leave an excess of 5 inches or so.

Step 30

Next, cut the ends of baker’s twine still attached to the rolls and tie in a knot as well.


Let's get this DIY Halloween shindig back on the road! Find out how to make this super sweet DIY pumpkin banner for easy and beautiful party decor!

Let's get this DIY Halloween shindig back on the road! Find out how to make this super sweet DIY pumpkin banner for easy and beautiful party decor!

Step 31

Ensure that your pennants stay evenly spaces by securing brads through each of the punched corners.


Let's get this DIY Halloween shindig back on the road! Find out how to make this super sweet DIY pumpkin banner for easy and beautiful party decor!

Step 32

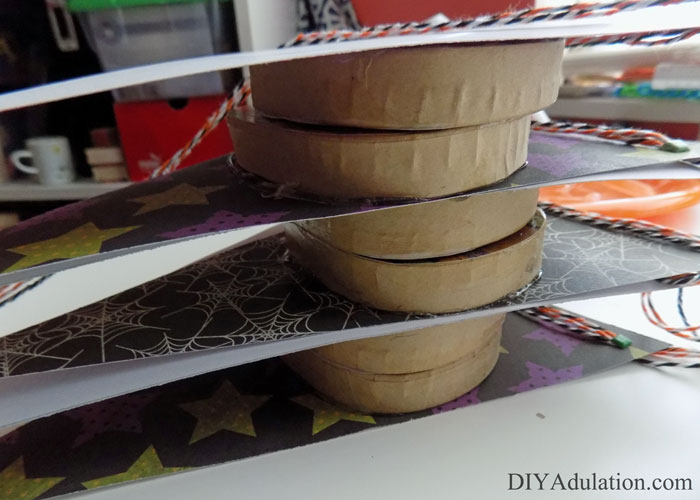
The last step is to attach all of your pumpkin lids to your pennants with hot glue. There are two ways to do this:

Let's get this DIY Halloween shindig back on the road! Find out how to make this super sweet DIY pumpkin banner for easy and beautiful party decor!

Let's get this DIY Halloween shindig back on the road! Find out how to make this super sweet DIY pumpkin banner for easy and beautiful party decor!

  1. Place glue on the bottom edge of the lids and press firmly to pennants.
  2. Trace the lid onto the pennant and place glue along the inside of the traced lines. Then secure your lid by placing it into the glue line. (This is the method I found to be most effective.)

Tip:

  • While attaching the lids, stack your finished pennants as pictured below to make it easy to keep the pennant you are working on in place.

Let's get this DIY Halloween shindig back on the road! Find out how to make this super sweet DIY pumpkin banner for easy and beautiful party decor!

Let's get this DIY Halloween shindig back on the road! Find out how to make this super sweet DIY pumpkin banner for easy and beautiful party decor!

Let's get this DIY Halloween shindig back on the road! Find out how to make this super sweet DIY pumpkin banner for easy and beautiful party decor!

Let's get this DIY Halloween shindig back on the road! Find out how to make this super sweet DIY pumpkin banner for easy and beautiful party decor!

Let's get this DIY Halloween shindig back on the road! Find out how to make this super sweet DIY pumpkin banner for easy and beautiful party decor!

Let's get this DIY Halloween shindig back on the road! Find out how to make this super sweet DIY pumpkin banner for easy and beautiful party decor!

Let's get this DIY Halloween shindig back on the road! Find out how to make this super sweet DIY pumpkin banner for easy and beautiful party decor!

Let's get this DIY Halloween shindig back on the road! Find out how to make this super sweet DIY pumpkin banner for easy and beautiful party decor!

Let's get this DIY Halloween shindig back on the road! Find out how to make this super sweet DIY pumpkin banner for easy and beautiful party decor!

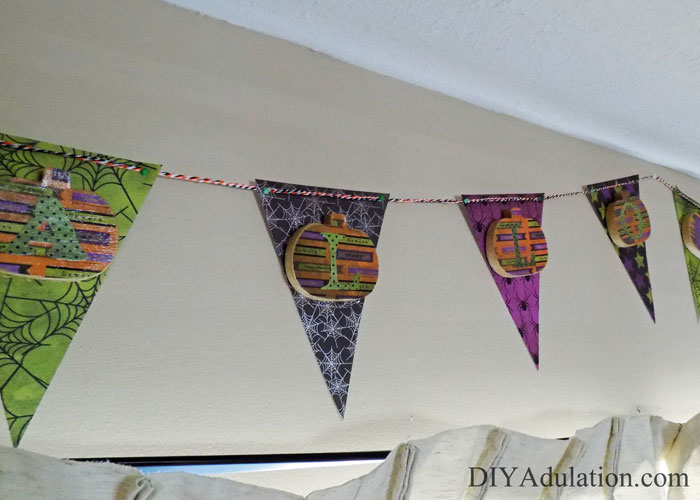
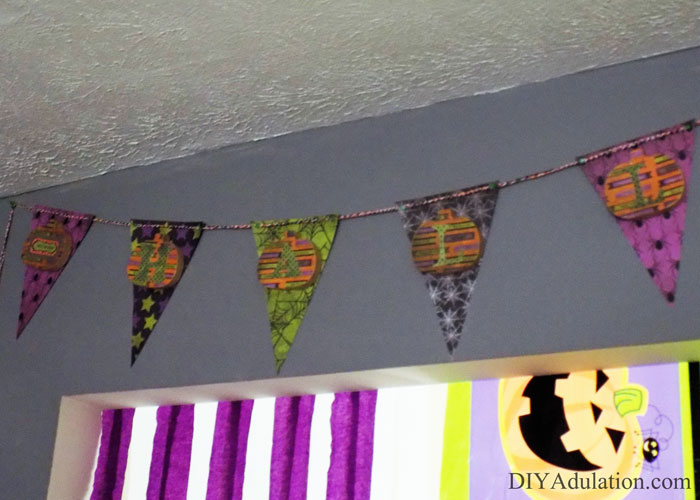
How cool is this banner?! Don’t forget that using paper from the same pack as your wickedly easy invitations means your party is perfectly coordinated effortlessly. Here are some extra party tips for you to bring the décor together easily:

  • Crepe paper streamers make awesome dividers. Use them to quickly and inexpensively cordon off the party zone for your guests.
  • Utilize plastic tablecloths for more than covering the snack table. These are an easy way to dress up your walls or add separation between rooms as you see in the pictures above.

Throwing an amazing party doesn’t have to break the bank or your back. It is all about utilizing your supplies in multiple creative ways. Wow your guests while still having the energy to enjoy their company. Come back on Wednesday for more Halloween party DIY!

Looking for a deal at Oriental Trading? Visit their coupon page for the latest in sales.

See where I’m linking up!

Wickedly Easy DIY Halloween Invitations

If you are looking to set your Halloween party apart from the others this year then these wickedly easy DIY Halloween invitations are perfect for you.

If you are looking to set your Halloween party apart from the others this year then these wickedly easy DIY Halloween invitations are perfect for you. Most of the components come from the same set of Halloween paper from <arel=”nofollow” href=”http://www.orientaltrading.com/holidays/halloween-a1-550760.fltr” target=”_blank”>Oriental Trading making it easy to achieve perfectly coordinated invites. Don’t limit yourself to a prefab party this year and instead make a unique fest that will keep your guests talking for years. These invites are the first tutorial in our Rocking DIY Halloween Party Series!

If you are looking to set your Halloween party apart from the others this year then these wickedly easy DIY Halloween invitations are perfect for you.


[bctt tweet=”Set your party apart this year with these wickedly easy DIY Halloween invitations. #ad #diy” username=”diyadulation”]


Materials

If you are looking to set your Halloween party apart from the others this year then these wickedly easy DIY Halloween invitations are perfect for you.


Step 1

Pull the purple and black polka dot sheets and the purple and black striped sheets out of your paper pack. (4 sheets total, 2 of each style)


If you are looking to set your Halloween party apart from the others this year then these wickedly easy DIY Halloween invitations are perfect for you.

Step 2

Take one sheet of paper and fold it in half.


If you are looking to set your Halloween party apart from the others this year then these wickedly easy DIY Halloween invitations are perfect for you.

Step 3

Open folded sheet of paper and cut along the fold line with your paper cutter.


If you are looking to set your Halloween party apart from the others this year then these wickedly easy DIY Halloween invitations are perfect for you.

Step 4

Next fold each newly created half in half again.


If you are looking to set your Halloween party apart from the others this year then these wickedly easy DIY Halloween invitations are perfect for you.

Step 5

Again, open your folded sheets and cut along the fold lines.


If you are looking to set your Halloween party apart from the others this year then these wickedly easy DIY Halloween invitations are perfect for you.

If you are looking to set your Halloween party apart from the others this year then these wickedly easy DIY Halloween invitations are perfect for you.

Step 6

Repeat steps 2-5 with your remaining 3 sheets of paper.


If you are looking to set your Halloween party apart from the others this year then these wickedly easy DIY Halloween invitations are perfect for you.

If you are looking to set your Halloween party apart from the others this year then these wickedly easy DIY Halloween invitations are perfect for you.

Step 7

Next attach opposite designs of paper. Start by placing glue along the edges of one square and then running an “x” in the center.

Note:

  • This ensures that your square sheets of paper stick firmly together.


If you are looking to set your Halloween party apart from the others this year then these wickedly easy DIY Halloween invitations are perfect for you.

If you are looking to set your Halloween party apart from the others this year then these wickedly easy DIY Halloween invitations are perfect for you.

Step 8

Carefully align the edges of paper together and press firmly to attach.

Tip:

  • If the sheets don’t align perfectly trim excess around the edges with your paper cutter.


If you are looking to set your Halloween party apart from the others this year then these wickedly easy DIY Halloween invitations are perfect for you.

Step 9

Continue repeating steps 7 and 8 until all of your squares are attached. Set finished squares off to the side.


If you are looking to set your Halloween party apart from the others this year then these wickedly easy DIY Halloween invitations are perfect for you.

Step 10

Next find the sheets in your Halloween paper stack that have tags on them. (See picture for references.) Pull out one sheet.


If you are looking to set your Halloween party apart from the others this year then these wickedly easy DIY Halloween invitations are perfect for you.

Step 11

Cut out all of the tags.


If you are looking to set your Halloween party apart from the others this year then these wickedly easy DIY Halloween invitations are perfect for you.

If you are looking to set your Halloween party apart from the others this year then these wickedly easy DIY Halloween invitations are perfect for you.

If you are looking to set your Halloween party apart from the others this year then these wickedly easy DIY Halloween invitations are perfect for you.

Step 12

Start assembling the fronts of your invitations following the formula listed below for each:

1 square + 1 tag + 1 vellum embellishment + 1 chipboard saying = Complete Invitation

If you are looking to set your Halloween party apart from the others this year then these wickedly easy DIY Halloween invitations are perfect for you.

If you are looking to set your Halloween party apart from the others this year then these wickedly easy DIY Halloween invitations are perfect for you.

Step 13

Next get your sheet of orange cardstock and cut into 9 equal(-ish) pieces.

Tip:

  • You can measure these if you want but I chose to just eyeball it. Uneven sizes kind of fit with the Halloween vibe.


If you are looking to set your Halloween party apart from the others this year then these wickedly easy DIY Halloween invitations are perfect for you.

Step 14

Mount your stamp on an acrylic block.

If you are looking to set your Halloween party apart from the others this year then these wickedly easy DIY Halloween invitations are perfect for you.

Note:

  • You will notice that my stamp is for a shower invitation however it still contains all of the pertinent information for an R.S.V.P. invite. By inking only the parts I want I am able to use this stamp for any invitation.


If you are looking to set your Halloween party apart from the others this year then these wickedly easy DIY Halloween invitations are perfect for you.

Step 15

Ink your stamp and press firmly onto the bottom two-thirds of your orange cardstock piece. Do this for each one.


If you are looking to set your Halloween party apart from the others this year then these wickedly easy DIY Halloween invitations are perfect for you.

Step 16

Next use your hole punch to put holes in the top corners of each piece of stamped cardstock.


If you are looking to set your Halloween party apart from the others this year then these wickedly easy DIY Halloween invitations are perfect for you.

If you are looking to set your Halloween party apart from the others this year then these wickedly easy DIY Halloween invitations are perfect for you.

Step 17

Now pull out your brads and your baker’s twine.


If you are looking to set your Halloween party apart from the others this year then these wickedly easy DIY Halloween invitations are perfect for you.

Step 18

Put the end of your baker’s twine through the top left hole of your orange cardstock and secure with a brad.


If you are looking to set your Halloween party apart from the others this year then these wickedly easy DIY Halloween invitations are perfect for you.

Step 19

Next cut your baker’s twine so that it is slightly longer than the end of your card. Then thread the loose end through the top right hole of the orange cardstock and secure it with a second brad.


If you are looking to set your Halloween party apart from the others this year then these wickedly easy DIY Halloween invitations are perfect for you.

If you are looking to set your Halloween party apart from the others this year then these wickedly easy DIY Halloween invitations are perfect for you.

Step 20

Flip the orange cardstock over and trim the excess baker’s twine.

Step 21

Repeat steps 18 through 20 for the remaining pieces of cardstock.


If you are looking to set your Halloween party apart from the others this year then these wickedly easy DIY Halloween invitations are perfect for you.

Step 22

Attach your pieces of cardstock to the back of your invitations by placing a glue dot on each back corner of the cardstock and pressing firmly to the center of your invitations.


If you are looking to set your Halloween party apart from the others this year then these wickedly easy DIY Halloween invitations are perfect for you.

Step 23

Lastly, add your little Halloween stickers to the bottom left corner of your orange cardstock. (See the picture above for reference.)


If you are looking to set your Halloween party apart from the others this year then these wickedly easy DIY Halloween invitations are perfect for you.

If you are looking to set your Halloween party apart from the others this year then these wickedly easy DIY Halloween invitations are perfect for you.

If you are looking to set your Halloween party apart from the others this year then these wickedly easy DIY Halloween invitations are perfect for you.

If you are looking to set your Halloween party apart from the others this year then these wickedly easy DIY Halloween invitations are perfect for you.

If you are looking to set your Halloween party apart from the others this year then these wickedly easy DIY Halloween invitations are perfect for you.

If you are looking to set your Halloween party apart from the others this year then these wickedly easy DIY Halloween invitations are perfect for you.

If you are looking to set your Halloween party apart from the others this year then these wickedly easy DIY Halloween invitations are perfect for you.

If you are looking to set your Halloween party apart from the others this year then these wickedly easy DIY Halloween invitations are perfect for you.

Looking for a deal at Oriental Trading? Visit their coupon page for the latest in sales.

I am so excited with how these turned out! They are perfect for an adult costume party or a family-friendly soiree. Handmade invitations are always the best (like these awesome luau ones for summer). During the busy Halloween party season handmade invites can be the difference between your guests responding “Yes,” to your party over another. Now that your invites are done it is time to get to work on the party décor with these Easy Painted Pumpkin Coasters. Then come back on Friday to find out how to make a super sweet Halloween pumpkin bunting! **UPDATE** The kiddos came down with something gross and absolutely horrible this week which has resulted in no sleep for this momma due to constantly cleaning up things, that no one should have to clean up, hourly. I promise to get the banner tutorial up a.s.a.p. Mom stuff simply has to come first. Thanks everyone!

See where I’m linking up!