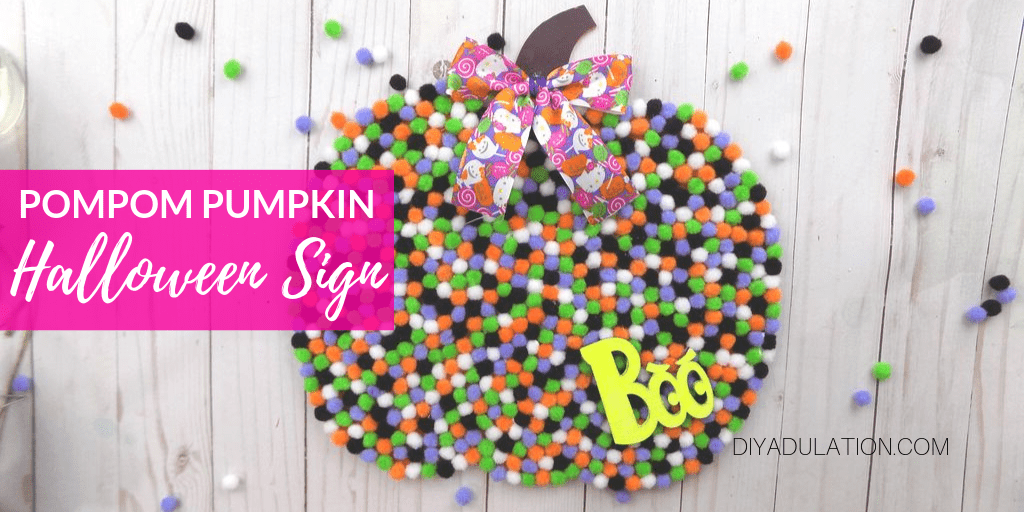
Are you looking for a new twist on your Halloween decor this year? Go the fun and colorful route with this pompom pumpkin Halloween sign. It’s totally easy to make and not too spooky for little ones. Find out how to make one for your mantle below now!
Affiliate links may be used in this post. Ordering a product through these links may result in a commission at no extra cost to you. Read the full disclosure here.

[bctt tweet=”This pompom pumpkin Halloween sign is a colorful addition to your Halloween decor this season. It’s festive and not too spooky for little ones.” username=”diyadulation”]
I have always had a lot of purple in my Halloween decor. It always seemed to add a richness to the overall look that regular orange and black didn’t. On top of that, I’m a Bengals fan so I see orange and black and think of football (or my high school colors) not Halloween. When you add in the purple, it instantly elevates it to something more bewitching, I think.
In addition, I didn’t want to do anything super scary. While I love scary movies, gore, and creepiness, my 6 year old daughter suffers from pretty bad nightmares and I don’t want to add to that. There will be plenty of time for super spookiness when the kiddos are teenagers. Until then, I’m embracing the colorful candy side of Halloween with super fun projects like this pompom pumpkin Halloween sign!

Pompom Pumpkin Halloween Sign Materials
- Wooden Pumpkin (I used a sign I found at Dollar Tree)
- Quick Dry Tacky Glue
- Multicolor Assortment of 1 cm Pompoms
- Colorful 1.5-2 inch Wide Ribbon
- Wooden Laser Cut Word “BOO”
- Glittery Neon Yellow Paint
- Small Flat Paintbrush
- Hot Glue Gun and Glue Sticks

Step 1
First, you have to take everything off of your wooden pumpkin. This includes the tags and any embellishments on it.
Step 2
Next, separate the colors of pompoms you need from the assortment mix. I used black, white, lavender, green, and orange.


Step 3
Then add a thick line of tacky glue to the outer edge of your pumpkin and cover it with pompoms.

Step 4
Next, add lines of tacky glue to the 2 curved lines near the center of the pumpkin. Again, cover them with pompoms.

Step 5
Once you have your pompom lines outlined, add pompoms to fill in the rest of your pumpkin. Only work on one third section at a time. This maintains the shape of the pumpkin so that you still get that illusion of sections like a real pumpkin has.


Step 6
Continue adding pompoms to your pumpkin until it is completely covered in pompoms. Do not cover the stem.


Step 7
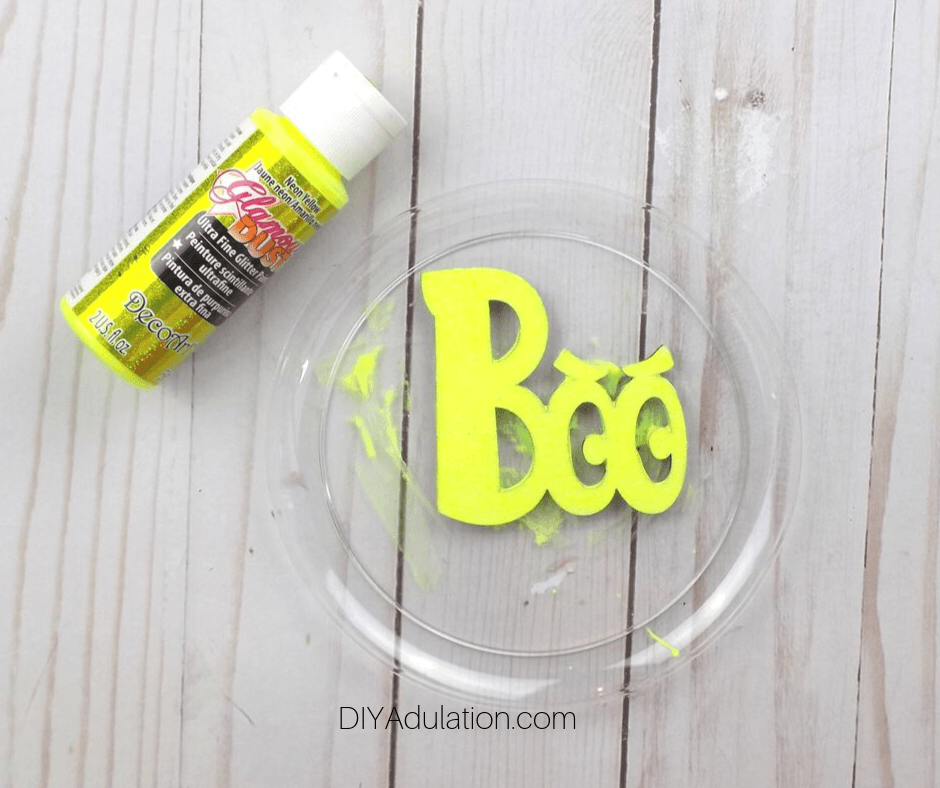
Set your pumpkin aside to dry and paint your wooden word “BOO” with the glittery neon yellow paint.

Step 8
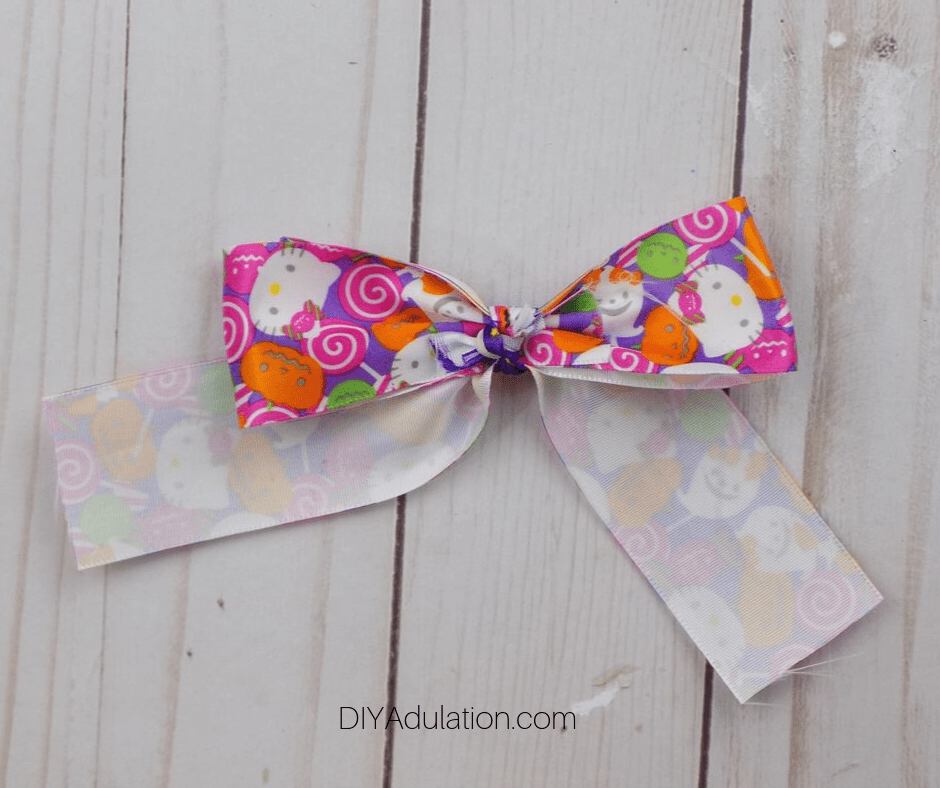
Set your wooden word to the side to dry and take the time to make a bow from your colorful ribbon. I folded one piece of ribbon to create the bow part and added a second piece of ribbon for the ends. Then I secured it all by tying a 3rd piece of ribbon around the center of the first 2.
Step 9 (Optional)
After your painted wooden word has dried, add a second coat of glittery yellow paint if desired. This makes it more vibrant especially since you aren’t sealing or treating the wood in any other way. Again, set it aside to dry.

Step 10
Once everything is dry, glue your bow to the base of the stem on your pumpkin with hot glue.

Step 11
Lastly, glue your painted wooden word to the bottom right corner of the pumpkin with hot glue.
Extra Tips:
- This is made for indoor use. If you want to use it on your porch or as a door hanger, I recommend using a stronger adhesive for the pompoms such as E6000.
- I made this for my mantle but if you want to hang it on the wall instead, use a small Command picture hanging strip to do so easily.
This pompom pumpkin Halloween sign is another fun and colorful addition to your Halloween decor this season. It’s totally in keeping with the theme without being too spooky or scary for little ones. Perfect for displaying on your mantle until the 31st!
See where I’m linking up!
Don’t Forget to Pin It!

More Ideas You’ll Love: