Easy Handmade Merry & Bright Christmas Card

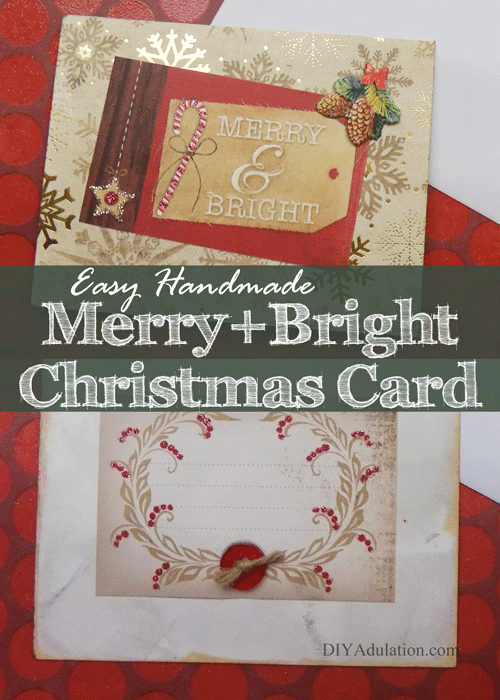
You know how much you can save when you DIY your Christmas. That is often easier said than done. Time constraints are one of the biggest barriers to a do-it-yourself Christmas. That’s why I’m going to be sharing project ideas with you throughout the season that are easy and fast. The first of these projects is this easy handmade Merry & Bright Christmas card. It is a lot of steps but they go really quickly. Excluding the dry time, it comes together in 5 minutes and the drying is hands-off so you can get other DIY projects done while you wait.

Affiliate links may be used in this post. Ordering a product through these links may result in a commission at no extra cost to you. Read the full disclosure here.

This easy handmade Merry & Bright Christmas card lets you save money on a DIY Christmas without devoting every free hour of your time to creating it.


[bctt tweet=”This easy handmade Merry & Bright #Christmascard lets you save money on a DIY Christmas without devoting every free hour of your time to creating it.” username=”diyadulation”]


This easy handmade Merry & Bright Christmas card lets you save money on a DIY Christmas without devoting every free hour of your time to creating it.

This easy handmade Merry & Bright Christmas card lets you save money on a DIY Christmas without devoting every free hour of your time to creating it.

Materials

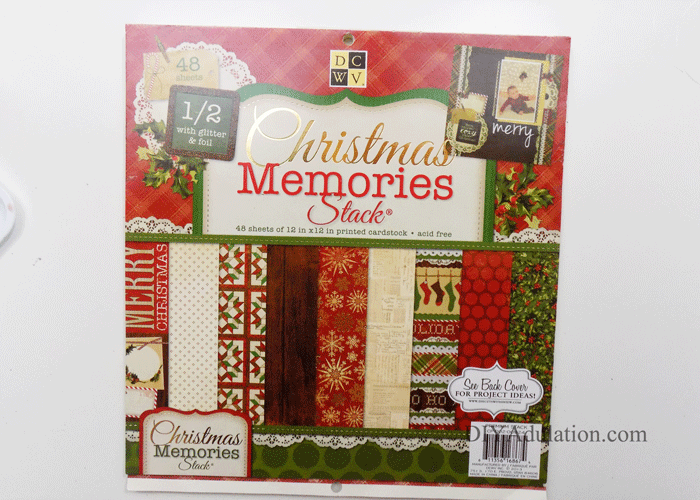
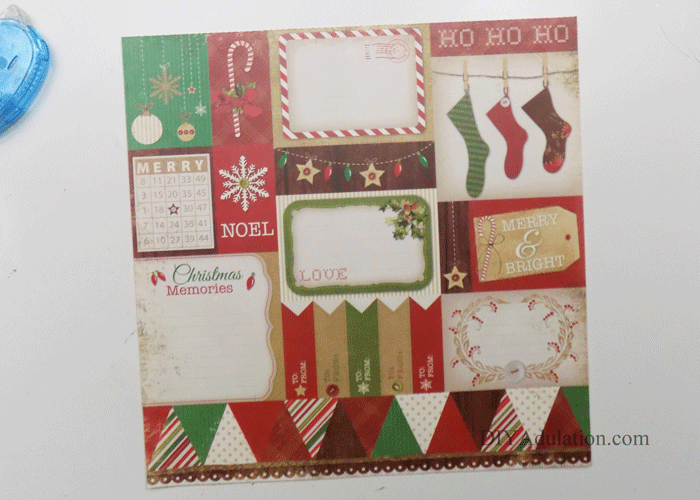
*The Christmas Memories Stack is no longer made. If you don’t already own it you can search on Ebay but you can also use this similar pack in the same fashion. Choose a pretty background paper to replace the gold snowflake paper and choose a phrase tag and journaling tag to embellish as I did.


This easy handmade Merry & Bright Christmas card lets you save money on a DIY Christmas without devoting every free hour of your time to creating it.

Step 1

First, pull a sheet of the gold snowflake paper out of your Christmas Memories stack.


This easy handmade Merry & Bright Christmas card lets you save money on a DIY Christmas without devoting every free hour of your time to creating it.

This easy handmade Merry & Bright Christmas card lets you save money on a DIY Christmas without devoting every free hour of your time to creating it.

Step 2

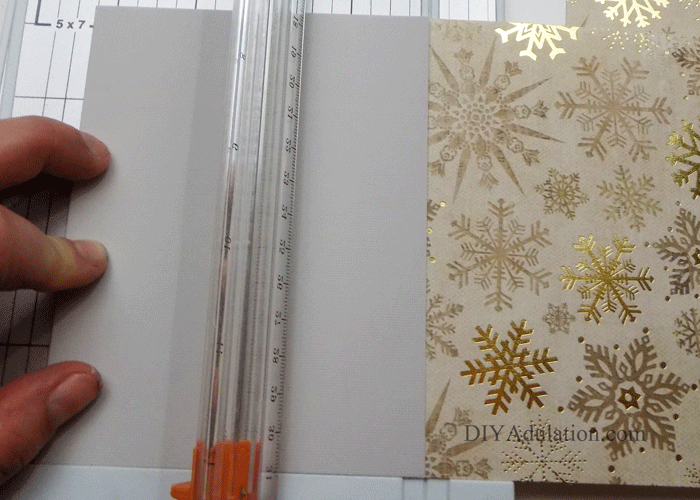
Next, use your gray card to measure and cut your paper with a paper cutter.


This easy handmade Merry & Bright Christmas card lets you save money on a DIY Christmas without devoting every free hour of your time to creating it.

Step 3

Turn your card 90º and use it to measure your cut snowflake paper strip and again cut with a paper cutter.


This easy handmade Merry & Bright Christmas card lets you save money on a DIY Christmas without devoting every free hour of your time to creating it.

Step 4

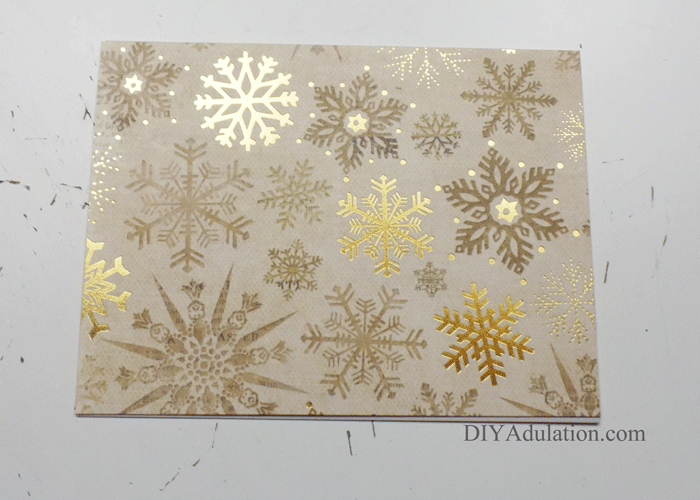
Set your card aside and use the rectangle from step 3 as a guide to measure and cut your second rectangle.


This easy handmade Merry & Bright Christmas card lets you save money on a DIY Christmas without devoting every free hour of your time to creating it.

Step 5

Now add glue to the front of your card in an “X” as pictured with your glue runner.


This easy handmade Merry & Bright Christmas card lets you save money on a DIY Christmas without devoting every free hour of your time to creating it.

Step 6

Next, attach one rectangle of gold snowflake paper to the front of your card.


This easy handmade Merry & Bright Christmas card lets you save money on a DIY Christmas without devoting every free hour of your time to creating it.

Step 7

Add a second “X” of glue to the back of your card.

Step 8

Attach your second rectangle of gold snowflake paper to the back of your card.

This easy handmade Merry & Bright Christmas card lets you save money on a DIY Christmas without devoting every free hour of your time to creating it.

Tip:

  • Leave a small space at the fold of your card so that the attached papers don’t hit each other when opening the card.


This easy handmade Merry & Bright Christmas card lets you save money on a DIY Christmas without devoting every free hour of your time to creating it.

Step 9

Next, pull out a sheet of the tag paper from your Christmas Memories stack.


This easy handmade Merry & Bright Christmas card lets you save money on a DIY Christmas without devoting every free hour of your time to creating it.

Step 10

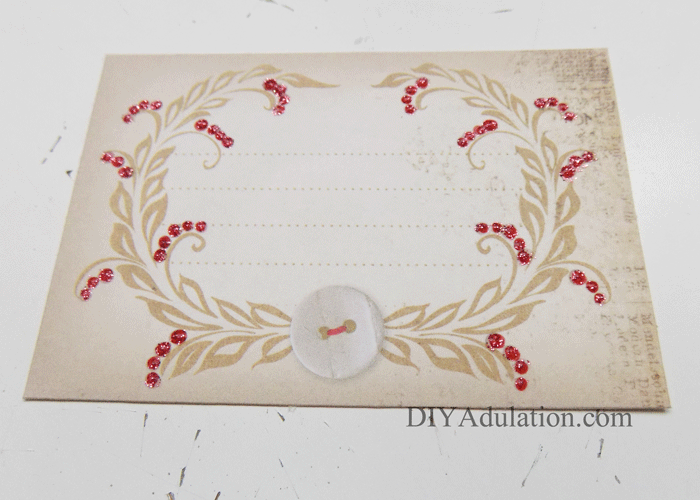
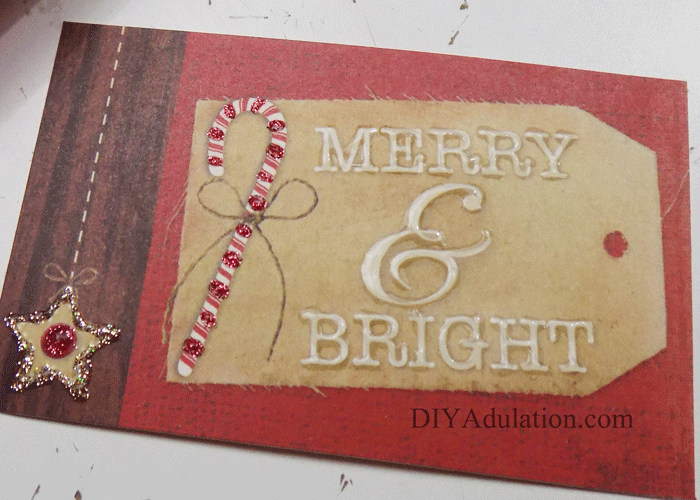
Cut out the “Merry & Bright” tag and the button journaling tag.


This easy handmade Merry & Bright Christmas card lets you save money on a DIY Christmas without devoting every free hour of your time to creating it.

Step 11

Add red Stickles to the candy cane and button on the “Merry & Bright” tag.


This easy handmade Merry & Bright Christmas card lets you save money on a DIY Christmas without devoting every free hour of your time to creating it.

Step 12

Also add red Stickles to the berries on the journaling tag.


This easy handmade Merry & Bright Christmas card lets you save money on a DIY Christmas without devoting every free hour of your time to creating it.

Step 13

Next, add gold Stickles to the star on the “Merry & Bright” tag.


This easy handmade Merry & Bright Christmas card lets you save money on a DIY Christmas without devoting every free hour of your time to creating it.

Step 14

Lastly, add Glossy Accents to the letters on the “Merry & Bright” tag.

Step 15

Set the “Merry & Bright” tag aside to dry.


This easy handmade Merry & Bright Christmas card lets you save money on a DIY Christmas without devoting every free hour of your time to creating it.

Step 16

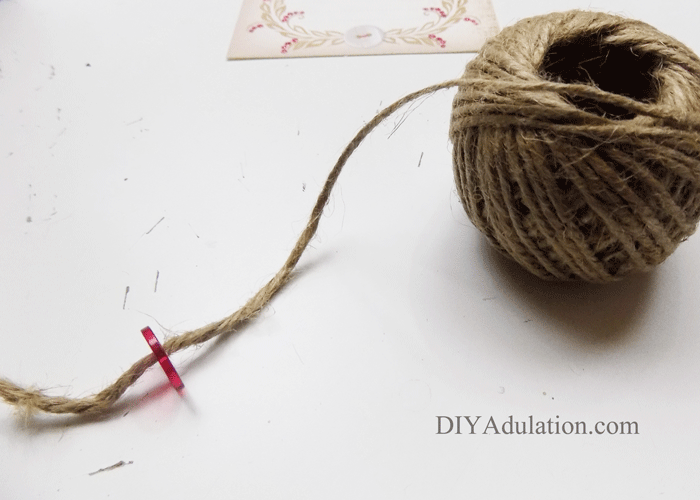
Now thread your red button onto your twine.


This easy handmade Merry & Bright Christmas card lets you save money on a DIY Christmas without devoting every free hour of your time to creating it.

Step 17

Cut the twine and thread the cut end through the second hole on your button.


This easy handmade Merry & Bright Christmas card lets you save money on a DIY Christmas without devoting every free hour of your time to creating it.

Step 18

Next, tie your twine in a knot to secure it to your button.


This easy handmade Merry & Bright Christmas card lets you save money on a DIY Christmas without devoting every free hour of your time to creating it.

Step 19

Trim the ends of your twine as pictured.
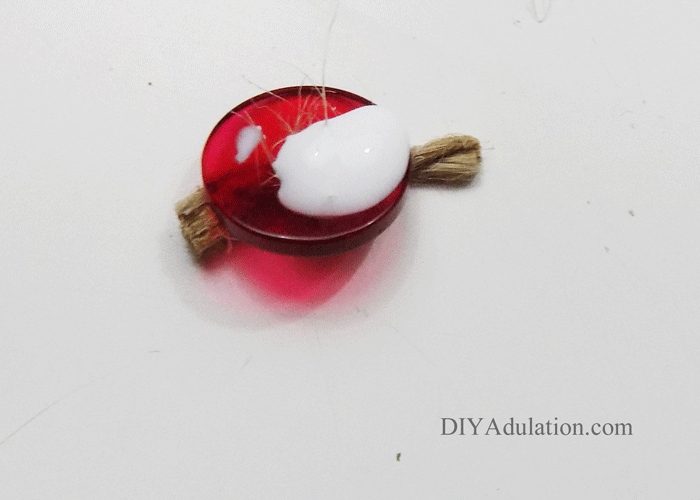
 

This easy handmade Merry & Bright Christmas card lets you save money on a DIY Christmas without devoting every free hour of your time to creating it.

Step 20

Add glue to the back of your button.

Note:

  • The back of your button is the side without the knot.


This easy handmade Merry & Bright Christmas card lets you save money on a DIY Christmas without devoting every free hour of your time to creating it.

Step 21

Attach your button over the picture of a button on the journaling tag.

Step 22

Set the journaling tag to the side to dry.
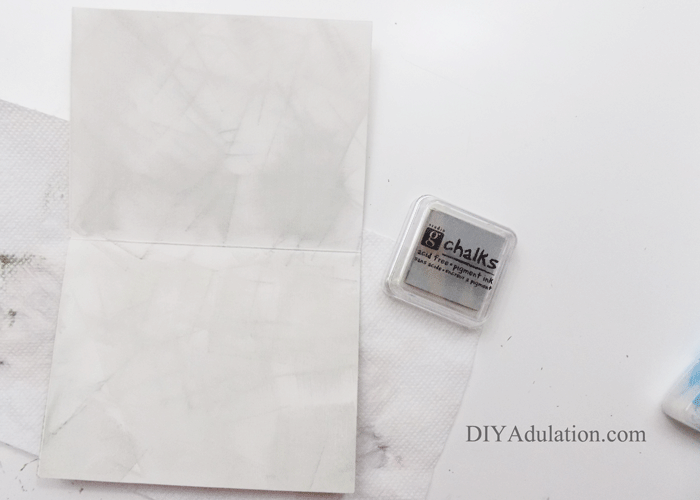
 

This easy handmade Merry & Bright Christmas card lets you save money on a DIY Christmas without devoting every free hour of your time to creating it.

Step 23

Open up with your card and chalk the entire inside with gray.

Step 24

Fold your card in half inside out (with the gold snowflake sides facing each other).


This easy handmade Merry & Bright Christmas card lets you save money on a DIY Christmas without devoting every free hour of your time to creating it.

Step 25

Next ink the outside edges of the inside bottom with cranberry pigment ink.


This easy handmade Merry & Bright Christmas card lets you save money on a DIY Christmas without devoting every free hour of your time to creating it.

Step 26

Then ink over the gray chalk on the inside top of card with chocolate brown ink. On the bottom, only ink the edges as you did with the cranberry ink.

Step 27

Fold your card the correct way again.

**Important**

Don’t move on until your tags are completely dry.


This easy handmade Merry & Bright Christmas card lets you save money on a DIY Christmas without devoting every free hour of your time to creating it.

Step 28

Add an “X” with your glue runner on the back of your “Merry & Bright” tag.
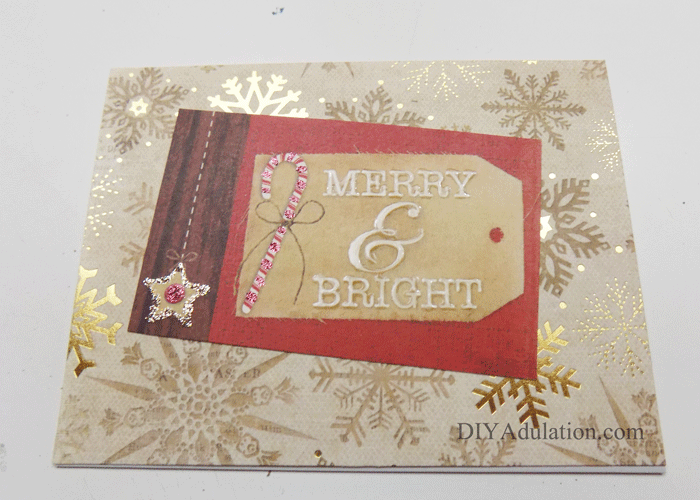
 

This easy handmade Merry & Bright Christmas card lets you save money on a DIY Christmas without devoting every free hour of your time to creating it.

Step 29

Attach your “Merry & Bright” tag to the front of your card at an angle as pictured.
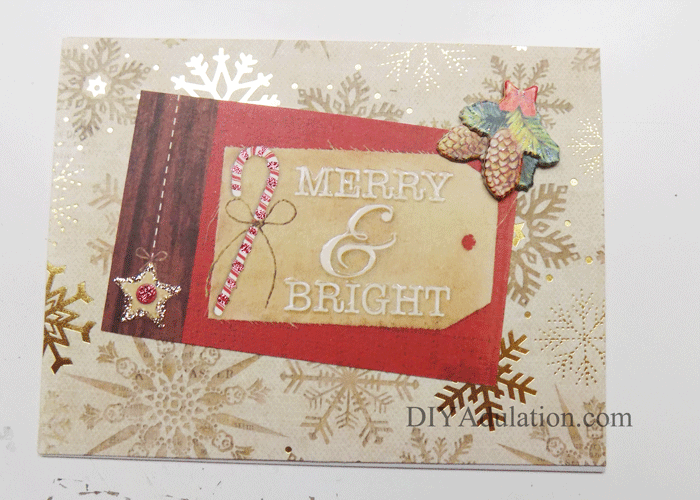
 

This easy handmade Merry & Bright Christmas card lets you save money on a DIY Christmas without devoting every free hour of your time to creating it.

Step 30

Next, add a 3-D Christmas embellishment to the top right corner of your “Merry & Bright” tag.
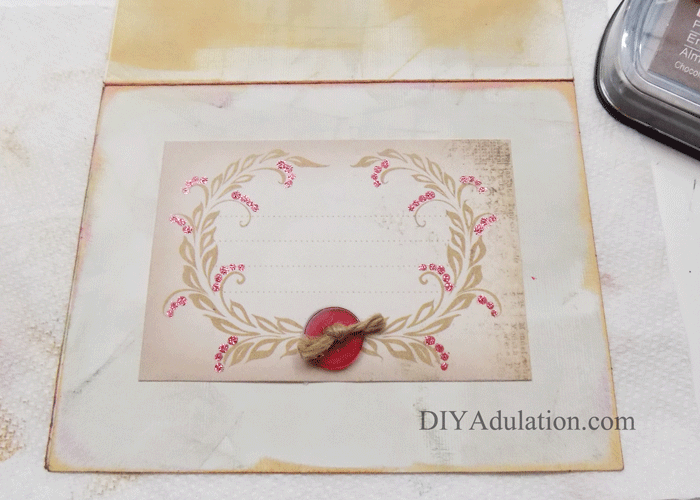
 

This easy handmade Merry & Bright Christmas card lets you save money on a DIY Christmas without devoting every free hour of your time to creating it.

Step 31

Lastly, attach your journal tag to the inside of your card, centered in the bottom.


This easy handmade Merry & Bright Christmas card lets you save money on a DIY Christmas without devoting every free hour of your time to creating it.

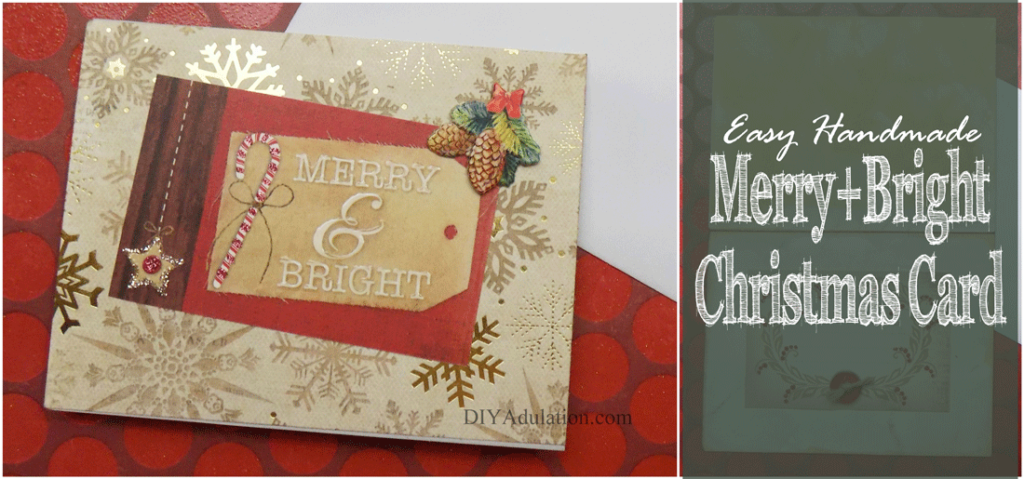
Once you have finished your easy handmade Merry & Bright Christmas card all that is left for you to do is fill out the journaling tag and mail it. Friends and family will delight at such a heartfelt card this year. You will delight at the low-impact is has on your holiday budget. If you haven’t set your Christmas budget for this year, check out Be a Christmas Gift Queen on a Budget. There you’ll find tips and a printable to rock your holiday on a budget.

See where I’m linking up!

Don’t Forget to Pin It!

This easy handmade Merry & Bright Christmas card lets you save money on a DIY Christmas without devoting every free hour of your time to creating it.