5 Tips to Dominate Your To-Do List

Are you drowning under a never-ending to-do list? Does it seem to grow larger each day and leave you feeling like you’ve gotten nothing accomplished at the end of the day? I have absolutely been there. Then I found a set of sticky notes in the Dollar Spot at Target that totally transformed my to-do list. They simply said “Top Five” followed by a colorful, numbered list. It was an “Ah-ha!” moment. Instead of trying to conquer a giant list of tasks, I started focusing on 5 each day. I am now dominating my to-do list and I’m sharing my 5 tips to dominate your to-do list, too!

Affiliate links may be used in this post. Ordering a product through these links may result in a commission. Read the full disclosure here.

Are you drowning under a never-ending to-do list? I am now dominating my to-do list and I’m sharing 5 tips to dominate your to-do list, too!


[bctt tweet=”Are you drowning under a never-ending to-do list? Here’s 5 tips to dominate your to-do list.” username=”diyadulation”]


Are you drowning under a never-ending to-do list? I am now dominating my to-do list and I’m sharing 5 tips to dominate your to-do list, too!

1. Use a Planner

It is so important to use a planner. To truly rock your to-do list, use a paper one. This forces you to physically write down your obligations and plans. This increases the retention of those plans in your memory. Find out how to best organize your planner to make it work extra hard for you.

Bonus:

  • Use a wall calendar, too. Write in important events and dates. This serves 2 purposes, one being that those events will be further imprinted on your memory. The second purpose is to help keep your family organized along with you. Instead of hearing, “Mom, what time’s my soccer game on Saturday?” your child can look at the family wall calendar.


Are you drowning under a never-ending to-do list? I am now dominating my to-do list and I’m sharing 5 tips to dominate your to-do list, too!

2. Create an Ongoing To-Do List

You also want to create an ongoing to-do list. This can be listed in your planner, on your phone, or in a separate notebook. Put it somewhere convenient that you will have easy access to. Any time that you think of something you need to do such as make a birthday gift or clean your coffee maker, put it on your list. Don’t limit yourself to small tasks. Include bigger ones like re-landscaping or decluttering your clothes. (The picture above is actually my ongoing post list because I keep my to-do list digitally.)


Are you drowning under a never-ending to-do list? I am now dominating my to-do list and I’m sharing 5 tips to dominate your to-do list, too!

3. Pick Your Top 5

This is THE most important thing you can do to dominate your to-do list! Each night before you go to bed pick the top 5 tasks that you want to complete the next day. Those tasks take priority over anything else on your to-do list. Even if the rest of your schedule has to change due to unexpected events popping up, do these 5 things.

Optional:

I try to choose my top 5 each day based on categories: cleaning, work, home, family, and self. This helps ensure that no area of my life falls between the cracks. A sample top 5 list using these categories is:

  • Cleaning: Wipe Down Baseboards
  • Work: Write Blog Post
  • Home: Make Freezer Meals
  • Family: Read with Kids
  • Self: 20 Minutes of Yoga


Are you drowning under a never-ending to-do list? I am now dominating my to-do list and I’m sharing 5 tips to dominate your to-do list, too!

4. Delegate

Stop trying to do it all. Enlist your family’s help where you can. Give your kids daily chores to help with the housework. Let your husband take over some of the weekly errands. This is one that I still struggle with. I think most moms do. We want to believe that we can do it all but we can’t. Even single mothers can’t do it all. Enlisting help from friends and family is necessary to be at your best and get everything on your list done.


Are you drowning under a never-ending to-do list? I am now dominating my to-do list and I’m sharing 5 tips to dominate your to-do list, too!

5. Start with the Worst

Always start on your to-do list with the task you dread the most. This is fluid, meaning it will change from day-to-day and also as you change and grow. If you are just starting to get in shape, exercise will be a dreaded task but as you become fit, you will start looking forward to it. Dishes are more likely to be dreaded on the day you are throwing a birthday party than they are on a regular day. Starting with the worst task on your list each day make the rest of your to-do list easier.


Are you drowning under a never-ending to-do list? I am now dominating my to-do list and I’m sharing 5 tips to dominate your to-do list, too!

Now you can dominate your to-do list every single day. Even better is that by sticking to your top 5 like glue, you will see that ongoing to-do list getting shorter. That always creates an awesome sense of accomplishment. If you have larger goals that you need help tackling you can find that help right here. You’ll get the tools you need to conquer every goal you set by breaking it down into smaller, more-manageable goals.

See where I’m linking up!

Hanging Toothbrush Organizers from Thrifted Frames

There is no law stating that organization has to be ugly or hidden. In fact, the more aesthetically pleasing your systems are the higher likelihood that you will use them. If your budget limits you from buying the Pottery Barn organizing systems of your dreams, take heart. These hanging toothbrush organizers from thrifted frames are the perfect budget solution. This month I’ve paired up again with a group of awesome and creative ladies to bring you the monthly Thrift Store Decor Upcycle Challenge. We create a new home decor piece from an item(s) we’ve found at a thrift store, yard sale, resale shop etc. There is no budget or specific theme so we are free to let our creativity run wild! 

Affiliate links may be used in this post. Ordering a product through these links may result in a commission. Read the full disclosure here.


Thrift Store DecorUpcycle Challenge 2

Amanda | The Kolb Corner      Chelc| Inside the Fox Den     
Erlene | My Pinterventures     Kim | Made in a Day     Sara | Twelve on Main    
Debra | Shoppe No. 5      Shirley | Intelligent Domestications    
Marie | DIY Adulation     Lindsay | Crazy Organized   Michelle | Our Crafty Mom    
Julie | Live From Julie’s House     Dru | Polka Dot Poplars    
Maureen | Red Cottage Chronicles     Pili | Sweet Things        
Colleen | Life on Kaydeross Creek     Ann | Duct Tape and Denim     Sherry | Savvy Apron   

You can also follow our board on Pinterest for more upcycled decor inspiration!


If you can't afford the PB organizing systems of your dreams, take heart. These toothbrush organizers from thrifted frames are the perfect budget solution.


[bctt tweet=”Find out how to make these toothbrush organizers from thrifted frames!” username=”diyadulation”]


If you can't afford the PB organizing systems of your dreams, take heart. These toothbrush organizers from thrifted frames are the perfect budget solution.

Materials


If you can't afford the PB organizing systems of your dreams, take heart. These toothbrush organizers from thrifted frames are the perfect budget solution.

Step 1

First, clean and disassemble your frames. Sand them if necessary.

Note:

  • I chose not to sand mine because there was no lacquer on the wood. If yours do, I recommend sanding.


If you can't afford the PB organizing systems of your dreams, take heart. These toothbrush organizers from thrifted frames are the perfect budget solution.

Step 2

Set up a protected surface on which to work and paint your first coat of blue paint on your frames.

Step 3

Set the frames off to the side to dry. Next, clean the glass panes removed from the frames if you are using them.

Note:

  • I didn’t use the glass but, in the interest of full transparency, I had originally planned to. Unfortunately, I am the clumsiest woman alive. I tripped on the extremely flat floor of my office and busted one of the panes on the back of my desk chair. Since I didn’t have a replacement, I was forced to work with what I had. I still love how these turned out despite the absence of glass.


If you can't afford the PB organizing systems of your dreams, take heart. These toothbrush organizers from thrifted frames are the perfect budget solution.

If you can't afford the PB organizing systems of your dreams, take heart. These toothbrush organizers from thrifted frames are the perfect budget solution.

Step 4

Trace your cardboard inserts on your yellow cardstock.

Tip:

  • Trace each insert individually. Although both frames are 5×7, the fact that they are thrifted can mean size variations. Make your life easier by tracing each insert separately from the start.


If you can't afford the PB organizing systems of your dreams, take heart. These toothbrush organizers from thrifted frames are the perfect budget solution.

Step 5

Cut your traced images out of the cardstock.

Note:

  • If using the glass panes, skip to step 10 now.


If you can't afford the PB organizing systems of your dreams, take heart. These toothbrush organizers from thrifted frames are the perfect budget solution.

Step 6

Place a coat of Mod Podge onto your cardboard insert.


If you can't afford the PB organizing systems of your dreams, take heart. These toothbrush organizers from thrifted frames are the perfect budget solution.

Step 7

Immediately set your matching yellow cut-out on top.


If you can't afford the PB organizing systems of your dreams, take heart. These toothbrush organizers from thrifted frames are the perfect budget solution.

Step 8

Cover the top of the paper with another coat of Mod Podge to seal it. Allow it to dry.


If you can't afford the PB organizing systems of your dreams, take heart. These toothbrush organizers from thrifted frames are the perfect budget solution.

Step 9

Repeat steps 6 through 8 for your second cardboard insert.


If you can't afford the PB organizing systems of your dreams, take heart. These toothbrush organizers from thrifted frames are the perfect budget solution.

Step 10

Next, put a second coat of paint on your frames. Allow the paint to dry completely.


If you can't afford the PB organizing systems of your dreams, take heart. These toothbrush organizers from thrifted frames are the perfect budget solution.

If you can't afford the PB organizing systems of your dreams, take heart. These toothbrush organizers from thrifted frames are the perfect budget solution.

Step 11

Once your frames (and inserts) are dry reassemble them.


If you can't afford the PB organizing systems of your dreams, take heart. These toothbrush organizers from thrifted frames are the perfect budget solution.

Step 12

Find the seam on one votive holder and run a line of hot glue down it.


Step 13

Next, attach the votive holder to the bottom center of the inside of your frame (where the picture would be).

Tips:

  • Working fast will allow you to slide the votive holder so that it is pressed against the inside bottom lip of the frame.
  • If you use electric toothbrushes instead of manual, use E6000 in place of the hot glue. This will create a stronger hold, allowing it to support the extra weight. Make sure that you allow the E6000 to dry for 24 hours before using your frames.


If you can't afford the PB organizing systems of your dreams, take heart. These toothbrush organizers from thrifted frames are the perfect budget solution.

Step 14

Repeat step 13 with your second frame. Once every element is completely dry, hang on your bathroom wall and enjoy!


Can't afford the PB organizing systems of your dreams? Take heart. Hanging toothbrush organizers from thrifted frames are the perfect budget solution.

If you’re still looking for bathroom organization, check out this awesome upcycled bathroom organizer. Don’t forget to check out my friends before you go.


Be sure to check out all of the other creative upcycle projects my fellow bloggers have come up with!


Organize Personal Information Now

There is nothing more frustrating than needing an important document and not being able to find it. If you don’t have your information organized chances are this is a frustration you deal with frequently. When you are enrolling kids in school, getting a passport, or doing a myriad of other things you need your personal and medical documents. You also want to make sure that you are always prepared for unexpected emergencies. That is why it is so important for you to organize personal information now and these tips will help you do just that.

Affiliate links may be used in this post. Ordering a product through these links may result in a commission. Read the full disclosure here.


It is so important to organize personal information now. You will always know exactly where the information you need is located when you follow these steps.


[bctt tweet=”Organize personal information now and know exactly where the information you need is located! #organize” username=”diyadulation”]


It is so important to organize personal information now. You will always know exactly where the information you need is located when you follow these steps.

Pick Your Storage for organizing your personal information

This is the easiest part of organizing your important information. Choose how you are going to store. You can use a binder for this but you may have to have multiple, itemized binders to hold all of the information you need to store.

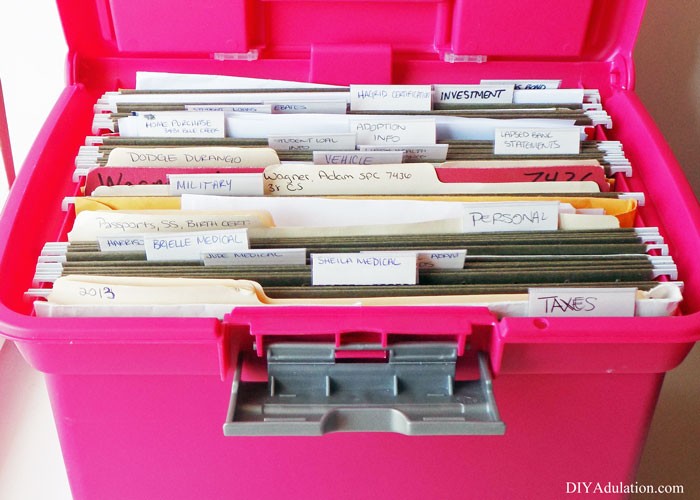
You can also use a file box, which is what I now use. Not only is this portable, it is also helps keep your paperwork under control because you only have a limited space in which to store it.

I don’t recommend using a large file cabinet for your staple documents (like birth certificates) because of portability. If you watch Agents of the Shield, picture when they make a “large file transfer” and toss the huge file cabinet out the window. This is great for television but not so much for family emergencies.

If you want to use a file cabinet for storage be sure to only store paperwork you wouldn’t need immediately following an emergency in it and use something smaller to store the emergency information so you can grab and go. To recap, here are the 3 common storage options:


It is so important to organize personal information now. You will always know exactly where the information you need is located when you follow these steps.

What to Include

The information and items you want to include will vary by individual families. However, everything you need to store will fall into 4 basic categories: personal, career, home/vehicle, and financial. To help you out, here are some basic examples of what to include broken down by category.

Personal

Career

Home/Vehicle

Financial


It is so important to organize personal information now. You will always know exactly where the information you need is located when you follow these steps.

Safety Tips for Organizing personal information

It is always a good idea to back up your information. Scan in copies of birth certificates, social security cards, and other personal documents. You also want to keep digital copies of your tax returns and military orders. In addition to saving digital copies here are a couple more tips for keeping your information safe:

  1. Keep additional copies of birth certificates in a secondary safe place in the event of an emergency or natural disaster. Ask a parent or trusted family member to store the copies for you or rent a safe deposit box at your bank.
  2. You should never store your social security card in your wallet. A thief will have everything he or she needs to steal your identity between your driver’s license and social security card.


It is so important to organize personal information now. You will always know exactly where the information you need is located when you follow these steps.

Know exactly where the information you need is located when you follow the steps above. Take the time to organize your information now and you will be prepared with the paperwork your kids will need for back to school. Make a hectic time of year a little easier for your family.

In addition to that, you have also prepared for multiple emergencies by storing them in something you can carry out the door and by making it easy to procure replacements quickly when needed. Get more organizing tips before you go with Organizing Your Life A to Z.

See where I’m linking up!

Don’t Forget to Pin It!It is so important to organize personal information now. You will always know exactly where the information you need is located when you follow these steps.


More Organizing Tips You’ll Love: