Easy DIY Jingle Bell Button Stockings

Do you spend hours on Pinterest drooling over those gorgeous Christmas mantles? Something that all of those mantles have in common is matching stockings. It sounds strange but I have always wanted gorgeous matching stockings for our family. I create these beautiful mantle scenes (even before I had an actual mantle) but then have to hang these hodge-podge stockings that don’t match at all. It was super sad for the decorator in me. This year, with the help of Oriental Trading, we have 5 beautiful, not-to-mention matching, stockings that match our new Christmas décor. Find out how to make your own DIY jingle bell button stockings and finally get that Pinterest-Perfect Christmas mantle.

This is a sponsored post written on behalf on Oriental Trading. In addition, affiliate links are used on this site. Ordering a product through these links may result in a commission. Read the full disclosure here.

A key component of a gorgeous Christmas mantle is matching stockings! Find out how to make your own DIY jingle bell button stockings with this tutorial! #ad


[bctt tweet=”Find out how to make your own #DIY jingle bell button stockings for your Christmas mantle! #ad” username=”diyadulation”]


Materials


A key component of a gorgeous Christmas mantle is matching stockings! Find out how to make your own DIY jingle bell button stockings with this tutorial! #ad

Step 1

Remove all of your stockings from the packaging and stretch/fluff them gently.


A key component of a gorgeous Christmas mantle is matching stockings! Find out how to make your own DIY jingle bell button stockings with this tutorial! #ad

Step 2

Next, do a trial layout of your buttons on the stockings.

Tip:

  • If you want to do a different design than the one I used, I recommend taking a picture of the design for reference.


A key component of a gorgeous Christmas mantle is matching stockings! Find out how to make your own DIY jingle bell button stockings with this tutorial! #ad

Step 3

Start attaching your buttons with Liquid Stitch.

Tip:

  • Begin in the center of your design and work your way outward.


A key component of a gorgeous Christmas mantle is matching stockings! Find out how to make your own DIY jingle bell button stockings with this tutorial! #ad

Step 4

Continue gluing your buttons until you have finished your design.


A key component of a gorgeous Christmas mantle is matching stockings! Find out how to make your own DIY jingle bell button stockings with this tutorial! #ad

Step 5

Next, add button designs to the rest of your stockings.


A key component of a gorgeous Christmas mantle is matching stockings! Find out how to make your own DIY jingle bell button stockings with this tutorial! #ad

A key component of a gorgeous Christmas mantle is matching stockings! Find out how to make your own DIY jingle bell button stockings with this tutorial! #ad

Step 6

Set your stockings aside on a flat surface to dry for 24 hours.

Step 7

Next, cut the white cord from your set into 5 equal pieces.


A key component of a gorgeous Christmas mantle is matching stockings! Find out how to make your own DIY jingle bell button stockings with this tutorial! #ad

Step 8

String 5 medium-sized bells onto your white cord in the following order:

Green – Gold – Red – Gold – Green


A key component of a gorgeous Christmas mantle is matching stockings! Find out how to make your own DIY jingle bell button stockings with this tutorial! #ad

Step 9

Repeat step 8 for each cord.


A key component of a gorgeous Christmas mantle is matching stockings! Find out how to make your own DIY jingle bell button stockings with this tutorial! #ad

Step 10

After your stockings have dried completely, sew the left end of one cord to the lining of the stocking lip.


A key component of a gorgeous Christmas mantle is matching stockings! Find out how to make your own DIY jingle bell button stockings with this tutorial! #ad

Step 11

Then slide your green bell over.


A key component of a gorgeous Christmas mantle is matching stockings! Find out how to make your own DIY jingle bell button stockings with this tutorial! #ad

Step 12

Sew a second stitch an inch to the right of the first stitch to create a loop.


A key component of a gorgeous Christmas mantle is matching stockings! Find out how to make your own DIY jingle bell button stockings with this tutorial! #ad

Step 13

Continue sliding bells and sewing loops until all of the bells and cording are attached to the stocking lip.

Step 14

Lastly, sew the rest of your bell-strung cords to your remaining stockings.


A key component of a gorgeous Christmas mantle is matching stockings! Find out how to make your own DIY jingle bell button stockings with this tutorial! #ad

A key component of a gorgeous Christmas mantle is matching stockings! Find out how to make your own DIY jingle bell button stockings with this tutorial! #ad

A key component of a gorgeous Christmas mantle is matching stockings! Find out how to make your own DIY jingle bell button stockings with this tutorial! #ad

A key component of a gorgeous Christmas mantle is matching stockings! Find out how to make your own DIY jingle bell button stockings with this tutorial! #ad

Aren’t these stockings absolutely adorable? They also have the added bonus of a bell alarm. If your kids mess with these DIY jingle bell button stockings, you will hear the tinkle of the bells. I’ve already busted my kids twice and there isn’t even anything in there! Next week I’ll share the rest of our new Christmas décor but for now you can check out one of the newest ornaments at DIY golden stained glass ornament. Don’t forget to check out Oriental Trading for all of your Christmas supplies!

See where I’m linking up!

Don’t Forget to Pin It!

A key component of a gorgeous Christmas mantle is matching stockings! Find out how to make your own DIY jingle bell button stockings with this tutorial! #ad

DIY Golden Stained Glass Ornament

Last week, on Easy Homemade Merry & Bright Christmas Card, I told you I would be sharing more easy Christmas projects throughout the season. Today it is time for another one! This year I decided to change up our Christmas décor after 10 years of the same tree and ornaments. That means we need all new ornaments and, of course, it also means loads of new DIY tutorials for you. The first of these is this DIY golden stained glass ornament. It is incredibly easy to make and looks gorgeous on the new tree. Continue reading to find out how to make this awesome new ornament.

Affiliate links may be used in this post. Ordering a product through these links may result in a commission at no extra cost to you. Read the full disclosure here.

Do you need to freshen up your Christmas decor this year or looking to change your style? Make this DIY golden stained glass ornament to do just that!


[bctt tweet=”Freshen up your Christmas decor with this #DIY golden #stainedglassornament!” username=”diyadulation”]


Golden Stained Glass Ornament Materials

Step 1

Remove your ornament from any packaging.


Do you need to freshen up your Christmas decor this year or looking to change your style? Make this DIY golden stained glass ornament to do just that!

Step 2

Next, cut the hanging ribbon off of your ornament.


Do you need to freshen up your Christmas decor this year or looking to change your style? Make this DIY golden stained glass ornament to do just that!

Step 3

Then paint the front of your ornament white.

Step 4

Let the paint dry before moving on.


Do you need to freshen up your Christmas decor this year or looking to change your style? Make this DIY golden stained glass ornament to do just that!

Step 5

After the white paint dries, paint the inside details of the bell maroon and the areas between the ribbons red.

Step 6

Set your ornament aside and let the paint dry.


Do you need to freshen up your Christmas decor this year or looking to change your style? Make this DIY golden stained glass ornament to do just that!

Step 7

Next, paint all of the raised areas off your ornament gold. See the picture above for reference.

Step 8

Wait for the paint to dry completely before moving on.


Do you need to freshen up your Christmas decor this year or looking to change your style? Make this DIY golden stained glass ornament to do just that!

Step 9

After the paint dries, flip your ornament over.


Do you need to freshen up your Christmas decor this year or looking to change your style? Make this DIY golden stained glass ornament to do just that!

Step 10

Then paint the entire back gold.

Step 11

Again, let the paint dry.


Do you need to freshen up your Christmas decor this year or looking to change your style? Make this DIY golden stained glass ornament to do just that!

Step 12

Flip your ornament back over and fill in the indentations with Glossy Accents.

Step 13

Let your ornament set for 24 hours to dry.


Do you need to freshen up your Christmas decor this year or looking to change your style? Make this DIY golden stained glass ornament to do just that!

Do you need to freshen up your Christmas decor this year or looking to change your style? Make this DIY golden stained glass ornament to do just that!

Step 14

Cut a length of red cord to create the hanger for your ornament.


Do you need to freshen up your Christmas decor this year or looking to change your style? Make this DIY golden stained glass ornament to do just that!

Step 15

Next, thread the cord through the eye of the ornament and knot the ends together.


Do you need to freshen up your Christmas decor this year or looking to change your style? Make this DIY golden stained glass ornament to do just that!

Step 16

Lastly, trim the excess cord from the end of your knot.


Do you need to freshen up your Christmas decor this year or looking to change your style? Make this DIY golden stained glass ornament to do just that!

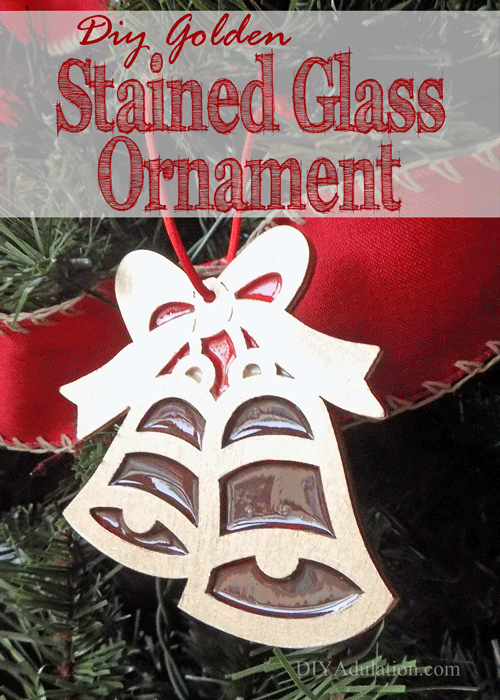
This DIY golden stained glass ornament is a beautiful addition to your Christmas tree this year. I know there is a lot of drying time but you don’t want to rush it. The end result is absolutely worth it. This would look gorgeous if you switched the colors to blue and silver as well. You may see an update with a variation on the colors in the near future. If you want more awesome DIY ornaments, check out 12 Handmade Christmas Ornaments. There you will find DIY ornaments to fit any tree style. Come back on December 1st for the start of this year’s 12 Days of Christmas Blog Hop and more amazing DIY ornament tutorials.

See where I’m linking up!

Don’t Forget to Pin It!

Do you need to freshen up your Christmas decor this year or looking to change your style? Make this DIY golden stained glass ornament to do just that!

12 Beautiful + Unique Holiday Wreaths

It’s day 12 of our 12 Days of Christmas 2016 Blog Hop! We are ending the blog hop with this amazing round-up of 12 Beautiful + Unique Holiday Wreaths that you can at home!

Join us for the 12 Days of Christmas Ideas Series along with eleven more talented bloggers. We’ve rounded up the best of the best Christmas ideas to make your holiday season more festive and fun.

Every day December 1-12th we will be sharing a new collection of Christmas Ideas rounded up from our best blogging friends around the web. That’s a total of 144 awesome Christmas Ideas to make your holiday season easier and more fun!

Some of our topics include Decor, DIY, Organization, Food, Games and so much more. We don’t want to spoil the fun by telling you too much. We want you to be surprised! Now is the perfect time to subscribe so you’ll be the first to know!

[bctt tweet=”Don’t miss this amazing round-up of 12 DIY Beautiful + Unique Holiday Wreaths! #diy #12daysofChristmas” username=”diyadulation”]


Meet The Hostesses

12-days-of-christmas-2016-hostess-graphic

Shirley of Intelligent Domestications ~ Erlene of My Pinterventures ~ Lindsay of Crazy Organized

Michelle of Our Crafty Mom ~ Stephanie of The Tip Toe Fairy ~ Lorelai of Life With Lorelai

Katie of The Organized Dream ~ Amanda of The Kolb Corner ~ Marie of DIY Adulation

Megan of C’mon Get Crafty ~ Sara of Twelve On Main ~ Kim of Made in a Day

Now for my roundup of Holiday Inspiration!


14906972_10207023223675415_5884091171050681403_n


12 Beautiful + Unique Holiday Wreaths


12-beautiful-unique-holiday-wreaths-madeinaday-com

Cupcakes & Crinoline • Red & White Christmas Wreath

My Pinterventures • Santa Gingerbread Man Wreath

Intelligent Domestications • Poinsettia Christmas Wreath

Designing and Diapers • Buffalo Check Wreath

Our House Now a Home • Ceiling Hanging Christmas Wreath

Atta Girl Says • Jeweled Christmas Wreath

Two Purple Couches • DIY Ornament Wreath

PMQ For TWO • DIY Starburst Wreath

Made in a Day • Winter Woodland Holiday Wreath

Carolyn’s Home Work • Celebration Holiday Wreath

Inspired by Charm • DIY Cookie Cutter Wreath

PMQ For TWO DIY • Minty & Cool Holiday Wreath

Thanks so much for joining us for the 12 Days of Christmas Blog Hop! If you missed any of our fun collections just see the links below!

Happy Holidays!!!