Easy and Gorgeous DIY Spring Wreath

Spring is such an exciting time of year. It brings more sunshine, new life, and promises hope. It also signals that summer is on its way which personally fills me with endless excitement. While it hasn’t quite peeked its head out yet, spring is right around the corner. You are probably, like me, catching the spring bug that motivates you to start cleaning out your home and planning your garden. To welcome the season and all of the wonderful promises that come along with it I’m showing you how to make this gorgeous DIY spring wreath today.

Affiliate links may be used in this post. Ordering a product through these links may result in a commission. Read the full disclosure here.


Celebrate the season with this gorgeous DIY spring wreath. You’ll love having this bright and cheery wreath welcome you every day during this spring.

[bctt tweet=”Celebrate the season with this gorgeous DIY spring wreath! #diy #springwreath”]

Spring is such an exciting time of year. It brings more sunshine, new life, and promises hope. It also signals that summer is on its way which personally fills me with endless excitement.

While it hasn’t quite peeked its head out yet, spring is right around the corner. You are probably, like me, catching the spring bug that motivates you to start cleaning out your home and planning your garden.

To welcome the season and all of the wonderful promises that come along with it I’m showing you how to make this gorgeous DIY spring wreath today.

DIY Spring Wreath Materials

Step 1

Choose 3 of your floral stems to being forming your wreath.

Note:


Celebrate the season with this gorgeous DIY spring wreath. You’ll love having this bright and cheery wreath welcome you every day during this spring.

Step 2

Find the thickest stem in one set of florals and attach the bottom stem of a second set to it using your floral wire. Next, attach more floral wire about every 3” or so to ensure it stays together as you form them into a circle.

Tip:


Celebrate the season with this gorgeous DIY spring wreath. You’ll love having this bright and cheery wreath welcome you every day during this spring.

Step 3

Repeat step 2 with the third set of florals only attaching it to the second set of florals instead of the first.


Celebrate the season with this gorgeous DIY spring wreath. You’ll love having this bright and cheery wreath welcome you every day during this spring.

Step 4

Complete forming your circles by repeating step 2 again, this time attaching the bottom stem of the first set of florals to the thickest stem on the third.


Celebrate the season with this gorgeous DIY spring wreath. You’ll love having this bright and cheery wreath welcome you every day during this spring.

Celebrate the season with this gorgeous DIY spring wreath. You’ll love having this bright and cheery wreath welcome you every day during this spring.

Step 5

When you’ve finished forming your circle it will look like the above photo with random flowers hanging off. Clean it up a little by “pinning” those flowers to the circle using your floral wire.

Step 6

Next, begin adding in your remaining floral stems to fill out the rest of your wreath. Use the existing attached floral wire to secure and only add more wire where needed.

Tip:


Celebrate the season with this gorgeous DIY spring wreath. You’ll love having this bright and cheery wreath welcome you every day during this spring.

Step 7

Cut a length of ribbon and place it around your wreath with the needs together at the top.

Tip:


Celebrate the season with this gorgeous DIY spring wreath. You’ll love having this bright and cheery wreath welcome you every day during this spring.

Step 8

Knot the ends together but leave long pieces free, out of the knot.


Celebrate the season with this gorgeous DIY spring wreath. You’ll love having this bright and cheery wreath welcome you every day during this spring.

Step 9

Rotate the ribbon so that the knot is at the wreath and tie your loose ends into a bow. Next hang up your wreath and enjoy.


Celebrate the season with this gorgeous DIY spring wreath. You’ll love having this bright and cheery wreath welcome you every day during this spring.

Celebrate the season with this gorgeous DIY spring wreath. You’ll love having this bright and cheery wreath welcome you every day during this spring.

Celebrate the season with this gorgeous DIY spring wreath. You’ll love having this bright and cheery wreath welcome you every day during this spring.

Celebrate the season with this gorgeous DIY spring wreath. You’ll love having this bright and cheery wreath welcome you every day during this spring.

Celebrate the season with this gorgeous DIY spring wreath. You’ll love having this bright and cheery wreath welcome you every day during this spring.

If you aren’t yet feeling motivated to tackle your spring potential hopefully making this gorgeous DIY spring wreath will help. Wave good-bye to winter with me (perhaps with Barbara Streisand singing “So Long Dearie” joyously in your head) and get psyched for the upcoming season. You’ll love having this bright and cheery wreath welcome you every day during this spring.

See where I’m linking up!

Don’t Forget to Pin It!

Dollar Store St Pats Party Hats + a Blog Hop

I’m starting to develop an obsession with creating dollar store crafts. I roam around the store and become flooded with tons of fantastic ideas for all of kinds of projects. I love the creativity the items inspire. That is why I made this dollar store St. Patrick’s wreath and why I’m sharing these fantastic dollar store St Pats party hats today!

Affiliate links may be used in this post. Ordering a product through these links may result in a commission at no extra cost to you. Read the full disclosure here.

Find out how to make these dollar store St Pats party hats along with 15 other budget St. Patrick's ideas!


Thank you for joining me for this St. Patrick’s Day Blog Hop! We’ve got 16 crazy talented bloggers sharing St. Patrick’s Day crafts – on a budget! Each blogger was given a budget of no more than $10 and challenged to create a St. Patrick’s Day craft using items from the dollar store or dollar section of their local stores.

Let’s meet these crafty bloggers!

Megan at C’mon Get Crafty

Erlene at My Pinterventures

Victoria at Dazzle While Frazzled

Kim at Made in a Day

Lyn at MidMichiganMom

Robin at Redo It Yourself Inspirations

Karen at Garden Chick

Marie at DIY Adulation

Terri at Our Good Life

Sherry at Olives-N-Okra

Raquel at Organized Island

Michelle at Our Crafty Mom

Betsy at Happily Ever After, Etc

Tammy at One More Time

Molly at Just a Little Creativity

Rebekah at Crayons in My Camera Bag


Dollar Store St Pats Party Hats

Find out how to make these dollar store St Pats party hats along with 15 other budget St. Patrick's ideas!


[bctt tweet=”Dollar store St Pats party hats along with 16 other budget St. Patrick’s ideas! #stpatricksday #budgetcrafts”]

Materials


Find out how to make these dollar store St Pats party hats along with 15 other budget St. Patrick's ideas!

Find out how to make these dollar store St Pats party hats along with 15 other budget St. Patrick's ideas!

Step 1

Remove staples and elastic from your plastic hats.


Find out how to make these dollar store St Pats party hats along with 15 other budget St. Patrick's ideas!

Step 2 (Optional)

Cover the existing sticker on the hat with green glitter tape.


Find out how to make these dollar store St Pats party hats along with 15 other budget St. Patrick's ideas!

Step 3

Remove the flowers from the stems and attach a flower to one side of your hat with hot glue.


Find out how to make these dollar store St Pats party hats along with 15 other budget St. Patrick's ideas!

Step 4

Cover up your glue spot by pushing back one of the petals to the hot glue. (Add more glue if it has already cooled.)


Find out how to make these dollar store St Pats party hats along with 15 other budget St. Patrick's ideas!

Find out how to make these dollar store St Pats party hats along with 15 other budget St. Patrick's ideas!

Step 5

Spread your petals apart and glue a gold coin to the center.


Find out how to make these dollar store St Pats party hats along with 15 other budget St. Patrick's ideas!

Step 6

Measure the placement for your glue by holding your hat to your headband where you would like it to sit and marking the spots with a marker or pencil.


Find out how to make these dollar store St Pats party hats along with 15 other budget St. Patrick's ideas!

Step 7

Place hot glue on the marks on your headband and gently press you hat to it.

Caution: The hot glue can melt the hat so I recommend letting it cool slightly before attaching your hat.


Find out how to make these dollar store St Pats party hats along with 15 other budget St. Patrick's ideas!

Find out how to make these dollar store St Pats party hats along with 15 other budget St. Patrick's ideas!

If you buy the same supplies I did at the dollar store, you can make 4-5 of these party hats for $4.00 in supplies. They are so super cute and you can seriously whip all of them up in about 20 minutes. Before you go, be sure to check out the other awesome projects below!

Check out the rest of the budget crafts!

Find out how to make these dollar store St Pats party hats along with 15 other budget St. Patrick's ideas!


  1. C’mon Get Crafty
  2. My Pinterventures
  3. Dazzle While Frazzled
  4. Made in a Day
  5. MidMichiganMom
  6. Redo It Yourself Inspirations
  7. Garden Chick
  8. DIY Adulation
  9. Our Good Life
  10. Olives-N-Okra
  11. Organized Island
  12. Our Crafty Mom
  13. Happily Ever After, Etc
  14. One More Time
  15. Just a Little Creativity
  16. Crayons in My Camera Bag

Do you have a budget friendly St. Patrick’s Day craft to share? Link up your project below and be seen on all 16 blogs!


Dollar Store St. Patrick’s Wreath

Tomorrow there will be a link up full of dollar store St. Patrick’s projects (including my tutorial for awesome party headbands) but today I want to show you how to make this super easy and inexpensive dollar store St. Patrick’s wreath.

Affiliate links may be used in this post. Ordering a product through these links may result in a commission at no extra cost to you. Read the full disclosure here.

Holiday decor doesn't have to break the bank. Find out how to make this awesome dollar store St. Patrick's wreath for the change in your couch!


[bctt tweet=”Make this awesome dollar store St. Patrick’s wreath for the change in your couch! #stpats #wreath”]

St. Patrick’s Day celebrations are always a blast! 10 years ago I went to my first party (that wasn’t in a bar) put on by some Irish friends of my in-laws. They went all out with food, drinks, and festivities and it was an absolute blast!

They also made THE BEST corned beef I have ever tasted, but that is another story for another post. Since then, I have thoroughly enjoyed and looked forward to the holiday, including decorating for it.

Dollar Store St. Patrick’s Wreath Materials


Step 1

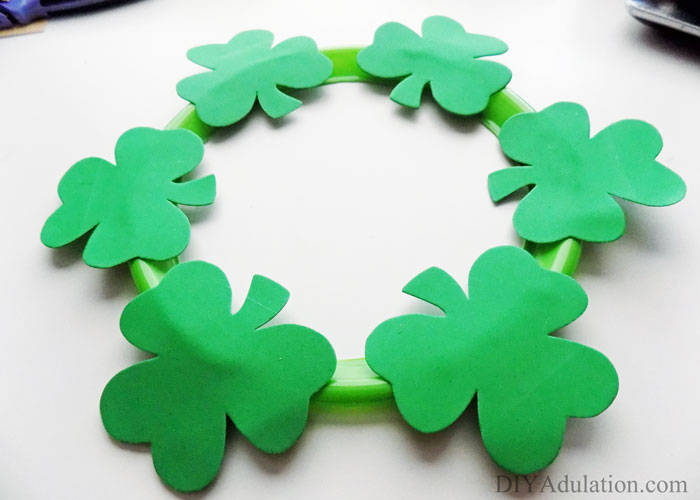
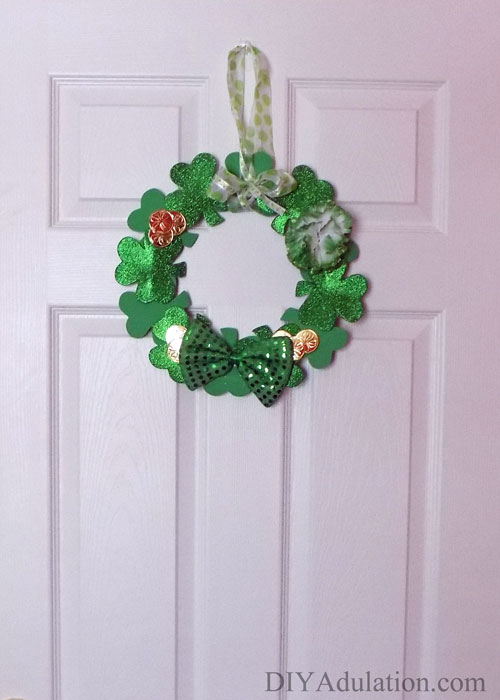
Cut the center out of your plastic plate using your box cutter. Be sure to do this on a cutting mat to protect your surface.


Holiday decor doesn't have to break the bank. Find out how to make this awesome dollar store St. Patrick's wreath for the change in your couch!

Step 2

Sand the inside edges so that there are no sharp edges. After sanding, wipe your plate down with a damp cloth or paper towel to remove any excess dust.


Holiday decor doesn't have to break the bank. Find out how to make this awesome dollar store St. Patrick's wreath for the change in your couch!

Step 3

Glue your non-glittery shamrocks to your plate with hot glue. Try to space them evenly around your entire wreath.

Step 4

Fill in the gaps by hot gluing the remaining glittery shamrocks in those gaps.


Holiday decor doesn't have to break the bank. Find out how to make this awesome dollar store St. Patrick's wreath for the change in your couch!

Step 5

Next, glue one carnation to the right side of the wreath, slightly above the center, with the stem facing the top of the wreath.


Holiday decor doesn't have to break the bank. Find out how to make this awesome dollar store St. Patrick's wreath for the change in your couch!

Step 6

Glue your second carnation with the stem facing the stem of the first one. Once in place, you shouldn’t be able to see any of your stems.


Holiday decor doesn't have to break the bank. Find out how to make this awesome dollar store St. Patrick's wreath for the change in your couch!

Step 7

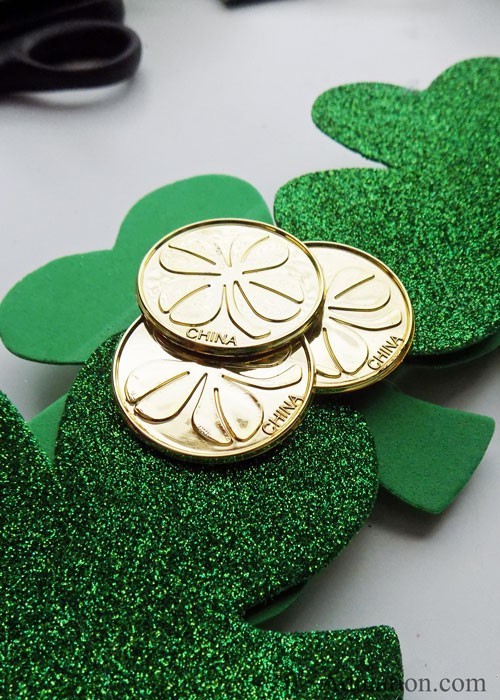
Glue 3 of your gold coins on the left side of your wreath directly across from your carnations.


Step 8

Glue 6 more of your gold coins to the bottom of your wreath in groups of three. Space the two groups roughly the width of your bowtie apart.


Holiday decor doesn't have to break the bank. Find out how to make this awesome dollar store St. Patrick's wreath for the change in your couch!

Step 9

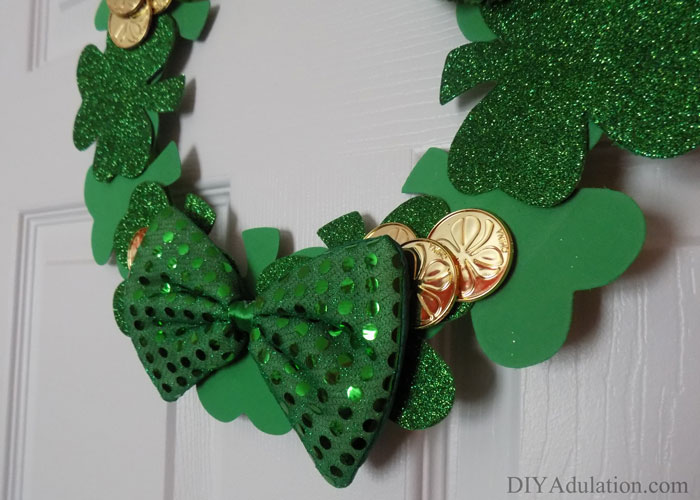
Remove the elastic from your bow tie with scissors.


Holiday decor doesn't have to break the bank. Find out how to make this awesome dollar store St. Patrick's wreath for the change in your couch!

Step 10

Glue your bow tie to the bottom center of your wreath (between your groups of gold coins).


Holiday decor doesn't have to break the bank. Find out how to make this awesome dollar store St. Patrick's wreath for the change in your couch!

Step 11

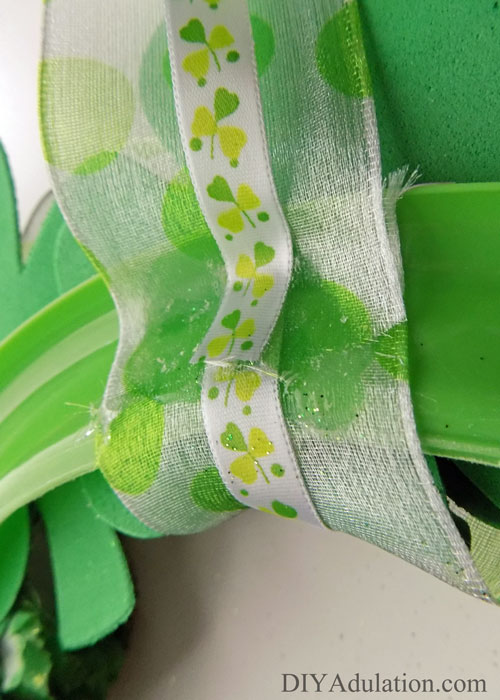
Glue the ends of your ribbon to the back of the top of your wreath. Make sure the ribbon goes around the front of your wreath as well, before gluing the second end. See the picture for reference.


Holiday decor doesn't have to break the bank. Find out how to make this awesome dollar store St. Patrick's wreath for the change in your couch!

Step 12

Flip your wreath back over and tie a bow in the front with your hanging ribbon.


Holiday decor doesn't have to break the bank. Find out how to make this awesome dollar store St. Patrick's wreath for the change in your couch!

This wreath turned out so pretty! It is also crazy light (which is why you can get away with just hot gluing the ribbon hanger). The best part is that it only costs about $2.00 to make:

  • Plastic Plates (4/$1): $.25
  • Pack of Foam Shamrocks: $1.00
  • Carnations (4 flowers/$1): $.50
  • Gold Coins (30/$1): $.30
  • Total: $2.05

I already owned the ribbon but even if you have to buy it, that still makes this dollar store St. Patrick’s wreath totally inexpensive! Decorating for the holidays doesn’t have to cost a lot. You can be festive and frugal. Don’t forget to come back tomorrow for even more ideas for dollar store St. Patrick’s décor!


Holiday decor doesn't have to break the bank. Find out how to make this awesome dollar store St. Patrick's wreath for the change in your couch!

See where I’m linking up!

Don’t Forget to Pin It!