Fun and Colorful Giant Candy Ornaments

Are you ready to decorate an awesomely over-the-top candy tree for Christmas? If so, you’re going to love this project for day 7 of the 12 Days of Christmas Blog Hop! Find out how easy it is to make these super fun and colorful giant candy ornaments with the easy tutorial below.

This post is sponsored by DecoArt. All ideas and opinions are my own. In addition, affiliate links may be used in this post. Ordering a product through these links may result in a commission at no extra cost to you. Read the full disclosure here.

Collage of Candy Ornaments with text overlay - Fun and Colorful Giant Candy Ornaments

Don’t forget to check out the kickoff post, 50+ Ideas to Jump Start Your Holidays, to see the schedule for all of the 12 Days of Holiday Ideas Blog Hop. Plus get inspired for your holiday season with DIY projects, recipes, and games while you’re there!

[bctt tweet=”Get your candy tree ready for Christmas! Find out how easy it is to make these super fun and colorful giant candy ornaments with this easy tutorial!” username=”diyadulation”]

Glittery Painted Candy Ornaments

After adding the Advent to the tree this year, I realized exactly what was missing from my decorations. The Advent pouches are much larger than any of the other ornaments on my tree and it actually helped make the tree really POP! That’s when I realized that what my tree was missing was larger-scaled ornaments.

Luckily for me, the awesome acrylic paints from DecoArt were just what I needed to create some super fun colorful giant candy ornaments without totally blowing our Christmas budget. That’s definitely a frugal crafty win, if I do say so myself! Check out the photos and tutorial below to be your own judge (but I think you’ll agree with me).


Candy Ornaments Materials

Colorful Giant Candy Ornaments Materials


2 Pieces of Tissue Paper next to Scissors

Step 1

First, cut 2 pieces of tissue paper roughly 10 inches by 6 inches.


2 Pieces of Fanned Out Tissue Paper

Step 2

Then, accordion fold one long edge of each piece of tissue paper so that they fan out on one side.


Fanned Out Tissue Paper Glued to Paper Plate

Step 3

Next, pull out one of your paper plates and attach one fanned piece of tissue paper to each side of the lip of your plate with hot glue.

Step 4

Pull out your ribbon and cut a piece that is 9 inches long.


Close Up of Ribbon Hanger Glued to Paper Plate

Step 5

Fold the cut piece of ribbon in half and glue the loose ends to the lip of your dessert plate.


Paper Plates Glued Together with Tissue Paper and Ribbon Hanger

Step 6

Now add a line of glue around the entire lip of the dessert plate and press a second plate down on top of it.


Candy Sections Drawn on Paper Plate

Step 7

Next, use your pencil to draw the lines of your candy. You want 8 sections defined.


Lavender Candy Sections Painted on Paper Plate

Step 8

Once your lines are drawn, paint every other section with your DecoArt lavender acrylic paint. Then set it aside to dry.

Note:


Teal and Lavender Candy Sections Painted on Paper Plate

Step 9

After your acrylic paint is dry, paint the remaining sections with you DecoArt Indian Turquoise acrylic paint. Again, set aside to dry.

Step 10 (Optional)

Since these are hanging on your tree, I recommend flipping your glued plates over after the paint has dried and repeating steps 7-9 on the back side of your plate. This ensures prettiness not matter what angle you see it from.


DecoArt Galaxy Glitter Painted on Paper Plate

Step 11

Lastly, cover your entire painted plate with DecoArt Galaxy Glitter paint. Let it dry completely, then hang on your tree.


Close Up of Glittery Painted Candy Ornaments on Christmas Tree

Close up of Candy Ornament with text overlay - Fun and Colorful Giant Candy Ornaments

Now you can easily add another dozen pretty ornaments to your candy tree for under $10 with these awesome colorful giant candy ornaments. 1 24 pack of plates and the paints make 12 ornaments with plenty of paint leftover for more fun projects. Before you rush out to pick up a stack of paper plates, check out the other awesome ornament projects from my friends at the link-up below!

Check out DecoArt on Facebook and Instagram!

See where I’m linking up!

Don’t Forget to Pin It!

Close up of Candy Ornament on Christmas Tree with text overlay - Fun and Colorful Giant Candy Ornaments

You are invited to the Inlinkz link party!

Click here to enter


We have a BIG GIVEAWAY from our Sponsors this year!

Giveaway begins Nov. 8, 2019 and ends Dec. 6, 2019. Winners will be notified by December 13, 2019. Sponsors will ship each prize to the winner. There will be a total of seven winners, one for each prize. Drawing is by random selection using the Rafflecopter widget. 

Must be 18 to win. Open to U.S. residents only.

a Rafflecopter giveaway

Glittery Pastel Nutcracker Christmas Wreath

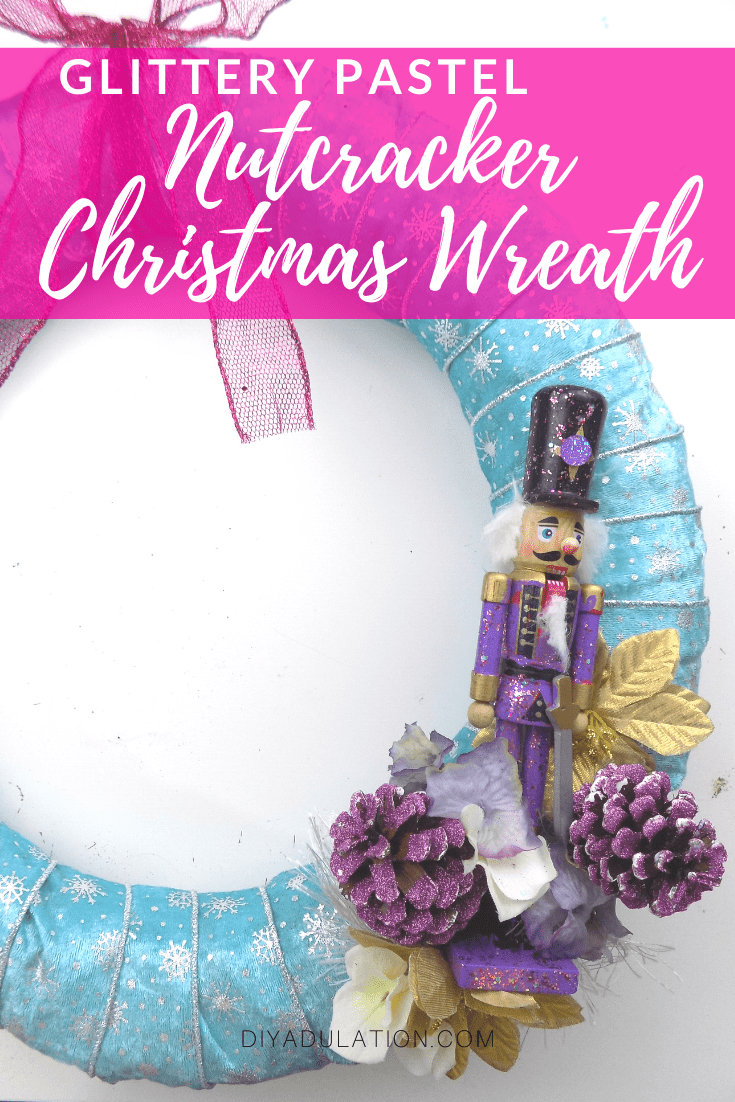
Are you ready for another awesome piece of DIY Christmas decor? We’re back with Day 6 of the 12 Days of Christmas blog hop and today is all about wreaths! This glittery pastel nutcracker Christmas wreath is the perfect mix of traditional and colorful for your door this season!

Affiliate links may be used in this post. Ordering a product through these links may result in a commission at no extra cost to you. Read the full disclosure here.

Collage of Photos of Nutcracker and Floral Elements on Wreath with text overlay - Glittery Pastel Nutcracker Christmas Wreath

Don’t forget to check out the kickoff post, 50+ Ideas to Jump Start Your Holidays, to see the schedule for all of the 12 Days of Holiday Ideas Blog Hop. Plus get inspired for your holiday season with DIY projects, recipes, and games while you’re there!

[bctt tweet=”Are you ready for another awesome holiday DIY project? This glittery pastel nutcracker Christmas wreath is the perfect mix of glittery color for your door!” username=”diyadulation”]

I used to have an entire tree centered around nutcrackers but the tree was very traditional in style and color. In fact, the nutcrackers are the only thing I have missed since switching to my candy tree. Finally, it occurred to me that I can still totally add some nutcrackers to my decor, I simply have to switch up the style and colors.

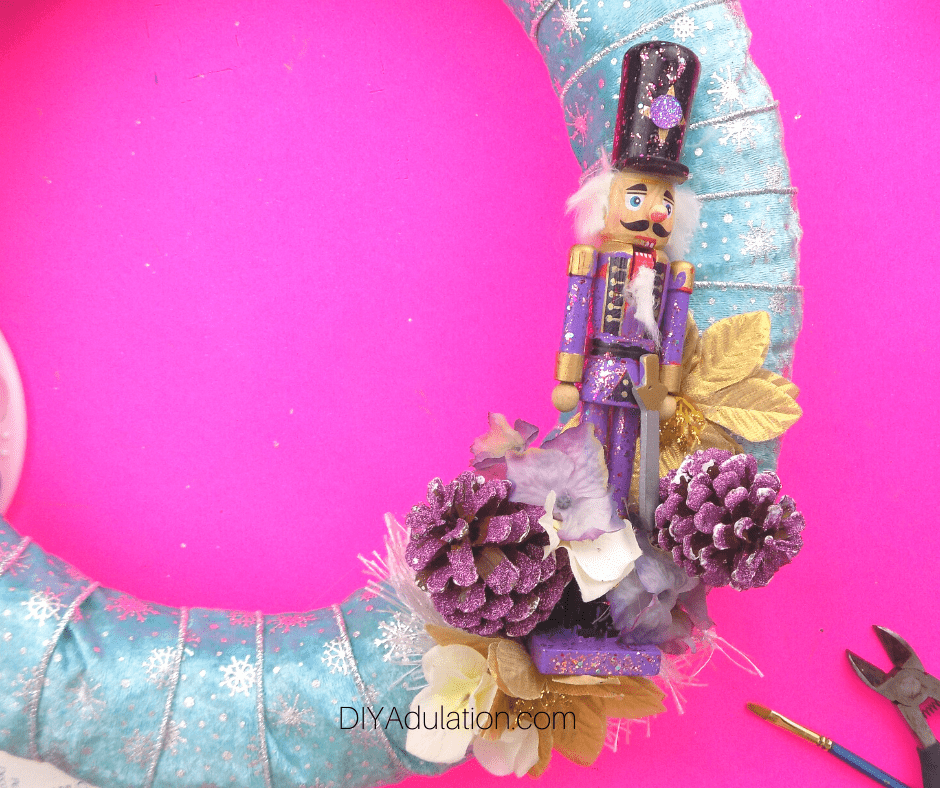
I found this super awesome nutcracker at the Dollar Tree and for a dollar I was willing to take a risk with paint. I’m so glad I did because this wreath is awesome and totally gorgeous. It’s sparkly, brightly colored, and perfect for a candy-themed winter wonderland.


Pastel Nutcracker Wreath

Glittery Pastel Nutcracker Christmas Wreath Materials

Step 1

First, glue one end of your teal snowflake ribbon to your wreath form.


Snowflake Ribbon Wrapped on Wreath

Step 2

Then begin wrapping your ribbon around the wreath form with a slight overlap until completely covered.

Step 3

Secure the end of your ribbon with another dab of hot glue.

Step 4

Trim any excess ribbon from your wreath.

Step 5

Set your wreath aside and grab your nutcracker.


Lavender Painted on Nutcracker

Step 6

Choose one coordinating color on your nutcracker and paint it lavender. Let your paint dry.

Step 7

After the paint is dry, add a second coat of lavender paint and set aside to dry completely.


Mod Podge on Pine Cone next to Paint Brush

Step 8

Now, grab your pine cones and add a coat of Mod Podge to the edges.


Glitter on Pine Cone next to Paint Brush

Step 9

Immediately cover your pine cones in glitter.

Step 10

Then shake off excess glitter and set your pine cones aside to dry. Return the excess glitter to the container.


Hand Holding Glitter Painted Nutcracker

Step 11

Once your nutcracker is dry, paint over the lavender with your glitter paint. Allow the paint to dry completely before moving on.


Gold Flower on Wreath

Step 12

While your glitter paint dries, glue a gold flower to the bottom right side of your wreath.


Nutcracker next to Gold Flower on Wreath

Step 13

Then, once your nutcracker is dry, glue it to the bottom right-hand side of your wreath slightly to the left of your gold flower.


Feathery Yarn Under Nutcracker on Wreath

Step 14

Next, glue your white feathery yarn around the bottom of your nutcracker.


Glittery Pine Cone Glued on Wreath

Step 15

Add a second gold flower below your nutcracker and glue your glitter-covered pine cones on either side of your nutcracker.


Close Up of Accents Glued onto Wreath

Close Up of Elements on Wreath

Step 16

Lastly, fill in the remaining area around your nutcracker with more flowers.


Pink Ribbon Attached to the Top of the Wreath

Step 17

Then tie a knot in your glittery pink ribbon and loop it around the top of your wreath.


Pink Bow on Top of Wreath

Step 18

Finish your wreath by tying a bow in the ends of the pink ribbon. Then hang and enjoy!


Nutcracker and Floral Elements on Wreath with text overlay - Glittery Pastel Nutcracker Christmas Wreath

This glitter pastel nutcracker Christmas wreath turned out wonderfully. I can’t wait to have it welcome us home everyday. You can easily customize it to match your decor by changing out a few of the element colors too! Before you start crafting, be sure to check out the other awesome wreath ideas from my friends below. And be sure to enter the holiday giveaway while you’re down there!

See where I’m linking up!

Don’t Forget to Pin It!

Nutcracker and Floral Elements on Wreath with text overlay - Glittery Pastel Nutcracker Christmas Wreath

You are invited to the Inlinkz link party!

Click here to enter


We have a BIG GIVEAWAY from our Sponsors this year!

Giveaway begins Nov. 8, 2019 and ends Dec. 6, 2019. Winners will be notified by December 13, 2019. Sponsors will ship each prize to the winner. There will be a total of seven winners, one for each prize. Drawing is by random selection using the Rafflecopter widget. 

Must be 18 to win. Open to U.S. residents only.

a Rafflecopter giveaway

Sparkly DIY Advent Calendar You Hang on Your Tree

Don’t go for the same traditional Advent this year. It’s time to change up your Advent routine with this sparkly DIY Advent calendar that you hang on your tree. Even better, you can use it year after year and make it a fun new holiday tradition.

This post is sponsored by BurlapFabric.com. All ideas and opinions are my own. In addition, affiliate links may be used in this post. Ordering a product through these links may result in a commission at no extra cost to you. Read the full disclosure here.

Collage of Advent Bags on Christmas Tree with text overlay - Sparkly DIY Advent Calendar

Don’t forget to check out the kickoff post, 50+ Ideas to Jump Start Your Holidays, to see the schedule for all of the 12 Days of Holiday Ideas Blog Hop. Plus get inspired for your holiday season with DIY projects, recipes, and games while you’re there!

[bctt tweet=”Switch up your Advent tradition this year with a fun new twist! This sparkly DIY Advent calendar is super versatile and totally reusable.” username=”diyadulation”]

I am seriously excited about our Advent this year. It’s the first year that I’m trying something totally new and I know the whole family is going to love it! This year I’m surprising them with a new board game every day leading up to Christmas.

Unfortunately, due to the nature of the gifts I needed a fun new way to surprise the family with it. That’s how this new Advent calendar came to be. I’m going to wrap all of the gifts and number them. Then I’m going to write the number on pieces of paper and slip them at random into the drawstring bags.

Then I hang the bags on the Christmas tree. Each day, during Advent, the kids will have to hunt for that day’s bag and find out what number is inside. Lastly, they’ll hunt for the corresponding numbered present under the tree. We’ll end the night playing the new game.


Advent Calendar on Christmas Tree

Sparkly DIY Advent Calendar Materials

Step 1

First, set up your Cricut machine with your Joys of the Season cartridge. Set your size dial to 4.5 and if using an older machine, set the pressure to high.

Tip:


Vinyl on Mat Loaded into Cricut Machine

Step 2

Next, place your vinyl shiny-side down on your cutting mat and load it into your machine.


Close Up of Cricut Cartridge Booklet

Step 3

Choose an ornament design to cut out and cut it on you vinyl. Make sure you choose designs that have larger openings in them. You’ll use the space later to number your bags.


Close Up of Cut Designs

Step 4

Continue cutting out ornament designs until you 4 different ones on one piece of vinyl.


Close Up of Weeded Designs

Step 5

Then weed your designs and cut each ornament apart.

Step 6

Continue cutting ornaments in different designs until you have 24 cut and weeded ornaments.


Cut Vinyl Design Laid Out on Burlap Pouch

Step 7

Place one ornament on a drawstring muslin bag and cover with a piece of cotton cloth. I used a plain t-shirt but any scrap piece of cotton cloth will work.


Close Up of EasyPress Controls

Step 8

Then heat your cloth-covered design with an iron or your EasyPress. I set my EasyPress to 350 for this project.

Step 9

Set your drawstring bag with the vinyl design attached to it aside to cool.

Step 10

Repeat steps 7 through 9 for the rest of your bags.


Vinyl Design Attached to Burlap Pouch

Step 11

Once your designs have cooled, carefully remove the plastic covering from your designs.


Number on Burlap Bag

Step 12

Lastly, number each of your bags 1-24 with your fabric markers.


Advent Bags on Christmas Tree with text overlay - Sparkly DIY Advent Calendar

This sparkly DIY Advent calendar is super versatile and totally reusable. You can fill the bags with small toys and treats, or steal my idea and fill them with the numbers of wrapped presents. The wrapped presents can be any theme you want from board games to books or movies. Bonus tip: save money by buying used items. A lot of the games I’m including this year came from Half Price Books for under $10 each.

Now it’s time to check out the other awesome Advent calendars from my friends below! Let me know which is your fave! And be sure to visit BurlapFabric on Facebook!

See where I’m linking up!

Don’t Forget to Pin It!

Advent Bags on Christmas Tree with text overlay - Sparkly DIY Advent Calendar


You are invited to the Inlinkz link party!

Click here to enter


We have a BIG GIVEAWAY from our Sponsors this year!

Giveaway begins Nov. 8, 2019 and ends Dec. 6, 2019. Winners will be notified by December 13, 2019. Sponsors will ship each prize to the winner. There will be a total of seven winners, one for each prize. Drawing is by random selection using the Rafflecopter widget. 

Must be 18 to win. Open to U.S. residents only.

a Rafflecopter giveaway