DIY Adulation

Fawning Over a Do-It-Yourself Life

  • Crafts
    • Papercrafts
    • Fabric Crafts
    • Paint Crafts
    • Recycled Crafts
    • DIY Crafts
  • Home
    • Home Decor
    • Organization
    • Recipes
    • Finances
    • Cleaning
  • Holidays
    • Spring Holidays
    • Summer Holidays
    • Autumn Holidays
    • Winter Holidays
  • Relationships
    • Self
    • Marriage
    • Parenting
    • Friends and Family
    • Kids
      • Kids Crafts
      • Kids Learning
      • Kids Activities
      • Back to School
      • Kids Parties
      • Kids Korner
  • Policies & Disclosures
  • Newsletter
  • About Me
  • VIP Resource Library

DIY I Can Play Sign | Kids Korner by Jude Craft

07.14.2018 by Marie // Leave a Comment

Summertime means kiddos get to play outside more with their friends and burn off that extra energy. If can also mean the neighborhood kids knocking at all hours of the day to find out if your child can play. Make it easier on everyone with a DIY I can play sign!

Affiliate links may be used in this post. Ordering a product through these links may result in a commission. Read the full disclosure here.

Collage of Door Sign Photos with text overlay: DIY I Can Play Door Sign


Let the your kids' friends know when your kiddos can play or not play with this easy DIY I Can Play Sign! It will make your life so much easier this summer! Click To Tweet

I admit, that this is especially frustrating for me in the summer. My youngest still takes a nap during the day and his bedroom is right next to the front door. Given how much he fights nap time (through yawns, mind you) it is infuriating when he get woken up by kids wanting to play.

This DIY I can play sign is perfect for Jude’s upcoming summer camp when he will be gone for an entire week. Now his friends can see when he is available or not without knocking on the door.

Jude knows how frustrating this is for me and made this fun DIY I can play sign to help out.

Materials

  • Unfinished Wooden Doorknob Hanger
  • Yellow Acrylic Paint (This is a great set with all of the colors you need)
  • Blue Acrylic Paint
  • Red Acrylic Paint
  • White Acrylic Paint
  • (Optional) Acrylic Sealant


Wooden Door Hanger

Wooden Door Hanger

Step 1

First take off the stickers [on your wooden door hanger].


Primary Color Stripes on Door Hanger

Step 2

Paint the [first side of your] wooden doorknob hanger [as pictured above].

Mom’s Note:

  • Allow the paint to dry before moving on.


We Can Play Painted on Door Hanger on Door Knob

Step 3

Next, paint the words “I can play” [or “We Can Play”] over the dried paint [with white acrylic paint].


Stripes Painted on Wooden Door Hanger

Step 4

After the paint dries, paint the other side [in the same style as the opposite side].

Mom’s Note:

  • Again, allow your paint to dry before moving on.


We Can Play Painted on Door Hanger

Step 5

Now paint the words “I can’t play” on the dry paint that is on the second side [of your wooden door knob hanger].

Mom’s Note:

  • Let the door hanger finish drying before moving on.


We Cant Play Painted on Door Hanger

Step 6 (Optional)

After your sign has finished drying, seal it with spray acrylic sealant on both sides. Allow the sealant to dry before hanging on your door. This will help protect your DIY I can play sign from the elements.

I did this so that my friends know when I can play and when I can’t. I hope you like it.


We Cant Play Painted on Door Hanger on Door Knob


Collage of Door Sign Photos with text overlay: DIY I Can Play Door Sign

I’m not gonna lie, this is my favorite Kids Korner by Jude project yet! This DIY I can play sign is going to make mom life a lot easier, especially during nap time for the baby. Admittedly, I would have made the words clearer but I’m banking on the idea that since Jude can easily read them, so can his friends. Only time will tell.

How do you keep kiddos (or delivery men) from waking up your little ones who still take a nap during the day? I’d love to hear your tips in the comments!

See where I’m linking up!

Don’t Forget to Pin It!

Collage of Door Sign Photos with text overlay: DIY I Can Play Door Sign


More Ideas You’ll Love:

  • DIY Kids Artwork Frame
  • Popsicle Stick Army Men Craft
  • DIY Mad Scientist Hand Puppet
  • 5 Ideas for an Awesome Sleepover with Boys – C’mon Get Crafty

Categories // Crafts, Kids, Kids Korner, Parenting, Relationships

DIY Kids Artwork Frame Fridge Magnet | Kids Korner by Jude

07.06.2018 by Marie // Leave a Comment

Jude is back from vacation and ready to share another awesome craft with you. If you don’t know what Kids Korner by Jude is then you can read about it here. Once you’re all caught up come back to make this DIY kids artwork frame fridge magnet.

Affiliate links may be used in this post. Ordering a product through these links may result in a commission. Read the full disclosure here.

Collage of Photos of Making an Artwork Frame Fridge Magnet with text overlay: DIY Kids Artwrok Frame Fridge Magnet Kids Korner by Jude

Note From Mom:

The humidity here is atrocious this week. Even sitting outside the fireworks on Wednesday long after the sun had set, you still became instantly sticky. Yuck!

That meant that we haven’t spent much time outside this week. When we’re stuck inside and mommy has to get work done, that means lots of crafts.

Tired of your refrigerator looking like an overwhelming art exhibit? Tame is with this DIY Kids Artwork Frame Fridge Magnet! Click To Tweet

Now I have a stack of new drawings and designs that the kids cannot bear to part with. (Sigh…) When Jude came up with this idea, I piggy-backed a little to help tame the artwork chaos.

Each kid gets one frame for the fridge and can choose one piece of artwork to go in it. Outside of that, no more paper clutter on the fridge. Yay!

If your fridge has become a messy gallery of artwork, make this DIY kids artwork frame fridge magnet. Then totally steal my new clutter-free refrigerator idea.
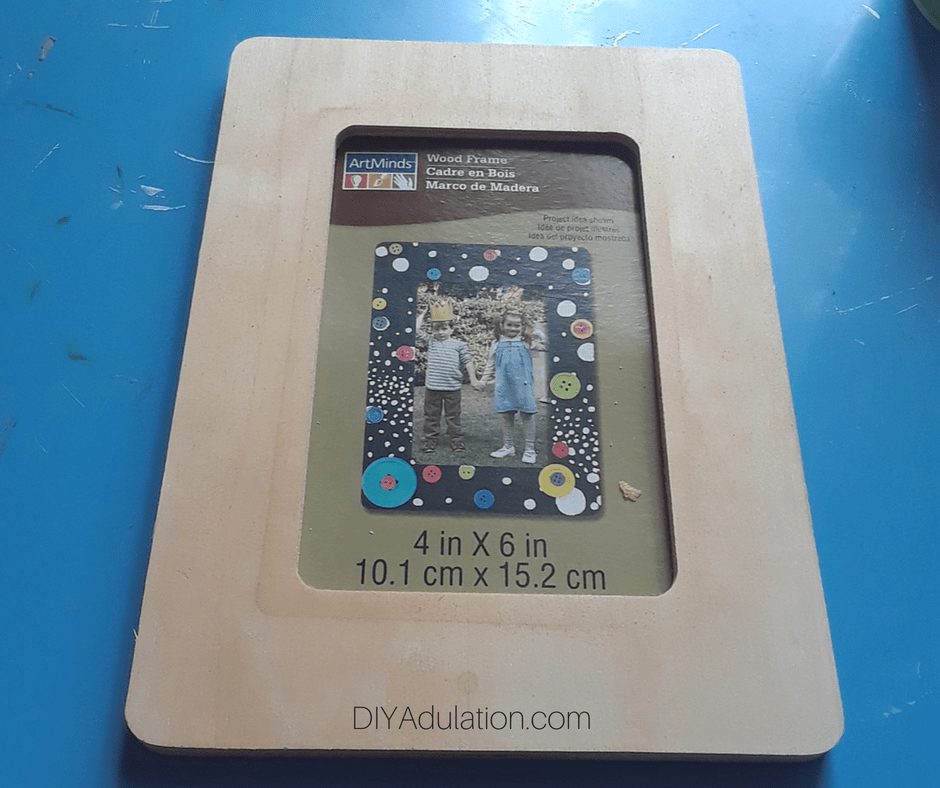
 

Blank Wooden Frame

Materials

  • Blank Wooden Frame
  • Patterned Paper
  • Tacky Glue
  • Water
  • Sponge Brush
  • Adhesive Magnet
  • Chipboard Letters

Mom’s Note:

  • Before you start this project, mix a small amount of tacky glue and water in a small plastic container. Use roughly a 3:1 ratio of glue and water. You want the glue to be looser without it turning into a watery mess.


Decorative Paper with Craft Supplies

Step 1

First pick out the paper that you like [and want to use on your frame].


Removed Insert Blank Wooden Frame

Step 2

Then remove the insert from your wooden frame.
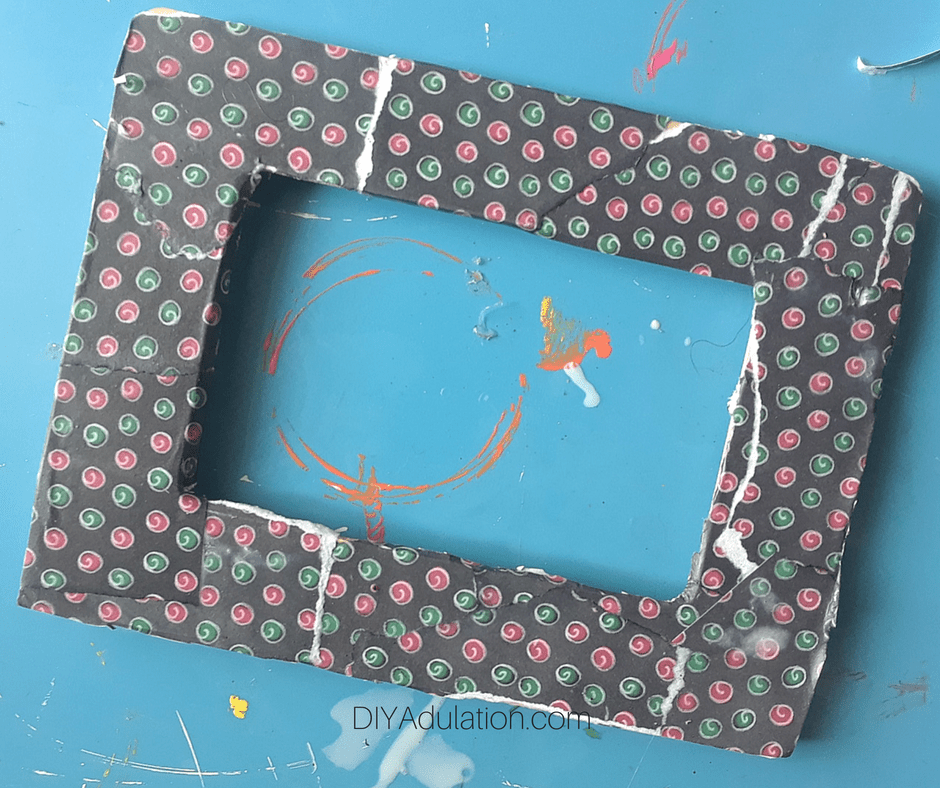
 

Ripped Up Pieces of Decorative Paper

Step 3

Next, rip the paper that you picked [in step 1] into small pieces.


Pieces of Paper Glued to Corner of Wooden Frame

Step 4

Then glue the ripped pieces of paper to the frame.


Glue on Corner of Wooden Frame

Mom’s Note:

  • First, put down a base of your glue mixture with the foam brush on the corner of your frame. Then top the corner with pieces of paper and brush more of the glue mixture on top.

Step 5

Continue gluing pieces of paper to the frame until it is completely covered.

Step 6

Let your glue dry.


Paper Covered Frame

Step 7

After your frame has dried, trim the extra paper around the edges of the frame.

Mom’s Note:

  • You may need to help with this part, especially with younger children.


T Glitter Letter Glued on Frame

R and T Glitter Letters Glued on Frame

Step 8

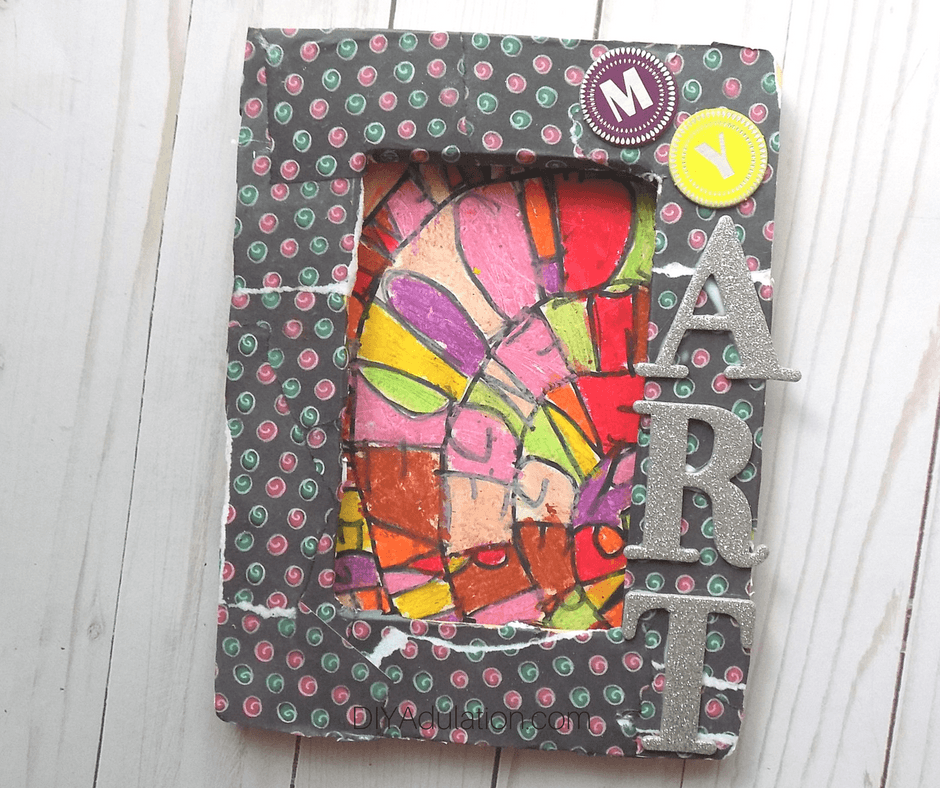
Put an A, R, and T chipboard letter [using non-diluted tacky glue] on the side of your frame starting at the bottom.


Chipboard Letters on a Paper Covered Frame

Step 9

Next, glue an M and a Y chipboard letter above it [the top right corner].

Mom’s Note:

  • Jude chose to use 2 different chipboard letter styles from my scrapbook stash. You can use all one style if your child wants.

Step 10

Let all of the glue dry.
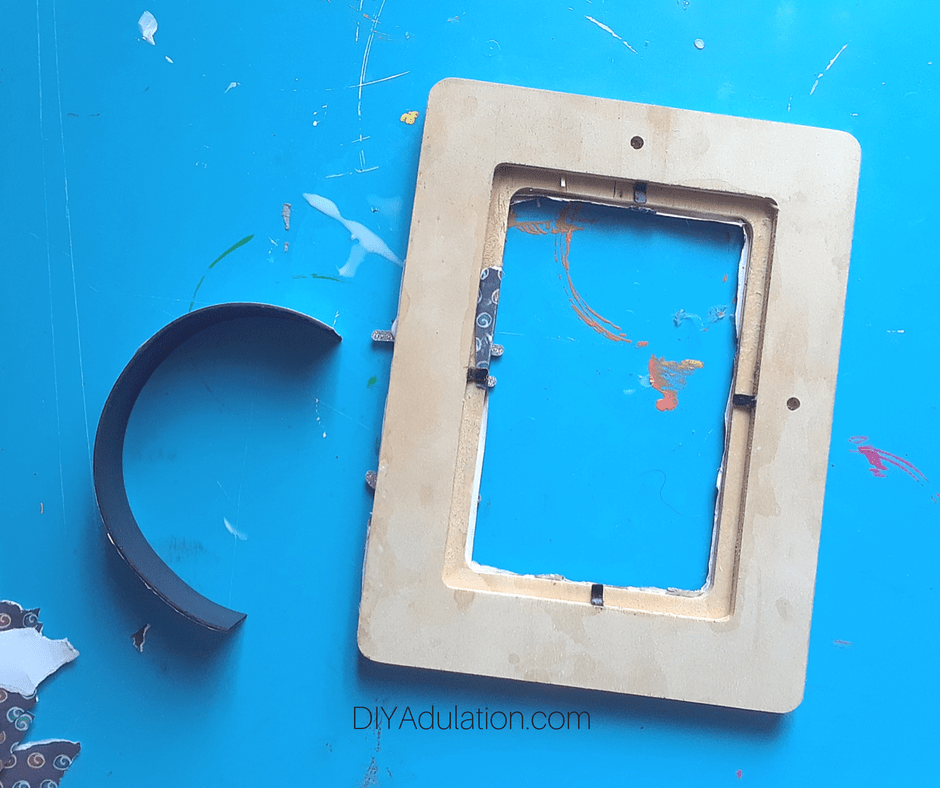
 

Strip of Magnet Next to a Wooden Frame

Strip of Magnet on the Back of a Wooden Frame

Strips of Magnet on the Back of a Wooden Frame

Step 11

Lastly, cut strips of adhesive magnets to fit your frame and attach them to the back of the frame.


Decorated Frame with artwork inside

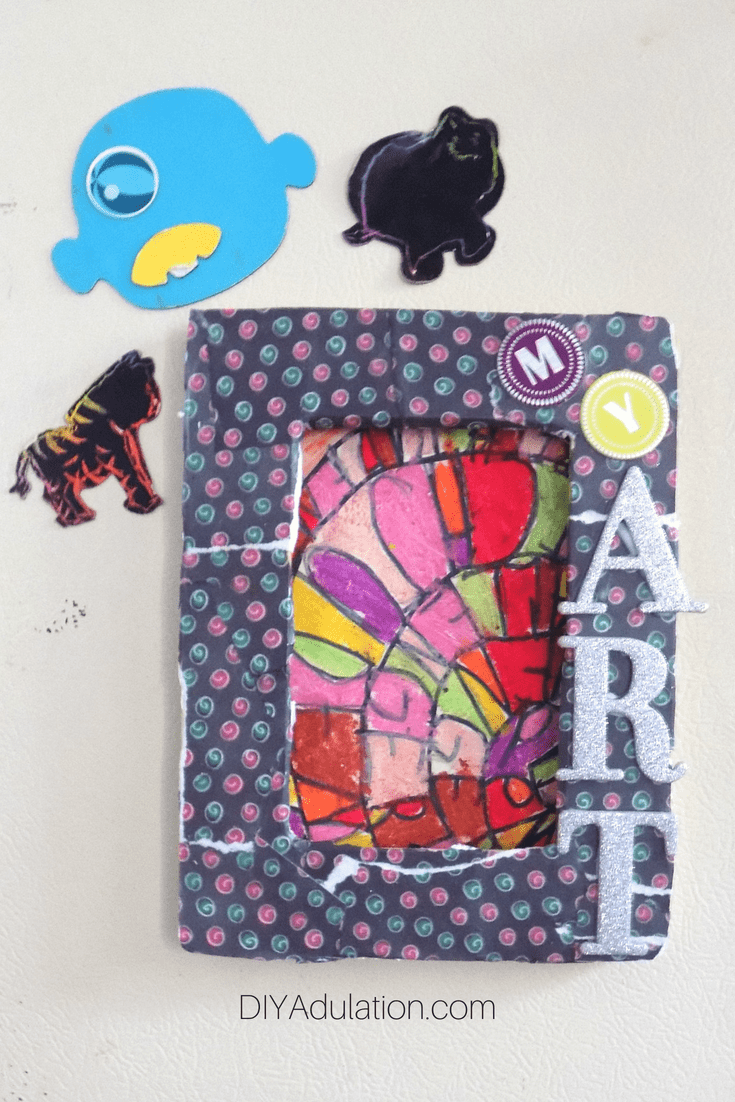
I’m doing this to hold my artwork with a beautiful frame. I hope you like it and enjoy.


Decorated Frame with artwork inside

Decorated Frame with artwork inside

Decorated Frame with artwork inside with text overlay: DIY Kids Artwork Frame Fridge Magnet

This DIY kids artwork frame fridge magnet help you cut down on the paper clutter on your refrigerator without the fight. Kids are more than happy to display their favorite pieces in a personalized frame! They won’t even mind changing them out as new creations are made.

I honestly wish I had thought of this idea sooner because it’s brilliant. The kids never want to lose any of their artwork and the collection had gotten ridiculous. Now they think about which ones are important enough to display and which one can get filed or recycled.

See where I’m linking up!

Don’t Forget to Pin It!

Collage of Photos of Decorated Frame with artwork inside with text overlay: DIY Kids Artwork Frame Fridge Magnet


More Ideas You’ll Love:

  • DIY Children’s Artwork Display
  • Googly Eyes Monogram
  • How to Make an Easy DIY Bedroom Door Sign
  • Summer Kid Boredom Busters – My Pinterventures

Categories // Crafts, Crafts, Kids, Kids Korner, Papercrafts

Popsicle Stick Army Men Craft | Kids Korner by Jude

06.22.2018 by Marie // Leave a Comment

We are back with another Kid’s Korner craft this week! Instead of making something for your home, let’s have some fun. This popsicle stick army men craft is fun to make and even more fun to play with.

Affiliate links may be used in this post. Ordering a product through these links may result in a commission. Read the full disclosure here.

Popsicle Stick Army Men with tank and text overlay: Kids Korner By Jude Popsicle Stick Army Men


Turn those kid's craft projects into a fun toy to play with later! These popsicle stick army men are fun to make, and the newest Kids Korner by Jude Craft! Click To Tweet

Before we get to it, I want to let you know that next week Jude will be on vacation with his dad so I will be posting Friday. Don’t worry, you’ll still be getting a fun kid’s craft so be sure to come and check it out.

Note From Mom:

Although Jude said that he made this because of Memorial Day last month, I think the kid might also be on a popsicle stick kick. In fact, the next project coming up from him includes popsicle sticks. Apparently the kid can’t get enough. Luckily, his obsession is your kid’s gain because what kid doesn’t love playing with army men?


Leaf print paper next to glue bottle and green popsicle sticks

Materials

  • Green Popsicle Sticks
  • Scissors
  • Green Leaf Print or Cammo Paper
  • White or Yellow Paper 
  • Blue Ink Pen
  • Tacky Glue

Step 1

First, cut out a small circle of white paper to be the head of your army man.

Mom Tip:

  • If the back of your leaf paper is white you can use the back of it for this step.


Step 2

Next, draw a face on your circle with the ink pen.

Step 3

Now, glue the face to the top of a green popsicle stick.

Step 4

Set you popsicle stick to the side and pull out your leaf print paper.


shirt cut out of paper

Step 5

Next, cut a shirt and pair of pants from the leaf print paper.

Mom tip:

  • Jude cut these out freehand but if your kid is having trouble, draw the shirt and pants on the paper first. Then have him cut it out on the lines.


Shirt glued on popsicle stick with glue bottle

popsicle stick army man

Step 6

Finally, glue your shirt and pants to the popsicle stick.


popsicle stick army men

Step 7

Repeat steps 1 through 6 for each army man you want to make.

This [popsicle stick army men craft] is a toy and exciting to make. Memorial Day is why I made this. I love playing with army men and I hope you do too!


Popsicle Stick Army Men with tank and text overlay: Kids Korner By Jude Popsicle Stick Army Men

Don’t forget that next week Jude is on vacation but we’ll still have an awesome new kids craft for you! Until then, your kiddos will have a blast playing pretend or putting on a show with these popsicle stick army men. In case you missed last week’s craft, be sure to check it out now.

See where I’m linking up!

Don’t Forget to Pin It!

Popsicle Stick Army Men with tank and text overlay: Popsicle Stick Army Men Kids Korner by Jude


More Ideas You’ll Love:

  • Crafty 3D Fireworks Decoration
  • Fun and Glittery DIY Notebook
  • DIY Mini Pompom Monsters Kid Craft
  • DIY Batman Chalkboard Play Table – C’mon Get Crafty

Categories // Crafts, Crafts, Kids, Kids Korner, Papercrafts

  • 1
  • 2
  • Next Page »

  • Facebook
  • Instagram
  • Pinterest
  • Twitter
  • YouTube
Shop The Best Machine Prices of the Year

Copyright © 2023 · Modern Studio Pro on Genesis Framework · WordPress · Log in